Lately the threat actors behind Dridex malware have been very active. Across all the recent Dridex phishing campaigns the technique is the same. All the Microsoft Office documents containembedded macros that download a malicious executable from one of many hard coded URLs. These hard coded URLs normally point to websites owned by legitimate people. The site is compromised in order to store the malicious file and also to hide any attribution related to the threat actors. The encoding and obfuscation techniques used in the macros are constantly changing in order to bypass security controls. The malicious executable also uses encoding, obfuscation and encryption techniques in order to evade antivirus signatures and even sandboxes. This makes AV detection hard. The variants change daily in order to evade the different security products.
When doing malware static analysis of recent samples, it normally does not produce any meaningful results. For example, running the strings command and displaying ASCII and UNICODE strings does not disclose much information about the binary real functionality. This means we might want to run the strings command after the malware has been unpacked. This will produce much more interesting results such as name of functions that interact with network, registry, I/O, etc.
In this case we will look at the following sample:
remnux@remnux:~$ file rudakop.ex_
 rudakop.ex_: PE32 executable for MS Windows (GUI) Intel 80386 32-bit
remnux@remnux:~$ md5sum rudakop.ex_
 6e5654da58c03df6808466f0197207ed  rudakop.ex_
The environment used to do this exercise is the one described in the dynamic malware analysis with RemnuxV5 article. The Virtual Machine that will be used runs Windows XP. First we just run the malware and we can observe it creates a child process with the same name. This can be seen by running the sample and observing Process Explorer from Sysinternals or Process Hacker from Wen Jia Liu. The below picture illustrate this behavior.
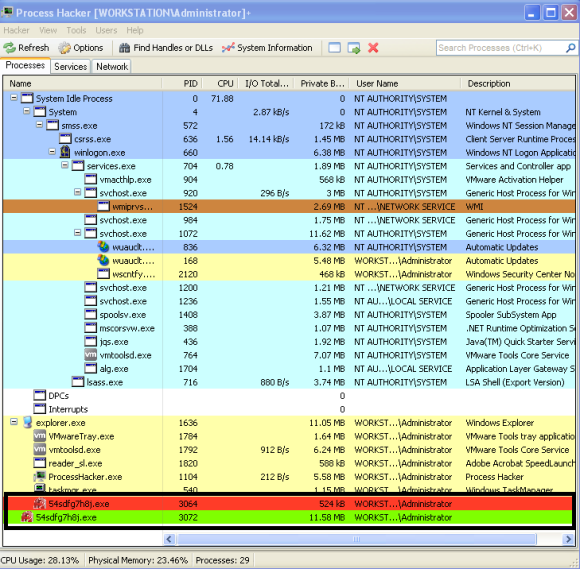
This behavior suggests that the malware creates a child process where it extracts an unpacked version of itself.
In this case we will try to unpack this malware sample in order to get more visibility into its functionality. Bottom line, when the packed executable runs it will extract itself into memory and then runs the unpacked code. Before we step into the tools and techniques lets brief review the concept around process hollowing.
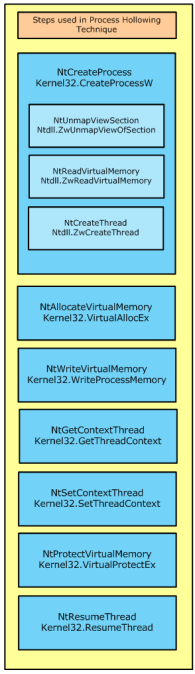
This technique, which is similar to the code injection technique, consists in starting a new instance of a legitimate process with the API CreateProcess() with the flag CREATE_SUSPENDED passed as argument. This will execute all the necessary steps in order to create the process and all its structure but will not execute the code.
The suspended state will permit the process address spaced of the legitimate process to be manipulated. More specifically the image base address and its contents.
The manipulations starts by carving out and clearing the virtual address region where the image base of the legitimate process resides. This is achieved using the API NtUnmapViewOfSection().
Then the contents of the malicious code and its image base will be allocated using VirtualAlloc(). During this step the protection attributes for the memory region will be marked as writable and executable. And then the new image is copied over to the carved region using WriteProcessMemory()
Then the main thread, which is still in suspended state, is changed in order to point to the entry point of the new image base using the SetThreadContext() API.
Finally, the ResumeThread() is invoked and the malicious code starts executing.
This technique has been discussed at lengths and is very popular among malware authors. If you want to even go deeper in this concept you can read John Leitch article. Variants of this process exist but the concept is the same. Create a new legitimate process in suspended state, carve its contents, copy the malicious code into the new process and resume execution.
Now lets practice! In order to debug these steps we will use OllyDbg on a virtual machine running Windows XP.
OllyDbg is a powerful, mature and extremely popular debugger for x86 architecture. This amazing tool was created by Olesh Yuschuk. For this exercise we will use version 1.1. The goal is to extract the payload that is used during the process hollowing technique.
When loading this sample into OllyDbg we are presented with two messages. First an error stating “Bad or unknown format of 32bit executable”. OllyDbg can load the executable but it cannot find the entry point (OEP) which suggest the PE headers have been manipulated. Following that the message “compressed code?” is presented. This warning message is normally displayed when the executable is compressed or encrypted. This is a strong indicator that we are dealing with a packed executable. Here we click “No”.

When the sample is loaded we start by creating a breakpoint in CreateProcessW. This is a key step in the process hollowing technique. We do this by clicking in the disassembler window (top left) and then Ctrl+G. Then we write the function name we want to find. When clicking ok this will take us to the memory address of the function. Here we press F2 and a break point is set. The breakpoints can been seen and removed using the menu View – Breakpoints (Alt+B).
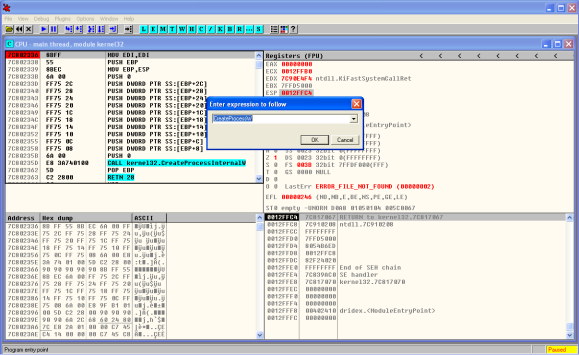
Then we start debugging our program by running it. We do this by pressing F9 or menu Debug – Run. Once the break point is reached we can see the moment before CreateProcessW function is invoked and the different arguments that will be loaded into the stack (bottom right). One of the parameters is the CreationFlags where we can see the process is created in suspended mode.

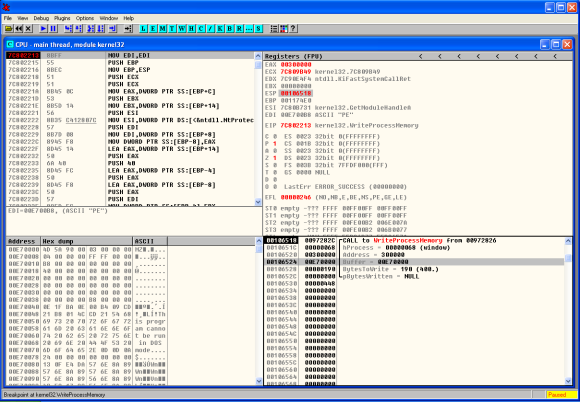
For the sake of brevity we wont perform the breakpoint steps for the other function calls. But the methodology is to set breakpoints across the important function calls. Before we start debugging the program we can set a break point for the different function calls that were mentioned and review how this technique works. In this case we will move into the end of the process hollowing technique were we hit a breakpoint in WriteProcessMemory() . Once the breakpoint is reached we can see the moment before WriteProcessMemory() function is called and the different arguments. In the stack view (bottom right) we can see that one of the parameters is the Buffer. The data stored is this buffer is of particular interest to us because it contains the contents of the malicious code that is going to be written to the legitimate process. In this case might give us the unpacked binary.
Following this step the code is resumed and executed. During the debugging process if we have Process Hacker running in parallel we can see the new process being created. We can also edit its properties and view the memory regions being used and its suspended thread. Finally when the code is resumed we can see the parent process being terminated.
That’s it for today. In the next post we will carve this buffer out and perform further analysis on this sample in order to understand its intent and capabilities.
The threat actors behind malware have many incentives to protect their code. The world of packing , unpacking, debugging and anti-debugging is fascinating. The competition between malware authors and malware analysts is a fierce fight. The malware authors write armored malware in order to evade AV and Sandboxing detection. In addition they go great lengths ensuring the analysis will be difficult. For further reference you may want to look into the following books: Malware Analyst’s Cookbook and DVD: Tools and Techniques for Fighting Malicious Code, the Practical Malware Analysis and Malware Forensics: Investigating and Analyzing Malicious Code . More formal training is available from SANS with GREM course authored by Lenny Zeltser. Free resources are the Dr. FU’s Security blog on Malware analysis tutorials. The Binary Auditing site which contains free IDA Pro training material. Finally, the malware analysis track in the Open Security Training site is awesome. It contains several training videos and material for free!
Source:https://countuponsecurity.com/


Working as a cyber security solutions architect, Alisa focuses on application and network security. Before joining us she held a cyber security researcher positions within a variety of cyber security start-ups. She also experience in different industry domains like finance, healthcare and consumer products.