Digital forensics is one of the fields often overlooked by aspiring hackers. In a rush to exploit every and any system they can, they often ignore learning digital forensics—the field that may lead to them being traced.
In addition to learning how to cover their tracks, studying digital forensics can give the aspiring hacker further insight into how systems operate. For instance, few newbie hackers are familiar with the Windows Registry and how it works, but for a forensic investigator, it can be a treasure trove of information about the attack and the attacker.
The forensic investigator is often called in after a breach of a network and system, and it is his/her job is to recreate what took place. This is both to build better defenses for the future and to identify who the attacker was and what their goals were.
Computer systems are constantly generating a plethora of information on what is happening on them—so much so that it becomes problematic to interpret. That is where Splunk comes in, a company founded about 12 years ago in San Francisco, CA that created software which could read machine data and make some sense of it for the system admin.
At its most basic level, Splunk is capable of gathering all of the data that systems generate and index it for searching. Originally developed for system administration, Splunk can also be a great tool for digital forensics.
We will be installing Splunk on Windows system and using it to conduct digital forensics on it (Splunk is also available for Linux, but in most cases, you will be conducting forensic analyses on Windows systems).
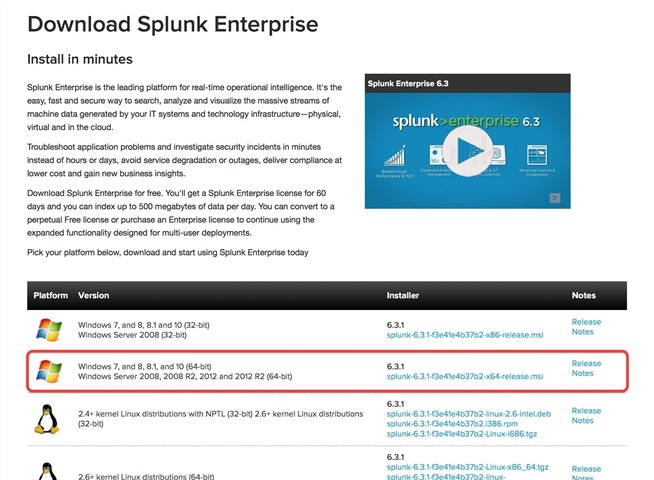
Step 1: Downloading Splunk
The first step is to download Splunk, so head to their website’s downloads section for the free download. Since I will be using a 64-bit system, I will be downloading the 64-bit Splunk for Windows 7, 8, and 10. This simply downloads the Windows .msi (installer), and since it is about 140 MB, it will only take few minutes.
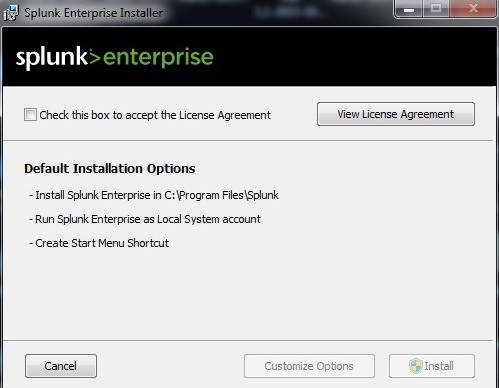
Step 2: Installing Splunk
Once the .msi is completely downloaded, open the file to start the installation. Then simply follow the Wizard steps to complete the installation.
Step 3: Logging into Splunk
When Splunk is completely installed, it will open a login interface in your default browser, like below.
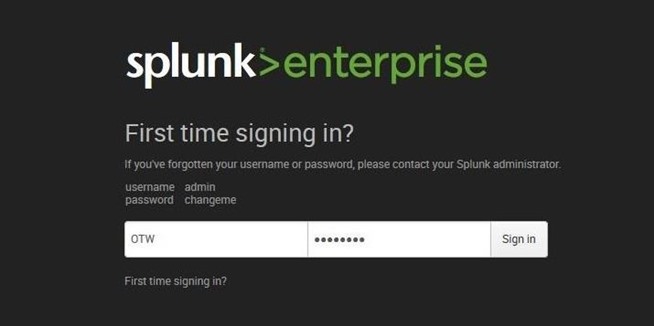
The default username and password are:
username = admin
password = changeme
Login with these credentials and then change the password.

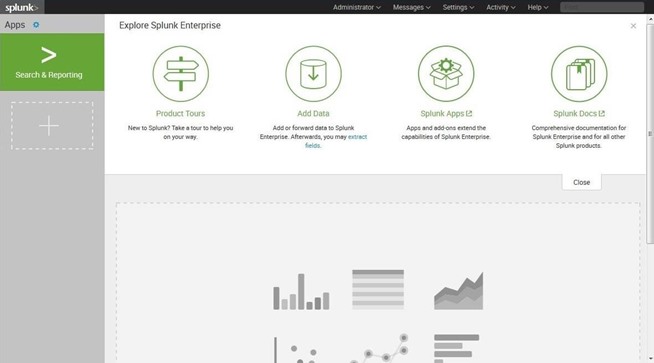
Step 4: Using Splunk
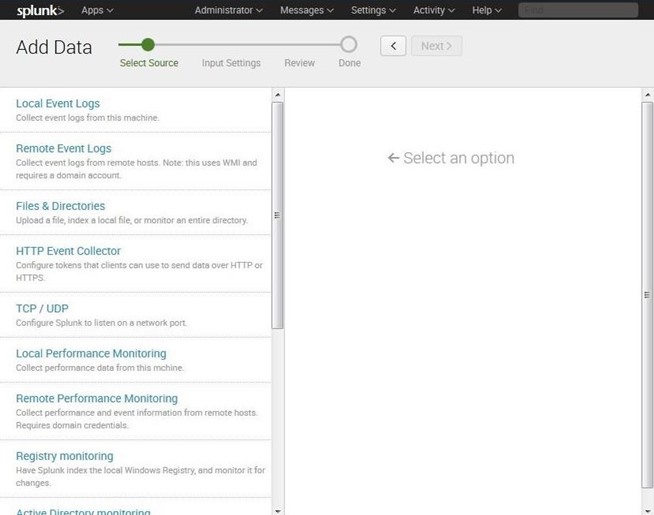
When you log into Splunk, you will be greeted with a web-based GUI interface like that below. Initially, we want to gather data, so click on the “Add Data” icon.
As you can see below, Splunk enables us to “Add Data” from multiple sources. In this first tutorial, we will be simply adding our log data from our local machine. We can add data from remote systems, or provide our own data, which we be examining in future tutorials on digital forensics.
Very often when doing a forensic examination, we will not have the luxury of having Splunk installed on the compromised system. In those cases, we can gather the data from the compromised system and then run it through Splunk for analysis.
In this screen, click on “Local Event Logs.” This will bring up a screen asking us to select what logs we want to input. In this case, I selected “System,” “Security,” and “Application” logs. These are the basic event logs that Windows systems generate.
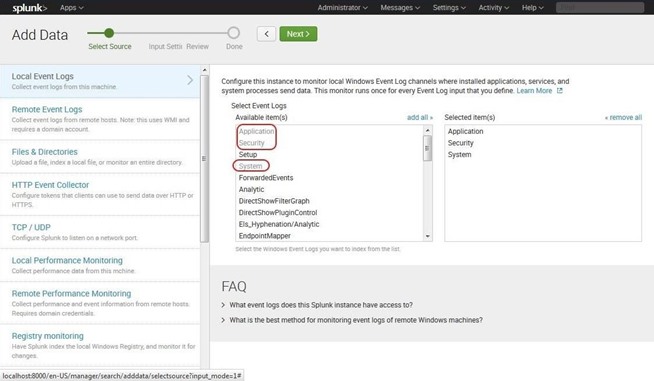
After selecting our data sources, go ahead and click “Next.”
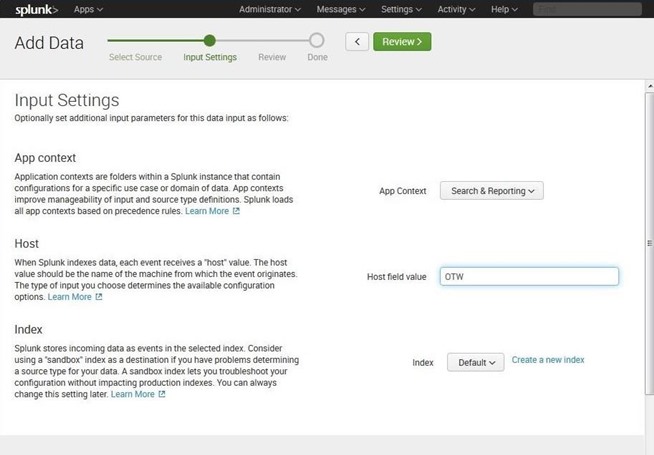
Step 5: Gathering the Data
Now that we have selected “Local Event Logs,” Splunk will respond with the Input Settings. When we click on “Review,” Splunk will begin to gather all of the data that we specified, in this case, the Security, System, and Application log data.
As you can see below, Splunk has gathered all the log data and displayed it. Most importantly, Splunk has indexed that data—much like Google indexes website data—so that we can search it.
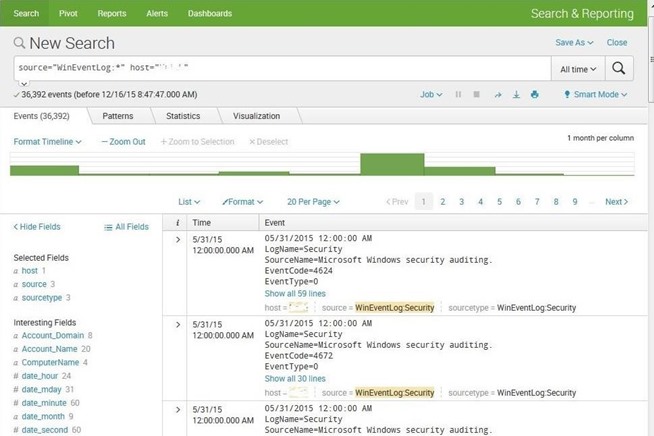
Next, let’s ask Splunk to find patterns in this data. Simply click on the “Patterns” tab and Splunk will work to find patterns in the data and categorize them.

Now that we have installed and have a basic understanding of Splunk, we can use it to recreate events for doing forensic analysis. Splunk can take data from many different sources and devices (such as those below) and help us to analyze and correlate the information.
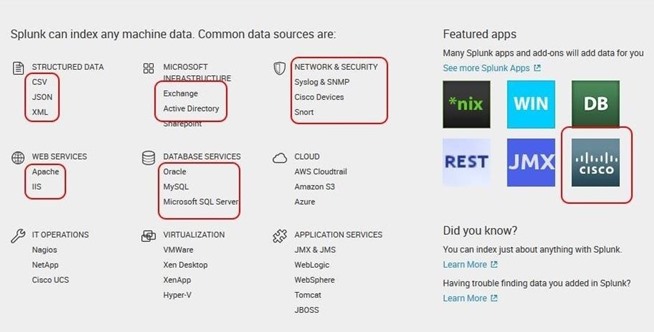
By analyzing the data from network devices, intrusion detection systems, databases, email servers, web servers, and other sources, the forensic analyst has the capability of recreating the breach and the events that led to the breach.
In the next tutorial using Splunk, we will use external data from a data breach from multiple sources on multiple machines to recreate and analyze the events. So keep coming back, my neophyte hackers!


Working as a cyber security solutions architect, Alisa focuses on application and network security. Before joining us she held a cyber security researcher positions within a variety of cyber security start-ups. She also experience in different industry domains like finance, healthcare and consumer products.