First we will see the topics that will be covered by the information security experts in this test / course of auto hacking: Configuration of virtual environments for tests, Sniffing CAN Traffic, Analyzing CAN Traffic, Inverse Engineering CAN IDs, Denial of service attacks, Reproduction / Traffic injection, Coding your own tools CAN Socket in python, Attacks directed against the components of your car and Transitioning this to attack a real car with hardware.

Before going into specific details of vehicle hacking, we will explain what CAN is; is to start your laboratory. In this occasion we are going to run a simple simulated CAN Bus network that controls several features of your simulated car. Experts always tell us that it is better to learn by doing than sitting down and saying a lot of network terms.
For this project you are not expected to buy too much hardware and jack in your real car immediately. Instead, there are options that can start hacking cars following this tutorial.
To begin with, information security researchers say you need to configure yourself with an Ubuntu VMware installation and load it. Optionally, you could also use VM Kali Linux, however, you may have copy problems and it is believed that Kayak was giving installation problems. It is also known that Kali works well with the virtual OpenGarages car.
Install PreReq libraries: Once loaded, you will install the CAN utilities and prerequisite libraries. This is really easy to do with the following Apt-get commands:
sudo apt-get update
sudo apt-get install libsdl2-dev libsdl2-image-dev can-utils
Then we will deploy the ICSimulator repository:
git clone https://github.com/zombieCraig/ICSim.git
Start the simulator: now we can start the simulator by changing the directories to the downloaded repository and executing the following 2 commands, which will configure a virtual CAN interface and a simulator GUI cluster:
Run the configuration script to get the vcan0 interface:
root @ kali: ~ / ICSim # ./setup_vcan.sh
root @ kali: ~ / ICSim # ./icsim vcan0
In a new terminal tab, open the simulator controller with the following command:
root @ kali: ~ / ICSim #. / controls vcan0
Professionals comment that the controller should be the GUI screen in focus to send keyboard commands to the simulator.
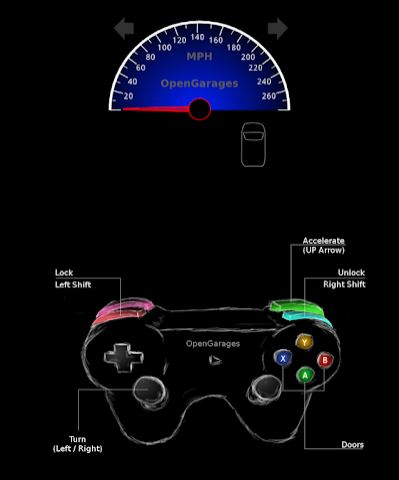
To use the simulator; experts in information security tell us that the simulator has a speedometer with turn signals to the right and left, doors, etc. There is a list of commands to control the simulator when the control panel is focused.
The up and down keys control the speedometer of the meter groups
Left and right keys Controls the flashing lights
Shift right + X, A or B open doors
Left shift + X, A or closed doors
Experiment with some of the previous commands, for example, Shift + X, you can see that the interface changes.
Now you have your own car to hack. It is important to note that in the configuration commands above we use a VCan0 interface. Run Ifconfig and you will see that it has a new network interface that speaks to the CAN network through VCan0.
ficti0n @ ubuntu: ~ / Desktop / ICSim $ ifconfig vcan0
vcan0 Link encap: UNSPEC HWaddr 00-00-00-00-00-00-00-00-00-00-00-00-00-
UP RUNNING NOARP MTU: 16 Metric: 1
RX packages: 558904 errors: 0 discarded: 0 overshoots: 0 frame: 0
TX packages: 558904 errors: 0 discarded: 0 overshoots: 0 operator: 0
Collisions: 0 txqueuelen: 1
Bytes RX: 3663935 (3.6 MB) Bytes TX: 3663935 (3.6 MB)
Researchers comment that the networks of cars are executed in a variety of more common protocols that are CAN. You can think of a CAN Bus as a network center where everyone can see the traffic of the whole world. This is true up to a point, although you may not see all the traffic if you are not connected to that particular bus. You can think of a type of CAN traffic similar to the UDP in which it is sent and forgotten, the main difference is that the parts of the CAN bus network do not really have addresses and everything is executed with IDs and arbitration priorities.
Now, let’s check if you can see our CAN traffic from our virtual car through the CanDump utility, which you installed as part of the previous CanUtils package. Using the following command in the vcan0 interface that our simulator uses, you can see a traffic sequence:
ficti0n @ ubuntu: ~ / Desktop / ICSim $ candump vcan0
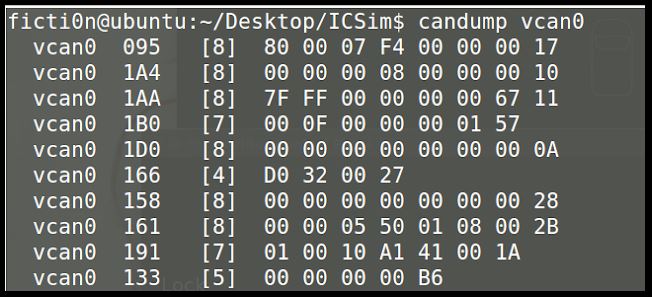
Now we can see CAN frames, and if we perform actions on the vehicle, we will see changes in the data values in the CanDump output. However, experts say that this can happen very quickly and we may not be able to see if we have unlocked the door of our simulators. This happens because things change constantly in the idle state of cars.
To capture and play CAN actions; an option would be to perform an action and reproduce it, you should see that the actions happen again in the repetition if the traffic for the action that we recorded is in the same bus network in which our device is connected. There are a lot of networks inside a car and our network tap is not guaranteed, an OBD2 port connector is connected to the same network as the door we open.
Another useful tool included with the CanUtils package is CanPlayer to reproduce traffic, say information security experts. If the functionality we are trying to capture is in the same Bus as the adapter connected to the car, or in this case our Virtual CAN interface, we can use CanDump to save the traffic in a file. Then we use CanPlayer to reproduce the traffic on the network. An example, run CanDump, opens a door and then replays the functionality with CanPlayer.
Lab 1 steps:
Run CanDump
Right Shift + X to open a door
Cancel CanDump (ctrl + c)
Left Shift + X to close the door
Run can the player with the dump saved and will replay the traffic and open the door
Record of the opening of the door: (-l for the record)
ficti0n @ ubuntu: ~ / Desktop / ICSim $ candump -l vcan0
Playback of the CanDump file: (use the file created by your Can dump)
ficti0n @ ubuntu: ~ / Desktop / ICSim $ canplayer -I candump-2018-04-06_154441.log
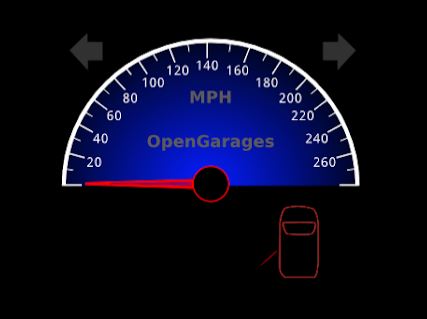
At this point you should see that your door is open again. CAN networks are not like TCP / IP, they are more like UDP in that you send your request and do not expect a response. Then, it is lost and you have to send again. It is likely that you were sending something with higher priority on the network at the time of its reproduction and your traffic was overshadowed by it.
Interacting with Can Bus and Reversing Traffic; this is good, but, CanDump is not very useful for this, it moves quickly so we can learn a lot from. Instead, we can use CanSniffer with colored output to show us the bytes inside the packets that change.
To start CanSniffer execute the following:
ficti0n @ ubuntu: ~ / Desktop / ICSim $ cansniffer -c vcan0
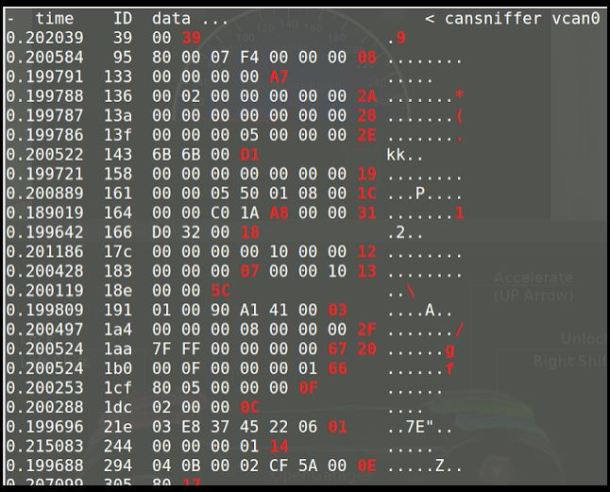
Now you will see Time, ID and Data. The most important part for our use is the ID and Data fields.
The frame ID is associated with the device in the network that is made by the box that is sent. Identification also determines the priority of the framework in the network. The smaller the CAN-ID number, the higher priority it will have on the network and the more likely it will be to handle it first. The data field is the information that is sent to change some parameter, such as unlocking a door or updating the output. The values in red are the values that are changing during the inactive state in which you are currently.
Determine which ID and Byte control the accelerator; with the sniff window of the terminal open, put the simulator and controller in the foreground, with the controller as the window in which you clicked and selected. Pay attention to the CanSniffer output while pressing the UP ARROW and look for a value that is white but is now red and increases in value as the accelerator goes up, say information security researchers.
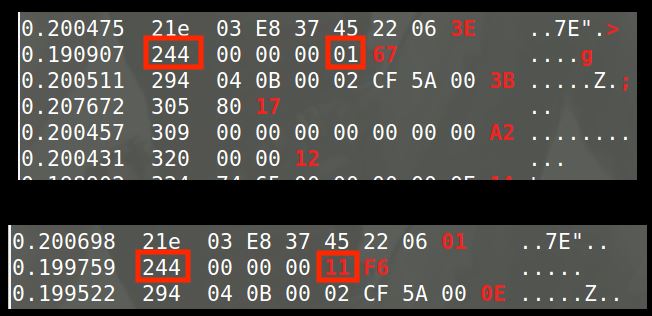
Select values with filters; to select the accelerator value, click on the terminal window and press -000000 followed by the Enter key that will erase all the values that are displaced. Then press +244 followed by the Enter key, which will add the accelerator identification again. Now you can click on the controller again and increase the speed with the up arrow button without all the noise obscuring your view. Instead, as shown below, you will only have ID 244 in your result.
To retrieve the IDs again, click on the terminal window and enter +000000 followed by the Enter key. Now you should see the entire exit as before. Essentially 000000 means to include everything. When you put a minus sign in front of it, it denies everything and clears your terminal window by filtering all the values.
Determine the Blinker ID; discover identification for the flashing lights. If you press the left or right arrow with the selected control window, you will see a completely new ID appear in the list, ID 188 shown in the following image, which is associated with the flashing light.
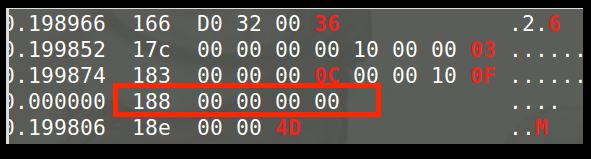
This ID was not mentioned, since it was not used in data output until you pressed the flashing light control. Let’s drop this value by pressing -000000 followed by +188. As in the example of the accelerator, your terminal should only show ID 188; initially it will be shown with values of 00 bytes.
Pressing the left and right flashing light, you can see the first change of Byte from 00 to 01 or 02. If none of them is pressed, it will be 00. The identification will remain visible as 00 until the time expires and disappears from the list when it is not active.
It’s time to do some protocol inversion. This lab will give you an idea of how to reverse all the functionality of the car and associate each action with the correct ID and BYTE. In this way, you can create a map of the desired functionality changes. We have already done some steps on how to determine which byte and ID are associated with an action. Now it’s time to map with all the remaining functions before moving on to attack individual components.
Attacking the functionality, with all the assigned functionality, we can now address several devices on the network directly without interacting with the GUI of the controllers. Perhaps we entered the car through the OnStar cellular connection or the central console units of the BLE connection that was connected to the CAN network in some way.
After an exploit we have direct access to the CAN network and we would like to take actions. Or maybe you have installed a wireless device in an OBD2 port under the board.
Using data from the CAN network reversal lab, we can call these actions directly with the appropriate CAN-ID and byte. Since we are far from the goal, we cannot simply reach out and grab the steering wheel or squeeze the accelerator; instead, we will send your CAN structure to make the change.
One way we can do this is through the CanSend utility, say information security researchers. Take the information from our laboratory above and make the left turn signal flash with the next ID 188 for the turn signal by changing the first byte to 01, which indicates that the left signal is pressed. CanSend uses the ID # Data format.
ficti0n @ ubuntu: ~ / Desktop / ICSim $ cansend vcan0 188 # 01000000
Now you should have noticed that the left signal flashed. If this did not happen, try again or make sure you have used the correct ID and changed the correct byte. This will do the same with the accelerator and try to adjust the speed to something with ID 244 that we determined was the accelerator.
ficti0n @ ubuntu: ~ / Desktop / ICSim $ cansend vcan0 244 # 00000011F6
Nothing will happen because it is so fast that the needle will not jump to that value. So, try repeating this over and over again with a bash loop.
ficti0n @ ubuntu: ~ / Desktop / ICSim $ while true; cansend vcan0 244 # 00000011F6
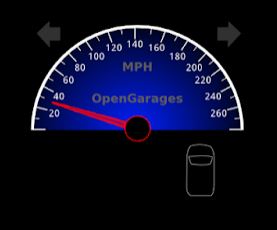
Now you may notice that the needle jumps back and forth a little. The needle bounces back and forth because normal CAN traffic is sent telling the car that it is actually set to 00 between its frames, which means it is 30 mph. Now the speed of the car has changed and the flashing light has been turned on without using the normal turn signal controls.
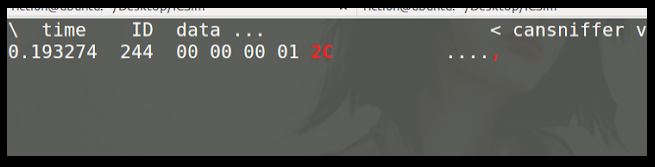
One way to handle this problem is to monitor the CAN network and when you see a sent ID, it will automatically send the corresponding ID with a different value. At this point we will try to modify the speed output by monitoring the changes. Next, we simply run CanDump and analyze the ID 244 in the record output, which is the value of the accelerator that tells the car the speed. When a device in the car reports ID 244 and its value, we will immediately send our own value saying that the speed is 30 mph with the value 11, said information security researchers.
ficti0n @ ubuntu: ~ / Desktop / ICSim $ candump vcan0 | grep “244” | while reading the line; cansend vcan0 244 # 00000011F6
With this operation after a few seconds you will see that the speed is adjusted to around 30 MPH once you capture a legitimate CAN-ID 244 network traffic and send your own value immediately afterwards.
While the previous command is still working, click on the controller window and start holding the arrow up with the controller in focus. After waiting a few seconds, when the speed exceeds 30 MPH you will see the needle fighting for the highest real value and adjust back to 30 MPH as your command continues to send its value as a replacement for the actual speed.
This is a way to monitor the network and react in a very crude way to what you see. Maybe someone stole your car and you want to control if there is an open door and if they try to open the door, it immediately locks them up


Working as a cyber security solutions architect, Alisa focuses on application and network security. Before joining us she held a cyber security researcher positions within a variety of cyber security start-ups. She also experience in different industry domains like finance, healthcare and consumer products.