
According to experts in security audits, from the May update of 2019 Windows Sandbox is available for Windows 10 system administrators. This tool provides an isolated environment of the main system installation to run unknown or unreliable source software.
Windows Sandbox works in a similar way to a virtual machine, although it offers security and efficiency features completely optimized for the Microsoft operating system. In addition, according to experts in security audits, all content scanned in this secure environment will be removed from your device once the Sandbox session is complete, creating a completely new desktop every time the tool is used. Next, we show you the steps to enable this security tool.
Create a configuration file for Windows Sandbox
- Open Notepad
- Click File
- Select Save As
- Enter a descriptive name and use the extension .wsb

- Use the Save as Type menu and select All Files
- Click the Save button
Once you complete these steps, you can edit the file using an XML format to control features such as graphics, networking, folder sharing, and startup scripts.
Managing the virtual network adapter in Windows Sandbox
To disable or enable the virtual network adapter in Windows Sandbox:
- Open File Explorer
- Navigate to the configuration file
- Right-click the .wsb configuration file that you created earlier, select Open With, and then click Choose another application
- Select Notepad
- Click OK
- Type the following to disable the virtual network adapter in Windows Sandbox:
<Configuration>
  <Networking>Disable</Networking>
</Configuration>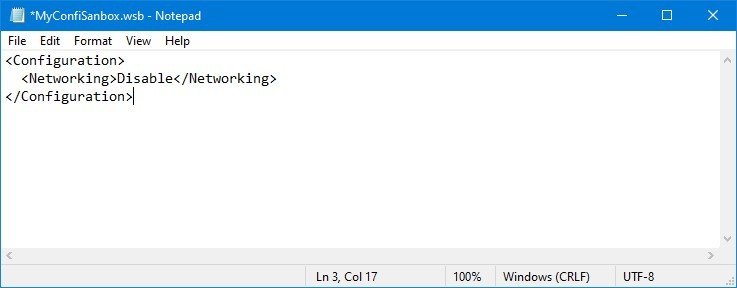
- Type the following to enable networking in Windows Sandbox:
<Configuration>
  <Networking>Default</Networking>
</Configuration>
Note: Although you can disable the network, Windows Sandbox will enable this function by default, whether or not you use a configuration file
- Click File
- Click Save
After completing these steps, you can double-click the .wsb file to start Windows Sandbox with the configuration changes you specified.
How to manage virtual graphics in Windows Sandbox
To disable or enable graphics virtualization in Windows Sandbox after you install the May 2019 update, follow these steps:
- Open File Explorer.
- Navigate to the configuration file
- Right-click the .wsb configuration file that you created earlier, select Open With, and then click Choose another application
- Select Notepad option
- Click OK
- Type the following to disable the vGPU adapter in Windows Sandbox:
<Configuration>
  <VGpu>Disable</VGpu>
</Configuration>
- Type the following to enable the vGPU in Windows Sandbox:
<Configuration>
  <VGpu>Default</VGpu>
</Configuration>
Note: Although you can specify disable vGPU, the Windows Sandbox will enable this function by default, whether or not you use a configuration file.
- Click File
- Click Save
Once you complete the steps, Windows Sandbox will use the graphics software representation on the virtual machine, but result in slower performance.
How to assign a host folder in Windows Sandbox
To share a folder from the host (physical) device to the Windows Sandbox desktop, follow these steps:
- Open File Explorer
- Navigate to the configuration file
- Right-click the .WSB configuration file that you created earlier, select Open With, and then click Choose another application
- Select Notepad
- Click OK
- Type the following to assign a folder in the Windows test area:
<Configuration>
  <MappedFolders>
    <MappedFolder>
      <HostFolder>C:\temp</HostFolder>
      <ReadOnly>true</ReadOnly>
    </MappedFolder>
  </MappedFolders>
</Configuration>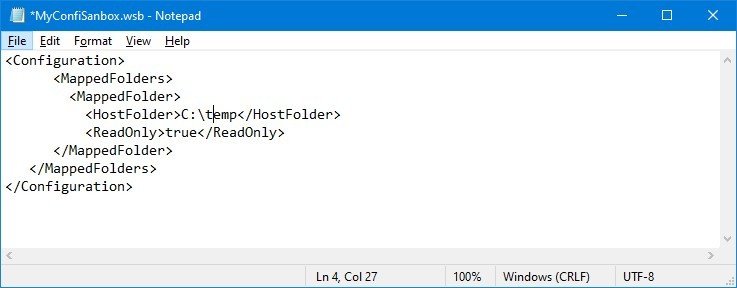
In the script, be sure to specify the path to the host folder that you want to appear in the Windows Sandbox within the HostFolder block. Also, within the ReadOnly block use the value “true” (recommended) to force access to the folder as read-only mode, or use the “false” value to allow read/write access to the folder.
- Click File
- Click Save
After completing the steps, when you run the .wsd file, Windows Sandbox will assign the folder, which you can easily access from the desktop. Each command that you run with Windows Sandbox will run under the account “WDAGUtilityAccount”, which means that shared folders always appear on the desktop.
How to run startup commands in Windows Sandbox
To run a command or script during logon in Windows Sandbox, follow these steps:
- Open File Explorer
- Navigate to the configuration file
- Right-click the .WSB configuration file that you created earlier, select Open With, and then click Choose another application
- Select Notepad
- Click OK
- Type the following to run a command during startup in Windows Sandbox:
<LogonCommand>
    <Command>cmd.exe</Command>
</LogonCommand>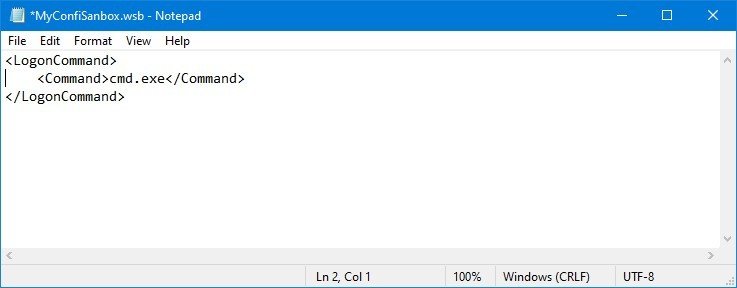
Inside the command block, be sure to replace CMD. exe with the command you want to execute. If you need to run a complex command, we recommend that you create a script and then run it with a single command within Sandbox.
Once you complete these steps, Windows Sandbox will execute the command you specified after the session was created.
How to control multiple options in Windows Sandbox
To run Windows Sandbox with multiple custom options, follow these steps:
- Open File Explorer
- Navigate to the configuration file
- Right-click the .WSB configuration file that you created earlier, select Open With, and then click Choose another application
- Select Notepad
- Click OK
- Type the following to customize Windows Sandbox with all available options:
<Configuration>
  <Networking>Disable</Networking>
  <VGpu>Disable</VGpu>
  <MappedFolders>
    <MappedFolder>
      <HostFolder>C:\Temp</HostFolder>
      <ReadOnly>True</ReadOnly>
    </MappedFolder>
  </MappedFolders>
  <LogonCommand>
    <Command>cmd.exe</Command>
  </LogonCommand>
</Configuration>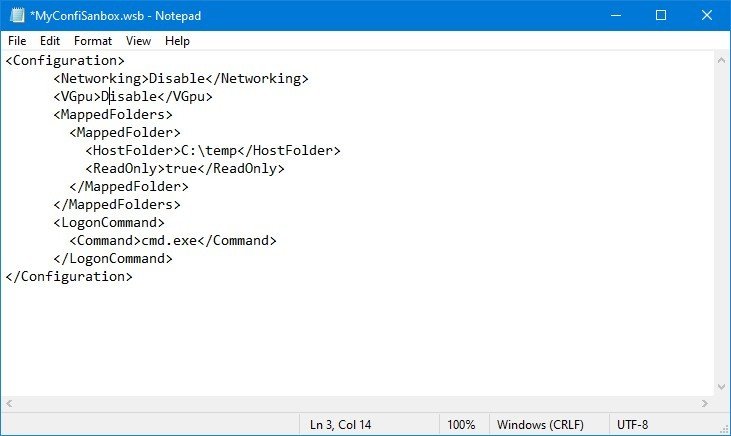
According to experts in security audits of the International Institute of Cyber Security (IICS), after completing these steps, Windows Sandbox will start offline and use the software representation instead of a virtual GPU.


He is a well-known expert in mobile security and malware analysis. He studied Computer Science at NYU and started working as a cyber security analyst in 2003. He is actively working as an anti-malware expert. He also worked for security companies like Kaspersky Lab. His everyday job includes researching about new malware and cyber security incidents. Also he has deep level of knowledge in mobile security and mobile vulnerabilities.


