
Backups can help you recover your data after a system failure, natural disaster, or a ransomware attack. When thinking about a recovery method, keep in mind the effectiveness of a third party backup solution compared to a legacy backup. Legacy backups can take up a lot of computing resources and time. On the other hand, a modern backup solution is cost-efficient, agentless, and fast. It can use snapshots to perform a VMware backup at the virtualization level. This type of architecture allows you to back up the entire virtual machines (VMs) along with their operating systems (OSs), virtual disks, and configuration files.
An innovative VMware backup software enables you to run lightweight and speedy backups without investing a lot of resources and effort. You can run your daily backups without taking extra time out of your daily tasks. In this blog post, we are going to discuss how to use a VMware backup solution to backup your data quickly and without any hassle. Learn how to back up your VMware VMs in five simple steps with NAKIVO Backup & Replication.
Before starting with the 5 steps, the first thing you need to do is to initiate a backup job. To do this, go to the NAKIVO Backup & Replication dashboard. On the Overview Page, click Create. Then choose VMware vSphere backup job from the drop-down list. This will open the New Backup Job Wizard for VMware vSphere. Now, you can proceed with your VM backup process.

Step 1: Select the VMs you need to back up
On the Source page, you can add the VMs you need to back up. There are three options that you can choose from:
- Hosts and Clusters
- VMs and Templates
- Policy
Selecting Hosts and Clusters enables you to see all VMware items, such as VMs, clusters, folders, hosts, and resource pools. Select the items you need by doing the following:
- For convenience, you can use the Search box to find the items you need. To do this, you can enter a full or partial string/name of the item in the search box.
- Place a checkmark next to the item you want to select.
- The items you select will appear in the right pane. You can rearrange the items on the list to back up the most critical VMs first.
- Review your list. If you need to remove a certain item from the list, you can select the box containing the item and click the X button.

If you select VMs and Templates, the inventory tree will display the VMs, VMware hosts, and VMware templates.

- Size of VM is more than 4 GB
- Number of VM CPU sockets is more than 2
- VM name contains “Ubuntu”
When selecting a policy, follow these steps
- A warning message will appear informing you that switching to the Policy will reset your previously selected items. To continue switching to the Policy view, click Switch view.
- Add at least one rule to the job policy.
- Add the selected VMs to the backup job by clicking Next.

The list of VMs that match the selection criteria will be displayed in the right pane. In case you can’t find a certain VM or container, check if the corresponding vCenter or ESXi host has been added to the inventory. You can also refresh the inventory to find the needed item. Keep in mind that by adding a container to a backup job, you ensure that all items in that container will be backed up. In the future, if you move a new item to a selected container, that item will be backed up. The same is true for new VMs that you may create inside the container.
Sometimes the Transporter cannot process all VMs of the backup job simultaneously. This could happen because the Transporter is processing other jobs at the same time or the number of VM disks exceeds the maximum load capacity of the Transporter. If the Transporter can’t process all VMs in the job at the same time, the order in which VMs are backed up becomes important.
Step 2: Choose a destination for your backups
The Destination page allows you to select a destination for your backup job. You can either select one or multiple backup repositories to back up your VMs. On the Destination page, you can also:
- Map your source VMs to the existing backups
- Exclude VM disks from the backup job
Single Repository Backup
To backup your previously selected VMs to a single repository, select Destination. Then choose Select target destination in the drop-down menu and click Next.

Backup to Different Repositories
To back up your VMs to different repositories, select Advanced Options>Different backup repositories. Then, in the VM boxes below, choose a backup destination/repository for every VM from the target destination drop-down list. Click Next.

Map a Source VM to an Existing Backup
There are two scenarios when mapping of a source VM to an existing backup is appropriate:
- You have already backed up the VM, but then lost the backup job.
- You need to create jobs in a new copy of the product.
To map a source VM to an existing backup, click Advanced options and select a backup repository with an existing backup. Next, choose Use existing backup as a target and select the appropriate existing backup from the drop-down menu. Click Next.

As you run the backup job, NAKIVO Backup & Replication will analyze the difference between your target and source VM and transfer the differential data. The VM backup mapping can take as much time as a full backup. Upon completion of the job, a new recovery point is created. The old recovery points are not changed or overwritten.
Exclude a VM Disk from a Backup Job
Sometimes there is no need to backup certain VM disks. In such a case, you can exclude those disks from the backup job. To do this:
- Click Advanced options.
- Uncheck the VM disks that you don’t want to back up.
- Click Next.

Step 3: Set up a backup schedule
The Scheduling option allows you to run either manual or automatic backup jobs.
Manual Backups
To schedule a manual backup job, choose the Do not schedule, run on demand option on the Destination Page.
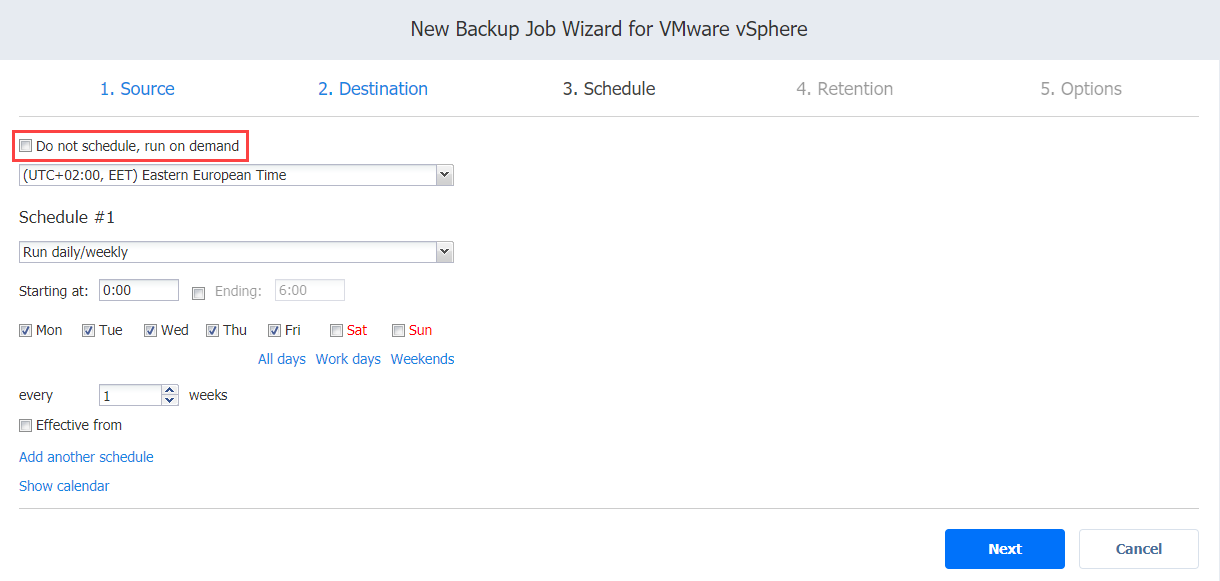
Daily and Weekly Backups
For a daily or weekly backup, select Run daily/weekly in the Schedule #1 panel. Next, follow these steps:
- From the time zone drop-down menu, select the time zone for running your backup jobs.
- In the Starting at box, specify the start time for the job.
- In the Ending box, specify the ending time for the job.
- Choose the days of the week to run your backup job.
- If needed, indicate the effective start date by checking the Effective from box and specifying the desired date.

Monthly and Yearly Backups
Select Run monthly/yearly from the drop-down menu to run monthly or yearly backups. Then follow these steps:
- From the time zone drop-down menu, select the time zone for running your backup jobs.
- In the Run every box, indicate the desired day and month for your backup job.
- In the Starting at box, specify the start time for the job.
- In the Ending box, specify the ending time for the job.
- If needed, indicate the effective start date by checking the Effective from box and specifying the desired date.

Periodic Backups
If you need to run your backup job multiple times a day, select Run daily/weekly in the Schedule #1 panel. Then choose a time period from the check boxes:
- From the time zone drop-down menu, select the time zone for running your backup jobs.
- In the Starting at box, specify the start time for the job.
- In the Ending box, specify the ending time for the job.
- Choose the days of the week to run your backup job.
- If needed, indicate the effective start date by checking the Effective from box and specifying the desired date.

Chained Job Backups
To run a chained job means to run a job after another job is completed. To do this, select Run after another job from the Schedule 1 drop-down menu and do the following:
- In the After the job section, indicate a job after which you want to start the current job.
- In the Run this job section, indicate whether to run the current job immediately after the previous one or within a certain time frame.
- In the After successful runs section, you can select to run the job only if the previous job has been completed.
- To run the job only if the previous job has failed, select After failed runs.
- To run the job only if the previous job has stopped, select After stopped runs.
- To start your backup on a specified date, select Effective from.

Add Additional Schedule
You can set up several schedules for your backup job. To add another schedule, click Add another schedule and follow the steps above to set it up.

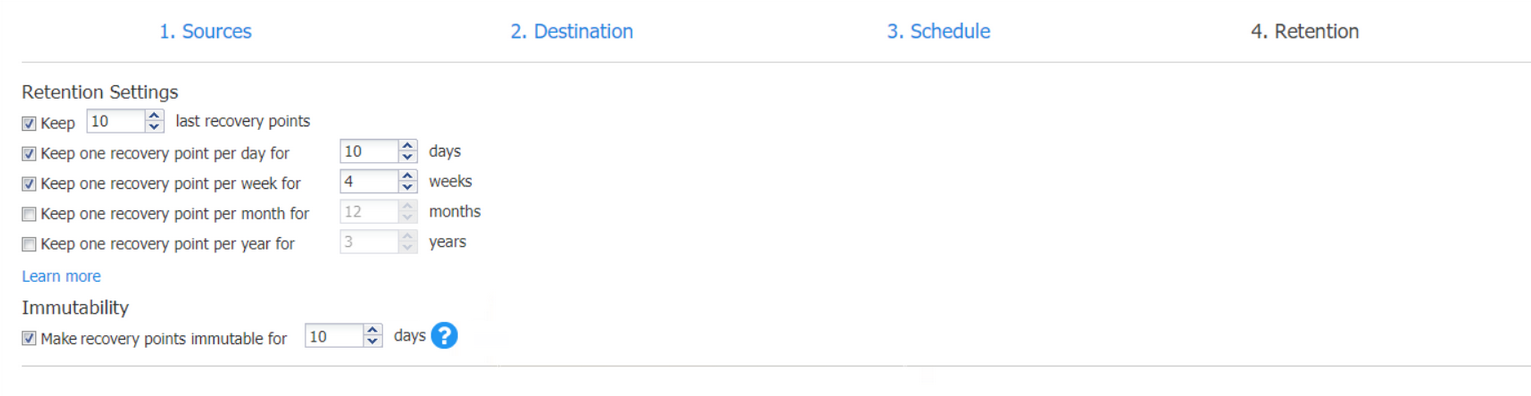
Step: 4: Configure a retention policy
Every time you run a recovery job, NAKIVO Backup & Replication creates a recovery point. A recovery point is a representation of the recovered VM at a particular point in time. A recovery point enables you to recover single files, objects, or VMs from the backup repository. You can implement a Grandfather-Father-Son rotation scheme to manage your recovery points.
If you select Amazon S3 or Local Folder as your backup repository, you can create immutable backups in these repositories. The immutable backups implement the write-once-read-many (WORM) model. This model protects your data from being overwritten, deleted, or changed by external users during a specified period of time.
On the Retention page, you can select the following retention options:
- Keep (number) last recovery points. Here you can indicate the number of last recovery points you want to retain. For example, you can keep the last 10 recovery points.
- Keep one recovery point per day for (number) days. Here you can indicate to retain the last recovery point per day for a given number of days. For example, you can keep one recovery point per day for 10 days.
- Keep one recovery point per week for (number) weeks: Retain the last backup of every week for a certain number of weeks. For example, keep one recovery point per week for 4 weeks.
- Keep one recovery point per month for (number) months: Retain the last backup of every month for a certain number of months. For example, keep one recovery point per month for 12 months.
- Keep one recovery point per year for (number) years: Retain the last available backup of every year for a certain number of years. For example, keep one recovery point per year for 3 years.
Immutability
In the Immutability section, you can make your recovery points immutable for a certain number of days.
To make your backups immutable, the following conditions must be met:
- Select only Amazon S3 or Local folder as your backup repository.
- If you select Amazon S3, enable Object Lock for the Amazon S3 bucket that contains your backup repository.
- If you select the Local folder option, the following conditions apply:
- Extended attributes, modified by chattr and setfattr commands, must be supported by the Target File System.
- Linux OS and NAS OS, except FreeNAS/TrueNAS, are supported.
- Select Local Folder as backup repository type.
- Select Store backups in separate files in the Backup repository.
Step 5: Utilize available backup options
On the Options page, you can set up the settings for the following sections:
- Job Options
- Full Backup
- Pre and Post Job Actions
- Data Transfer
Job Options
In this section, you can set a variety of options.
- Job name: Assign a name for your backup.
- App-aware mode. VM backup incorporates guest OS quiescing that relies on Microsoft Volume Snapshot Service(VSS) to ensure app consistency.
- Change tracking. From the drop-down menu, select one of the following:
- Use VMware CBT. Turning on this feature enables NAKIVO Backup & Replication to use Changed Block Tracking (CBT). CBT copies only the data that has changed since the previous backup, allowing for incremental backups and boosting the backup speed.
- On error. This option helps to correct errors related to CBT. If VMware CBT can’t provide data on changed blocks, select one of the following options:
- switch to proprietary method – NAKIVO Backup & Replication can perform an incremental backup relying on the NAKIVO proprietary changed tracking technology.
- reset CBT – VMware CBT for the VM will be reset.
- fail VM processing – stops NAKIVO Backup & Replication from processing the VM. In this case, job failure is announced and other VMs in the job will be processed.
- Double check changed blocks provided by CBT. NAKIVO Backup & Replication can check the data blocks detected by VMware CBT. This ensures that VMware CBT accurately represents the amount of changed data.
- Use proprietary method. This option allows you to perform backups by using the NAKIVO proprietary change tracking technology.
- No change tracking (always full). By selecting this option, you enable NAKIVO Backup & Replication to perform a full backup of all source VMs.
- Network acceleration. Utilizes compression and network reduction techniques to speed up data transfer over WAN or LAN.
- Encryption. Incorporates AES 256 encryption to protect your VM data during transfer. Data encryption can increase the time of your backups and CPU load on computers that run transporters. Therefore, use Encryption when you back up over WAN and you don’t have a VPN connection.
- VM verification. Backup verification has the following options:
- Disabled. Select to disable VM verification.
- Screenshot verification. Enables you to verify all backups in a single job. This is accomplished by recovering VMs with Flash VM Boot after the backup is completed. After the VM’s OS boots, NAKIVO Backup & Replication takes a screenshot of the recovered VM. Afterward, the VM is discarded. You can obtain a VM screenshot via email or look it up on the NAKIVO dashboard.
- Boot verification. After the backup is complete, the VM is recovered by Flash VM boot. Afterward, you can start the VM and check if the hypervisor tools are running.
Note: You must install VMware tools on all VMs.
If you choose to run Screenshot verification, follow these steps when the dialog box opens:
- Choose a location to boot your VMs:
- Using Flesh VM Boot, select a target container (cluster, host, resource pool) to run your VMs.
- Select a datastore to track changes to the recovered VM.
- Choose a transporter from the list
Note: The transporter you use for your backup repository cannot implement iSCSI port because this port is already used by other services. The iSCSI packages are not on the transporter that you use for your backup repository.
- Configure verification settings:
- Verify not more than (number) VMs simultaneously. Indicate the maximum number of VMs to start in the target container. For example, choose Verify no more than 2 VMs simultaneously.
- Recovery time objective. Specify the time limit for verifying each backup. For example, select Recovery time objective 5 min.
Note: NAKIVO Backup & Replication enables you to automatically skip swap files and partitions and to skip unused blocks during the backup process, which saves storage space and decreases the time for each backup.

Full Backup
To run full backups, on the Destination page, set Incremental with full backups as the backup type. In addition, select the option to Store backups in separate files. With those selections in place, you can select the following options:
- Synthetic Full. This option enables you to perform an incremental backup first. Afterward, NAKIVO Backup & Replication can transform all accumulated data into a full backup. The synthetic full backup is faster than the Active backup. It puts less load on the network since less data is being transferred. The load is also much lower on the source data stores that run the production.
- Active Full. By choosing this option, you enable NAKIVO Backup & Replication to read the VM data from the source datastore and transfer this data to the backup repository.
 Pre and Post Job Actions
NAKIVO Backup & Replication can perform certain tasks before and after each backup job.
- Send email notifications. NAKIVO Backup & Replication can send notifications upon job completion. To send a notification, select Send job run reports to and indicate the email address of the recipient.
- Truncate Microsoft Exchange and Microsoft SQL Server logs. You can truncate (delete) the accumulated Microsoft Exchange and Microsoft SQL server logs to clear your disk space. To truncate the Exchange logs, select Truncate Exchange logs, then select the credentials for your VMs. To truncate Microsoft SQL Server logs, select Truncate SQL Server logs, then select the credentials for your VMs.
- Run pre- and post-job scripts. To run pre- or post-job scripts, do the following:
- Set your script file on the computer where Director is installed.
- Select the Run local pre job script/Run local post job script.
- Indicate: Script path (local path to the script, e.g. for Windows: cmd.exe /c D:\script.bat ).
- Select Job behavior: wait for the script to finish (start backup after the script is completed)/do not wait for the script to finish (start backup while the script is running.
- Select Error handling:Continue the job on script failure (run the backup even if the script fails)/Fail the job on script failure (Don’t perform the backup if the script fails).

Data Transfer
The Data Transfer section enables you to:
- Select a transport mode. With the Automatic selection option, you can automatically select the best transport mode to retrieve VM data. If your source transporter is installed on a VM, the transport modes look as follows: Hot Add > SAN > LAN. If your source transporter is installed on a physical machine, the transport modes look as follows: SAN > LAN. Other transport modes include SAN only, Hot-add only, LAN only.
- Select a Transporter. The transporter can be chosen automatically by default or you can set it up manually. You can choose one of the following options to configure your transporter: automatic selection, manual (configured for all VMs), Manual – configured per host.
- Set the transporter load. By default, your transporter can perform 3 tasks related to the job that you run. However, you can change the maximum number of tasks per transporter. To do this:
- Select Limit transporter load in the Data Transfer section.
- Indicate the number of concurrent tasks.
In addition, the Options section allows you to enable:
- Bandwidth Throttling to speed up your data transfer.
- Backup from storage snapshot to backup large volumes of data and reduce the production load.

Finish Your VMware Wizard Backup Job
Click Finish or Finish & Run to complete your backup job. If you choose the Finish & Run option, you will be asked to enter the parameters of your job.
To learn more about how to backup your VMware VMs, read here.


Information security specialist, currently working as risk infrastructure specialist & investigator.
15 years of experience in risk and control process, security audit support, business continuity design and support, workgroup management and information security standards.


