
Privacy is everything what users should aware off. Every users wants to hide their sensitive information on the internet. Many time when sending any important file or any message strong encryption is required. Secret messages/ files can be encrypted using manual/ automation techniques that many times it requires an special ethical hacking skills to decrypt such files. These files are encrypted so no unauthorized person can open such files. In steganography, message can be in plain text, audio or any type of file. Sender could attack password which is also called stego key to ensures that only receiver should de-crypt file.
Steganography has different techniques of encrypting files or messages also stated by researchers of International Institute of cyber Security in audio-steganography. Today we will show how hide data in audio & Image files using different techniques. Steganography can be used in different ways
- Pure Steganography – It doesn’t required any exchange of stego key.
- Secret Key Steganography – Here stego/ secret key is exchanged prior to communication. Secret key takes cover message & encrypts with secret message. Only senders & recipients knows how to open encrypted files.
- Public Key Steganography – In public key sender will use public key during encryption process & only private key which is co-related with public key can de-crypt the secret message.
Types of Steganography :-
- Image Steganography : Image stenography is used to hide secret messages in an image. This technique is widely used to hide secret messages inside LSB (Least Significant Bit), explained below. It is required to use lossless compressed image, otherwise secret message will be loss.
- Audio Steganography : Audio can conceal secret message in audio file. It can encrypt 16 bit file which has 216 levels of sound. The difference levels of sound cannot be detectable by human ear.
- Video Steganography : It brings more possibilities for large data because it has combination of image & sound. The biggest advantage of video steganography is that it can hold large amount of data.
- Text Steganography : Text steganography can be used in data compression as it encrypts secret messages in one representation.
Steganography Mechanisms :-
LSB (Least Significant Bit) is referred as low-order bits. It is far right bit of a string value. The right digit is considered as lowest digit of a string whereas left most digit is considered as highest significant bit. It is the opposite of most left most bit, which carries the highest value in a multiple-bit binary, as well as the nu which is farthest to the right. When data is transmitted right most bit is transmitted first, followed by other bits.
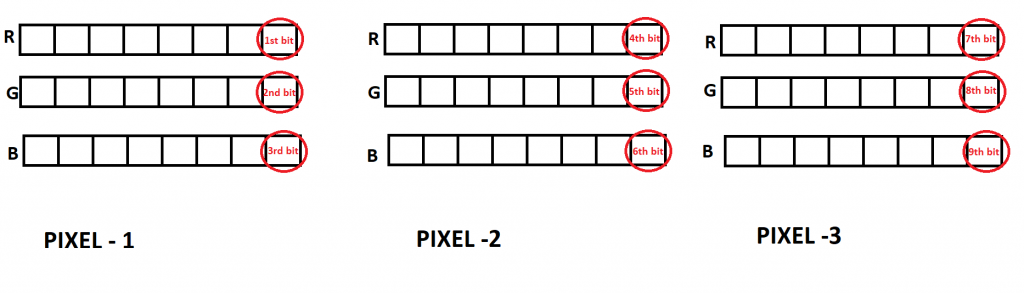
As explained by the ethical hacking researcher of International Institute of Cyber Security, Each pixel is made up of Red, Green, Blue color, each red, green and blue color is denoted by 8 bit to store the color information. From this 8 bit we can use a LSB to store our data and it will do minor effect to the photo which can’t be seen by normal person. So every pixel has 3 LSB where we can use to store the secret message.
List of Tools on LSB (Least Significant Bit) :-
- Stego
- LSB-steganography
- jsteg
- OpenStego
- deepsoud
- Stegno
- mp3stego
Working Of Tools :-
STEGO
- For testing we are using Kali Linux 2019.1 amd64.
- Type sudo apt-get update && type sudo apt-get install python3
- Then type sudo apt-get install python3-pip
- Type git clone https://github.com/ragibson/Steganography.git
root@kali:~/Downloads# git clone https://github.com/ragibson/Steganography.git
 Cloning into 'Steganography'…
 remote: Enumerating objects: 94, done.
 remote: Total 94 (delta 0), reused 0 (delta 0), pack-reused 94
 Unpacking objects: 100% (94/94), done.
- Type python3 setup.py install
root@kali:~/Downloads/Steganography# python3 setup.py install
 running install
 running bdist_egg
 running egg_info
 creating stego_lsb.egg-info
 writing stego_lsb.egg-info/PKG-INFO
 writing dependency_links to stego_lsb.egg-info/dependency_links.txt
 writing entry points to stego_lsb.egg-info/entry_points.txt
 writing requirements to stego_lsb.egg-info/requires.txt
 writing top-level names to stego_lsb.egg-info/top_level.txt
 writing manifest file 'stego_lsb.egg-info/SOURCES.txt'
 reading manifest file 'stego_lsb.egg-info/SOURCES.txt'
 writing manifest file 'stego_lsb.egg-info/SOURCES.txt'
 installing library code to build/bdist.linux-x86_64/egg
 running install_lib
 running build_py
- Type cd Steganography/stego_lsb && type ls
root@kali:~/Downloads# cd Steganography/stego_lsb
root@kali:~/Downloads/Steganography# ls
 bit_manipulation.py  cli.py  init.py  LSBSteg.py  StegDetect.py  WavSteg.py
- Type stegolsb wavsteg –help
root@kali:~/Downloads/Steganography/stego_lsb# stegolsb wavsteg --help
 Usage: stegolsb wavsteg [OPTIONS]
 Hides or recovers data in and from a sound file
 Options:
   -h, --hide               To hide data in a sound file
   -r, --recover            To recover data from a sound file
   -i, --input TEXT         Path to a .wav file
   -s, --secret TEXT        Path to a file to hide in the sound file
   -o, --output TEXT        Path to an output file
   -n, --lsb-count INTEGER  How many LSBs to use  [default: 2]
   -b, --bytes INTEGER      How many bytes to recover from the sound file
- For testing we have created text file for hiding inside .wav file.
Binding Text file with Audio File :-
- Type stegolsb wavsteg -h -i sample01.wav -s /root/Downloads/Steganography/stego_lsb/iicybersecurity.txt -o /root/Downloads/Steganography/sound.wav
- -h is used to hide file inside text file. sample01.wav (1.02 MB) is sound file used.

- -s give path of a file in sound file.
- -o give path of output file. sound.wav is another file which will be created after binding text file inside wav file.
root@kali:~/Downloads/Steganography/stego_lsb# stegolsb wavsteg -h -i sample01.wav -s /root/Downloads/Steganography/stego_lsb/iicybersecurity.txt -o /root/Downloads/Steganography/sound.wav
 Using 2 LSBs, we can hide 134118 bytes
 Files read                     in 0.00s
 21 bytes hidden                in 0.00s
 Output wav written             in 0.00s
- Above query has bind the iicybersecurity.txt file with sample01.wav & creates an new file sound.wav. The text file consists of 21 bytes of data which binds file in minimal seconds of time.
- By default 2 LSB are used. You can see how many LSBs to use.
Recovering Data From WAV sound :-
- Type stegolsb wavsteg -r -i /root/Downloads/Steganography/stego_lsb/sample04.wav -o /root/Downloads/Steganography/sample.txt -n 2 -b 25
- -r is to recover from sound file.
- -o is used to give location of output file where hidden file will saved.
- -n is used to assign LSB.
- -b is used to assign bytes. Here we have given 25 because in some cases, cyber forensics researchers are not aware that how much memory of data is hidden.
root@kali:~/Downloads/Steganography/stego_lsb# stegolsb wavsteg -r -i /root/Downloads/Steganography/stego_lsb/sample04.wav -o /root/Downloads/Steganography/sample.txt -n 2 -b 25
 Files read                     in 0.00s
 Recovered 25 bytes             in 0.00s
 Written output file            in 0.00s
- Above query has de-crypted the text file from the sound. While encrypting the files we also checked that no sound was break during the binding process & memory was also same.
- After decrypting file we found that file was decrypted properly but some another characters were printed.
root@kali:~/Downloads/Steganography# cat output.txt
 hello iicybersecurity;▒uC       ▒b▒▒'i▒▒`▒o㔛▒▒▒▒~▒
- Above is the output file which was binded with an .wav sound.
Binding Zip File with an Image :-
- In this functionality we will hide zip file in image. Type stegolsb steglsb –help
root@kali:~/Downloads/Steganography/stego_lsb# stegolsb steglsb --help
 Usage: stegolsb steglsb [OPTIONS]
 Hides or recovers data in and from an image
 Options:
   -h, --hide                      To hide data in an image file
   -r, --recover                   To recover data from an image file
   -a, --analyze                   Print how much data can be hidden within an image  [default: False]
   -i, --input TEXT                Path to an bitmap (.bmp or .png) image
   -s, --secret TEXT               Path to a file to hide in the image
   -o, --output TEXT               Path to an output file
   -n, --lsb-count INTEGER         How many LSBs to use  [default: 2]
   -c, --compression INTEGER RANGE
                                   1 (best speed) to 9 (smallest file size)  [default: 1]
   --help                          Show this message and exit.
- Type stegolsb steglsb -h -i 02.png -s iicybersecurity.rar -n 2 -o /root/Downloads/Steganography/output.png
- -h is used to hide data in image file. Here image size is 5.33 KB.
- -s is used to assign path to file for hiding in image.
- -n is used to assign lsb.
- -o is used to assign path to an output file.
root@kali:~/Downloads/Steganography/stego_lsb# stegolsb steglsb -h -i 02.png -s iicybersecurity.rar -n 2 -o /root/Downloads/Steganography/output.png
 Files read                     in 0.02s
 104 bytes hidden               in 0.00s
 Image overwritten              in 0.04s
- Above query has binded the zip file with an image. After binding zip file with an image we found that image size has increased.
- Above output shows that zip file is binded of 104 bytes in 0.04s & it was overwritten. And after binding files we found that image size is increased upto 58.6 KB. This information is used in cyber forensics course labs of International Institute of cyber Security.
- After hiding zip file in image file, above screenshot shows that image size has increases after hiding zip file.
Recovering Zip file From Image :-
- Type stegolsb steglsb -r -i /root/Downloads/Steganography/output.png -o /root/Downloads/Steganography/output.zip -n 2
- -r is to recover from image file.
- -o is used to give location of output file where hidden file will saved.
- -n is used to assign LSB.
- -b is used to assign bytes.
root@kali:~/Downloads/Steganography/stego_lsb# stegolsb steglsb -r -i /root/Downloads/Steganography/output.png -o /root/Downloads/Steganography/output.zip -n 2
 Files read                     in 0.02s
 104 bytes recovered            in 0.00s
 Output file written            in 0.00s
- After recovering data, zip file has been extracted from the image. When we unzip output.zip, we found file was perfect & file was working properly.
- For further we opened output.zip in another OS (Windows 7 64 Bit) testing, file was working properly.
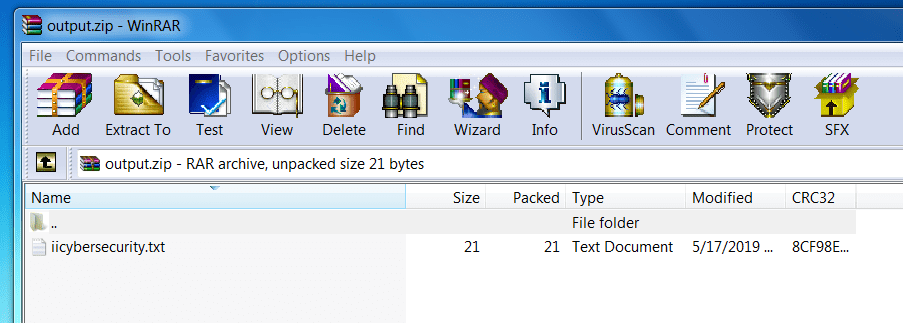
- Above file was working properly, we also unzipped file & text file was opening, all the data was found.
LSB-steganography
Encoding An Text File in Image Using LSB-Steg :-
Many time, an situation occurs where you want to send important messages to someone, this techniques is used by hacker to communicate to each other and this is important topics of ethical hacking course offered by International Institute of Cyber Security. We will show you another tool which is used in hiding text file in image. Here LSB-steganography will hide text file in image using LSB approach.
- For testing we are using Kali Linux 2019.1 amd64. Open terminal type git clone https://github.com/RobinDavid/LSB-Steganography.git
root@kali:~/Downloads# git clone https://github.com/RobinDavid/LSB-Steganography.git
 Cloning into 'LSB-Steganography'…
 remote: Enumerating objects: 65, done.
 remote: Total 65 (delta 0), reused 0 (delta 0), pack-reused 65
 Unpacking objects: 100% (65/65), done.
 root@kali:~/Downloads# cd LSB-Steganography/
- Type cd LSB-Steganography & type pip install -r requirements.txt
root@kali:~/Downloads# cd LSB-Steganography/
root@kali:~/Downloads/LSB-Steganography# pip install -r requirements.txt
 Collecting opencv-python (from -r requirements.txt (line 1))
   Downloading https://files.pythonhosted.org/packages/77/30/36c3f0644fa9f42d92f079b972e990a5874c1fc2b2c0e9656eb88bb8d6dc/opencv_python-4.1.0.25-cp27-cp27mu-manylinux1_x86_64.whl (26.6MB)
     100% |████████████████████████████████| 26.6MB 28kB/s
 Collecting docopt (from -r requirements.txt (line 2))
   Downloading https://files.pythonhosted.org/packages/a2/55/8f8cab2afd404cf578136ef2cc5dfb50baa1761b68c9da1fb1e4eed343c9/docopt-0.6.2.tar.gz
 Requirement already satisfied: numpy in /usr/lib/python2.7/dist-packages (from -r requirements.txt (line 3)) (1.15.4)
Successfully installed docopt-0.6.2 opencv-python-4.1.0.25
- Type python LSB-Steg.py –help
root@kali:~/Downloads/LSB-Steganography# python LSBSteg.py --help
 LSBSteg.py
 Usage:
   LSBSteg.py encode -i
 -o  -f
   LSBSteg.py decode -i
 -o
 Options:
   -h, --help                Show this help
   --version                 Show the version
   -f,--file=          File to hide
   -i,--in=
           Input image (carrier)
   -o,--out=         Output image (or extracted file)
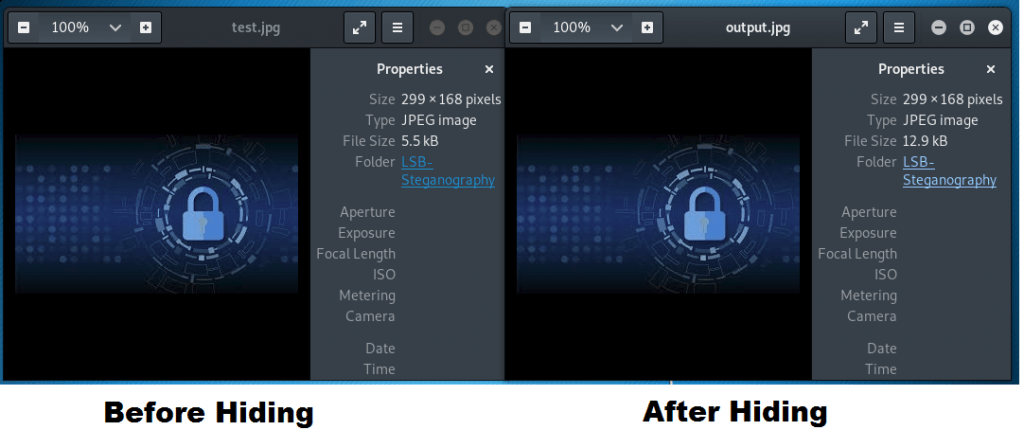
- Type python LSBSteg.py encode -i test.jpg -o output.jpg -f confidential.txt
- -i is used for input file.
- -o is used for output file.
- -f is used for hiding any file. Here we are using text file.
root@kali:~/Downloads/LSB-Steganography# python LSBSteg.py encode -i test.jpg -o output.jpg -f hidden.txt
root@kali:~/Downloads/LSB-Steganography#
- After executing above query an new image will form with same image which is used in input as shown below.
- Now you can send the image containing confidential text.
Decoding Text file From Image :-
- Type python LSBSteg.py decode -i output.png -o confidential.txt
- -i is used to enter encoded file name with extension.
- -o is used to enter hidden file with extension.
root@kali:~/Downloads/LSB-Steganography# python LSBSteg.py decode -i output.png -o confidential.txt
root@kali:~/Downloads/LSB-Steganography#
- After executing above query text file has decoded from image.
- Type cat confidential.txt
root@kali:~/Downloads/LSB-Steganography# cat confidential.txt
 hello iicybersecurity
 root@kali:~/Downloads/LSB-Steganography#
- Text file has been decoded & readable.
We have test some other tools following LSB approach :-
JSTEG
Jsteg is type of tool which can hide text data inside into jpeg file. This work by copying each bit of the data into the least-significant bit of the image.
Installation :-
- Open terminal and type wget -O /usr/bin/jsteg https://github.com/lukechampine/jsteg/releases/download/v0.1.0/jsteg-linux-amd64
- Then give the permissions for giving permissions type chmod +x /usr/bin/jsteg
- Now type wget -O /usr/bin/slink https://github.com/lukechampine/jsteg/releases/download/v0.2.0/slink-linux-amd64
- For giving permissions type chmod +x /usr/bin/slink
root@kali:~# wget -O /usr/bin/jsteg https://github.com/lukechampine/jsteg/releas                                                                                                             es/download/v0.1.0/jsteg-linux-amd64
 --2019-05-17 04:24:15--  https://github.com/lukechampine/jsteg/releases/download                                                                                                             /v0.1.0/jsteg-linux-amd64
 Resolving github.com (github.com)… 192.30.253.112
 Connecting to github.com (github.com)|192.30.253.112|:443… connected.
 HTTP request sent, awaiting response… 302 Found
 Location: https://github-production-release-asset-2e65be.s3.amazonaws.com/102983                                                                                                             532/c8d17a4c-9a4d-11e7-9121-6ab0667e9f29?X-Amz-Algorithm=AWS4-HMAC-SHA256&X-Amz-                                                                                                             Credential=AKIAIWNJYAX4CSVEH53A%2F20190517%2Fus-east-1%2Fs3%2Faws4_request&X-Amz                                                                                                             -Date=20190517T082418Z&X-Amz-Expires=300&X-Amz-Signature=b9bfc48f4a114eed3fdcee9                                                                                                             0406656ae4d3cb74e115ff8f803f51ae7c9e1ec4b&X-Amz-SignedHeaders=host&actor_id=0&re                                                                                                             sponse-content-disposition=attachment%3B%20filename%3Djsteg-linux-amd64&response                                                                                                             -content-type=application%2Foctet-stream [following]
 --2019-05-17 04:24:17--  https://github-production-release-asset-2e65be.s3.amazo                                                                                                             naws.com/102983532/c8d17a4c-9a4d-11e7-9121-6ab0667e9f29?X-Amz-Algorithm=AWS4-HMA                                                                                                             C-SHA256&X-Amz-Credential=AKIAIWNJYAX4CSVEH53A%2F20190517%2Fus-east-1%2Fs3%2Faws                                                                                                             tion-release-asset-2e65be.s3.amazonaws.com)… 52.216.8.203
 Connecting to github-production-release-asset-2e65be.s3.amazonaws.com (github-pr                                                                                                             oduction-release-asset-2e65be.s3.amazonaws.com)|52.216.8.203|:443… connected.
 HTTP request sent, awaiting response… 200 OK
 Length: 2230578 (2.1M) [application/octet-stream]
 Saving to: ‘/usr/bin/jsteg’
 /usr/bin/jsteg      100%[===================>]   2.13M  1.07MB/s    in 2.0s
 2019-05-17 04:24:21 (1.07 MB/s) - ‘/usr/bin/jsteg’ saved [2230578/2230578]
 root@kali:~# chmod +x /usr/bin/jsteg
 root@kali:~# wget -O /usr/bin/slink https://github.com/lukechampine/jsteg/releas                                                                                                             es/download/v0.2.0/slink-linux-amd64
 --2019-05-17 04:24:32--  https://github.com/lukechampine/jsteg/releases/download                                                                                                             /v0.2.0/slink-linux-amd64
 Resolving github.com (github.com)… 192.30.253.112
-----------------------------------SNIP------------------------------------
 Connecting to github.com (github.com)|192.30.253.112|:443… connected.
 HTTP request sent, awaiting response… 302 Found
 Location: https://github-production-release-asset-2e65be.s3.amazonaws.com/102983                                                                                                             532/83a4d348-a0dc-11e7-94b9-de79771603db?X-Amz-Algorithm=AWS4-HMAC-SHA256&X-Amz-                                                                                                             Credential=AKIAIWNJYAX4CSVEH53A%2F20190517%2Fus-east-1%2Fs3%2Faws4_request&X-Amz                                                                                                             -Date=20190517T082433Z&X-Amz-Expires=300&X-Amz-Signature=58cc24619b55209869ef880                                                                                                             6ab332dbe48d24067df6b4fb2072f7e7a6305125a&X-Amz-SignedHeaders=host&actor_id=0&re                                                                                                             sponse-content-disposition=attachment%3B%20filename%3Dslink-linux-amd64&response                                                                                                             -content-type=application%2Foctet-stream [following]
 --2019-05-17 04:24:33--  https://github-production-release-asset-2e65be.s3.amazo                                                                                                             naws.com/102983532/83a4d348-a0dc-11e7-94b9-de79771603db?X-Amz-                                            tion-release-asset-2e65be.s3.amazonaws.com)… 52.216.20.24
 Connecting to github-production-release-asset-2e65be.s3.amazonaws.com (github-pr                                                                                                             oduction-release-asset-2e65be.s3.amazonaws.com)|52.216.20.24|:443… connected.
 HTTP request sent, awaiting response… 200 OK
 Length: 2522891 (2.4M) [application/octet-stream]
 Saving to: ‘/usr/bin/slink’
 /usr/bin/slink      100%[===================>]   2.41M  1.12MB/s    in 2.1s
 2019-05-17 04:24:36 (1.12 MB/s) - ‘/usr/bin/slink’ saved [2522891/2522891]
 root@kali:~# chmod +x /usr/bin/slink
Usage :-
- After the jsteg installed open terminal and type jsteg
root@kali:~# jsteg
 Usage:
     jsteg hide in.jpg [FILE] [out.jpg]
       Hide FILE (or stdin) in in.jpg, writing the result to out.jpg (or stdout)
     jsteg reveal in.jpg [FILE]
       Write the hidden contents of in.jpg to FILE (or stdout)
- Here we are using one jpg format picture and one text.txt file with some text to hide in the pictures.
How to hide ?
- Currently tool is supported by two image formats jpeg & png. We have tested both formats.
- Here we are testing on JPEG format image. JPEG (also known as JPG), file types ending in .jpg
- To hide text file behind image , open terminal and type
jsteg hide pointer-computer-icon-B5mDxM2-600.jpg text.txt abc.jpg - hide command is used to hide the text behind image
- pointer-computer-icon-B5mDxM2-600.jpg image used
- text.txt the text file which you want to hide behind the imag
- abc.jpg you can use any name of the file . this should be in jpg because this is save as a image .
- You can check if the file is created or not to check type ls
root@kali:~/jsteg# jsteg hide pointer-computer-icon-B5mDxM2-600.jpg text.txt abc.jpg
root@kali:~/jsteg# ls
 abc.jpg     huffman.go                             reader.go  text.txt
 cmd         jsteg_test.go                          README.md  writer.go
 fdct.go     LICENSE                                scan.go
 go_LICENSE  pointer-computer-icon-B5mDxM2-600.jpg  testdata
- Now we hide the text successfully behind the image.
Recovering the Encoded File(abc.jpg) :-
- Reveal command is used to reveal the text form the image .
- Enter the image name of which your want to decode the hidden text file.
- Enter name of the file which you want to recover. We have mentioned output.txt
- Type jsteg reveal abc.jpg output.txt
root@kali:~/jsteg# jsteg reveal abc.jpg output.txt
root@kali:~/jsteg# ls
 abc.jpg     huffman.go     pointer-computer-icon-B5mDxM2-600.jpg  testdata
 cmd         jsteg_test.go  reader.go                              text.txt
 fdct.go     LICENSE        README.md                              writer.go
 go_LICENSE  output.txt     scan.go
- To read the text file type nano and the file name. Type cat output.txt
root@kali:~/jsteg# cat output.txt
 abcd
root@kali:~/jsteg# jsteg
- As you can see jsteg has encoded & decoded the file properly in jpeg format.
- Here we are testing on PNG format images. PNG, file types ending in .png
root@kali:~/jsteg# jsteg hide range.png text.txt cool.png
- hide command is used to hide the text behind image
- range.png image used
- text.txt the text file which you want to hide behind the image
- cool.png you can use any name of the file . This should be in jpg because this is save as a image .
Recovering the Encoded File(cool.png) :-
- Type jsteg reveal cool.png output2.txt
- Reveal command is used to reveal the text form the image .
- Enter the image name of which your want to decode the hidden text file.
- Enter name of the file which you want to recover. We have mentioned output.txt
- Type jsteg reveal cool.png output2.txt
root@kali:~/jsteg# jsteg reveal cool.png output2.txt
- Type cat output2.txt to see the encoded data.
root@kali:~/jsteg# cat output2.txt
hello iicybersecurity
root@kali:~/jsteg#
- As you can see jsteg has encoded & decoded the file properly in png format.
Many developers has followed LSB (Least Significant Bit) approach & created some further tools. We will show you tools running on Windows OS.
OPENSTEGO
Openstego is a steganography tool which can hide our data within a cover file (e.g.images) and also it help to create watermarking files with an invisible signature. It can be used to find the unauthorized file from copying. With openstego we can also set passwords on Data hiding images.
- For testing we are using Windows 7 Professional 2017 SP1
- Before going further Java must be installed & show be configured to use openstego.
- Download openstego : https://github.com/syvaidya/openstego/releases/download/openstego-0.7.3/Setup-OpenStego-0.7.3.exe
- After downloading the setup file, run the file. It will for administrator permission, click on yes and continue.
- After installing successfully, launch openstego. Go to the path where the tool installed. In our PC tool is installed in Local Disk (C:) >Program Files (x86)/OpenStego
- Go to lib folder – Computer/Local Desk (C)/Program Files (x86)/OpenStego
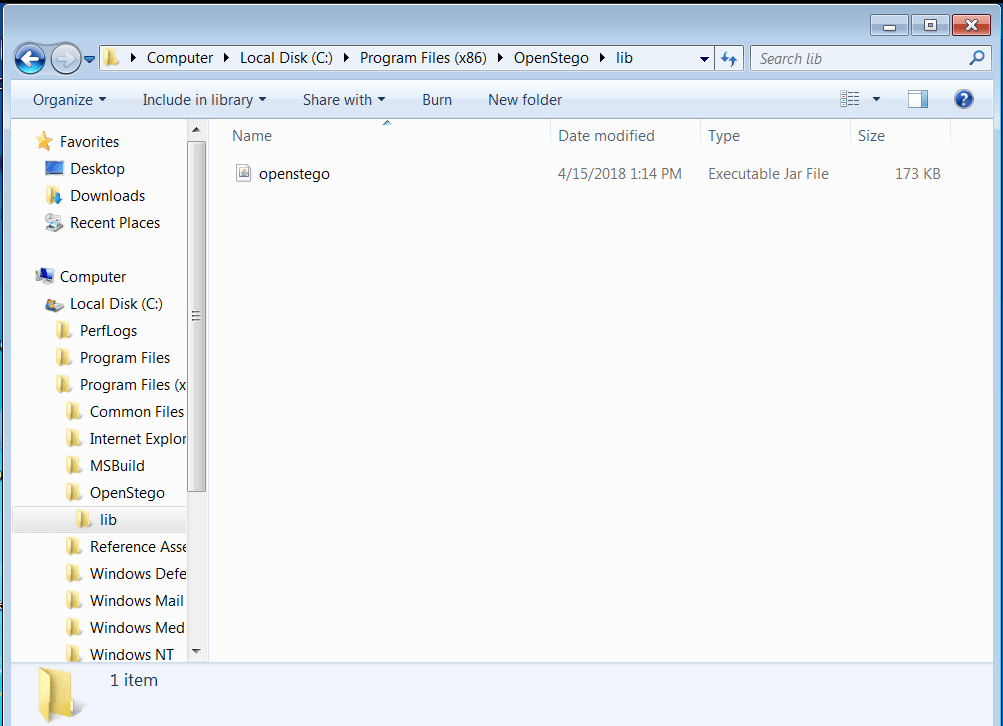
- Click on the OpenStego.jar
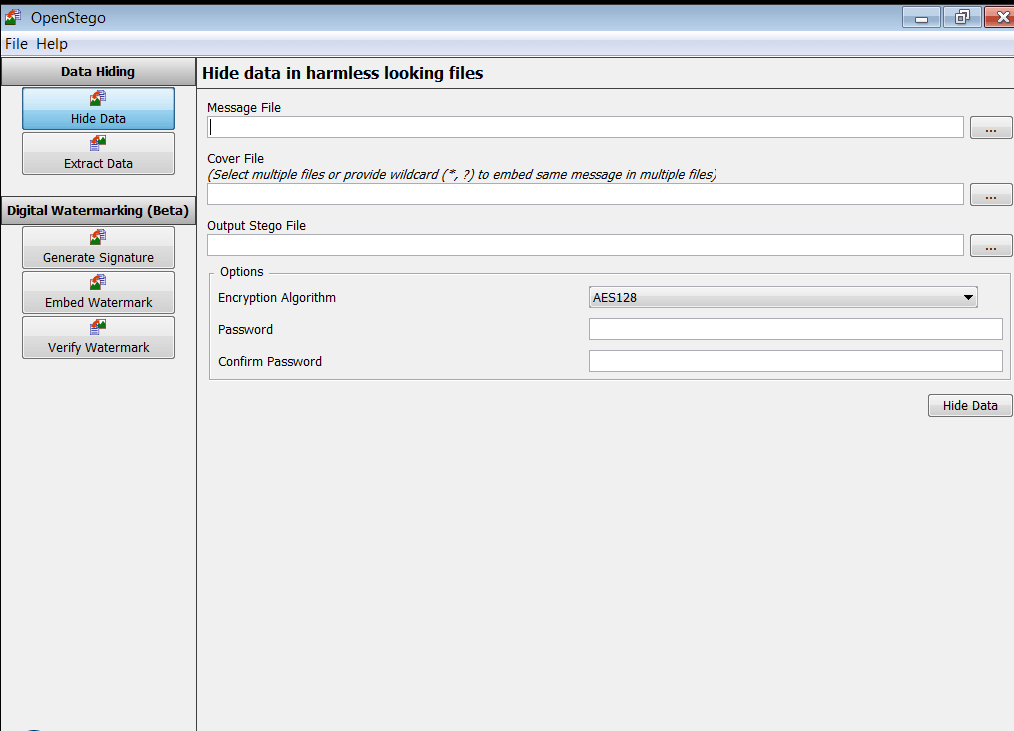
Encoding data :-
- We are creating text file for encoding with image. OpenStego offers different formats to encode text file with various image formats.We will be using a abcd.txt txt file.
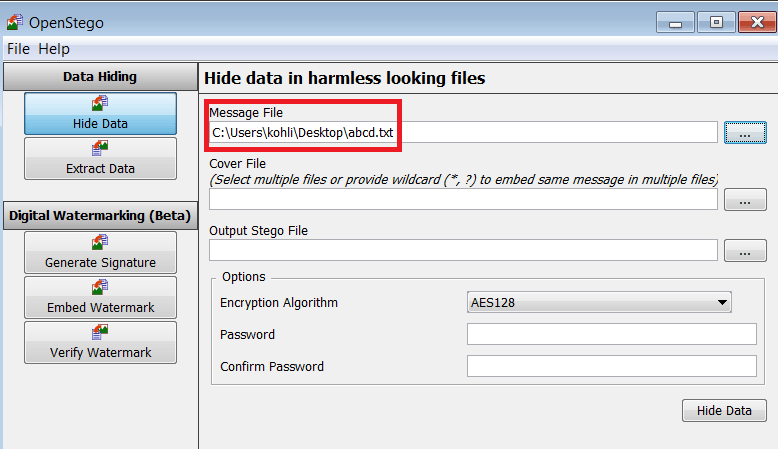
- The cover file should be harmless looking image, inside which the message file will be stored.
- Make sure it is bigger then the message file.Here we are using jpegsystem-home.jpg as a cover file.
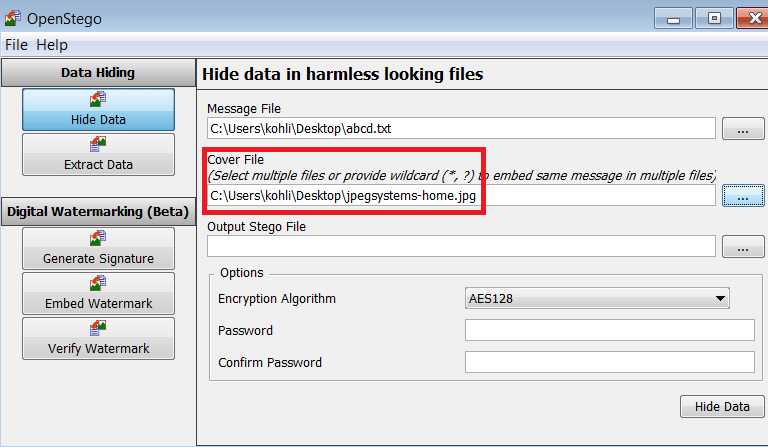
- Now select the output stego file, Navigate to the folder where you want to store the output stego file. For example – Desktop then enter any name for in the box below e.g. abcd.txt
- Now click Open once again. Here we are taking home.bmp as a name.
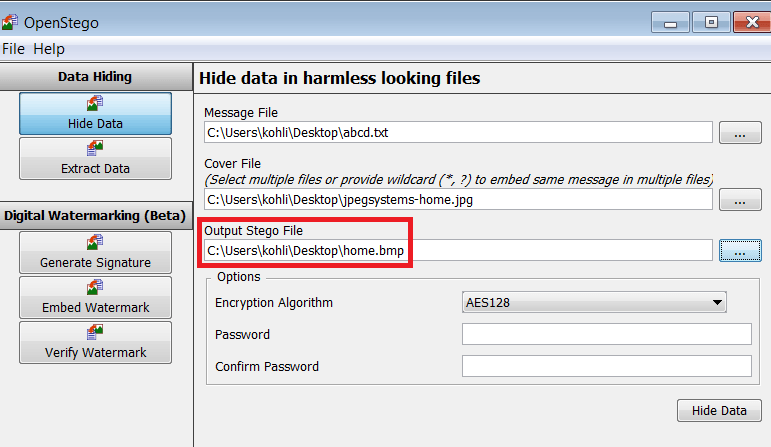
- Choose encryption setting, here you can choose to encrypt your message file with a password. We are encrypting file with password to show how OpenStego works.
- You can encode abcd.txt file without using any encryption method. Click on Password & then on confirm password, click on hide data.
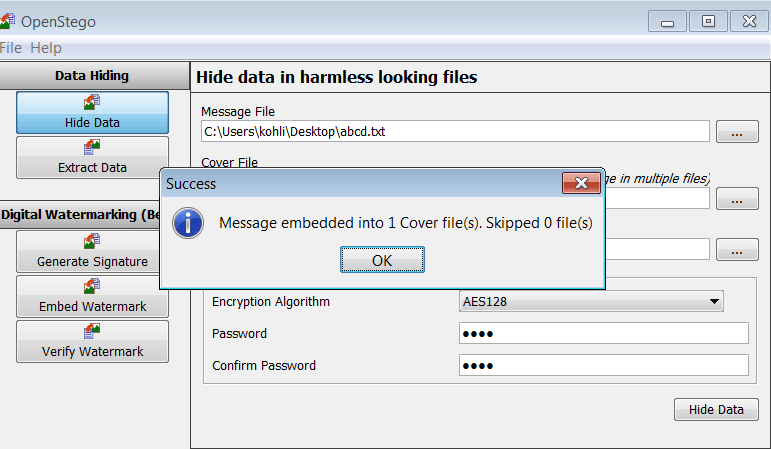
- Your abcd.txt file will hide inside the cover file. Openstego will create another file as home.bmp.
Decoding Data :-
- For extracting file, click on the button beside ‘Hide Data’ & find the file which was created by OpenStego (home.bmp). Next, Go to Input Stego File button. Select the file you want to extract (home.bmp)
- Then go to Output Folder, select the location where you want to extract the file (abcd.txt).
- If you set password, make sure to type, as we have set the password.
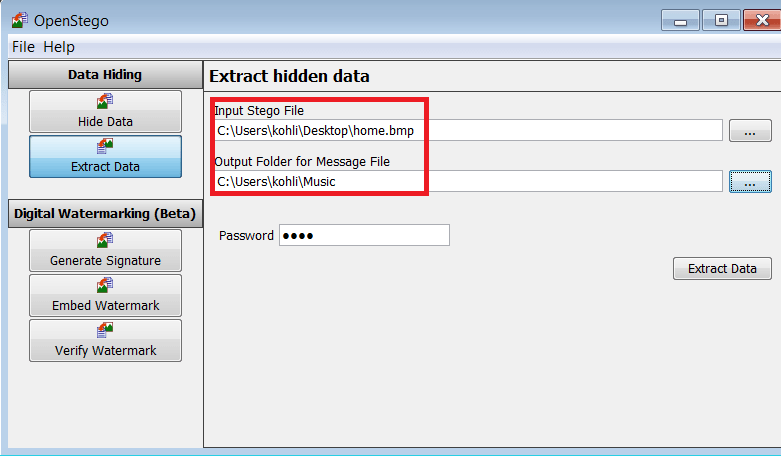
- Click on Extract Data Button. OpenStego GUI is pretty easy tool to used for hiding & extracting data using image of two common formats (PNG & JPG).
DEEPSOUND
Now you see another steganography tool and audio converter that can hides your secret data into audio files, this is also covered under the ethical hacking course of International institute of Cyber Security. This tool is also enables you to extract secret files directly form the audio files or CD audio tracks. DeepSound also support encrypting secret files using AES-256 (Advanced Encryption Standard) to improve data protection.
Installation :-
- Before downloading tool must ensure you have installed Microsoft .Net Framework 4.0. Then download deepsound from :
https://jpinsoft.net/deepsound/download.aspx - After installation start deepsound.
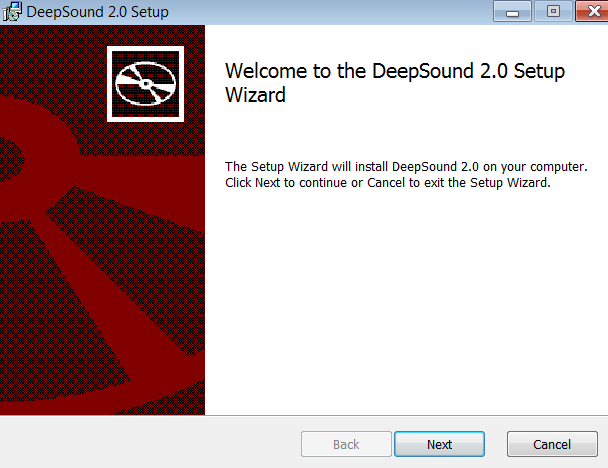
- Windows executable’s are easy to install. Simply click on next. For installing deepsound you don’t need to configure anything.
- After installation start deepsound.
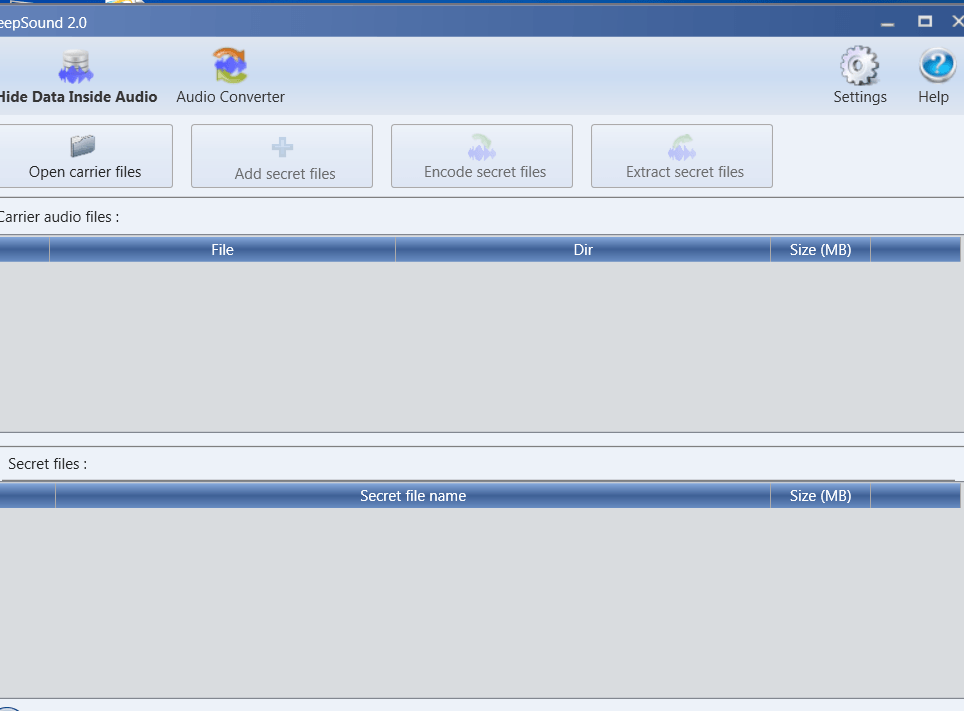
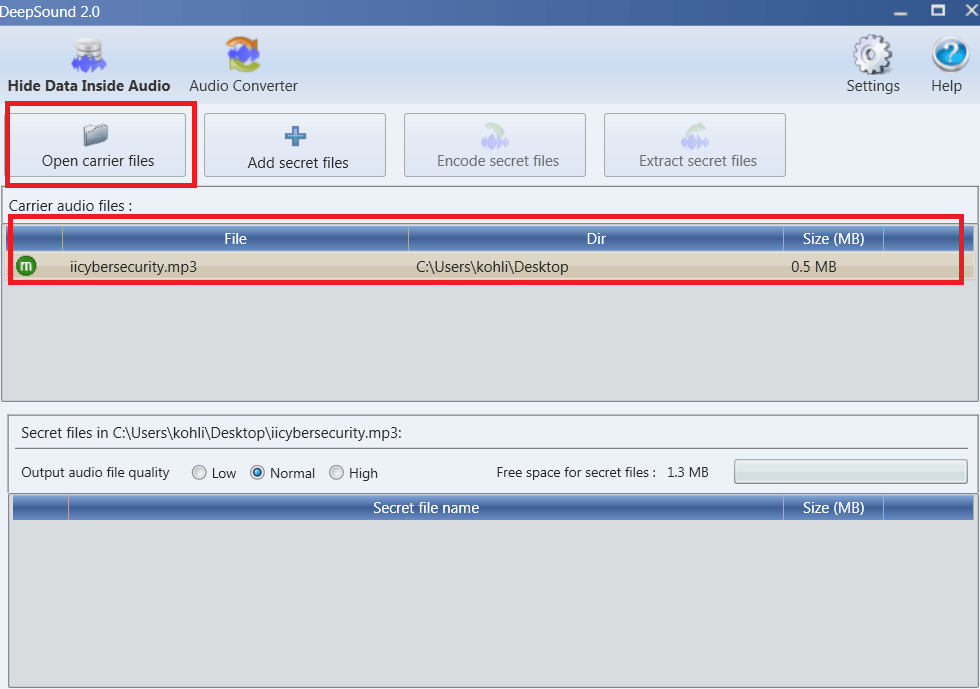
- Click on Open Carries files to select audio file. For testing we have used mp3 file.
- For this we are using iicybersecurity.mp3 file.
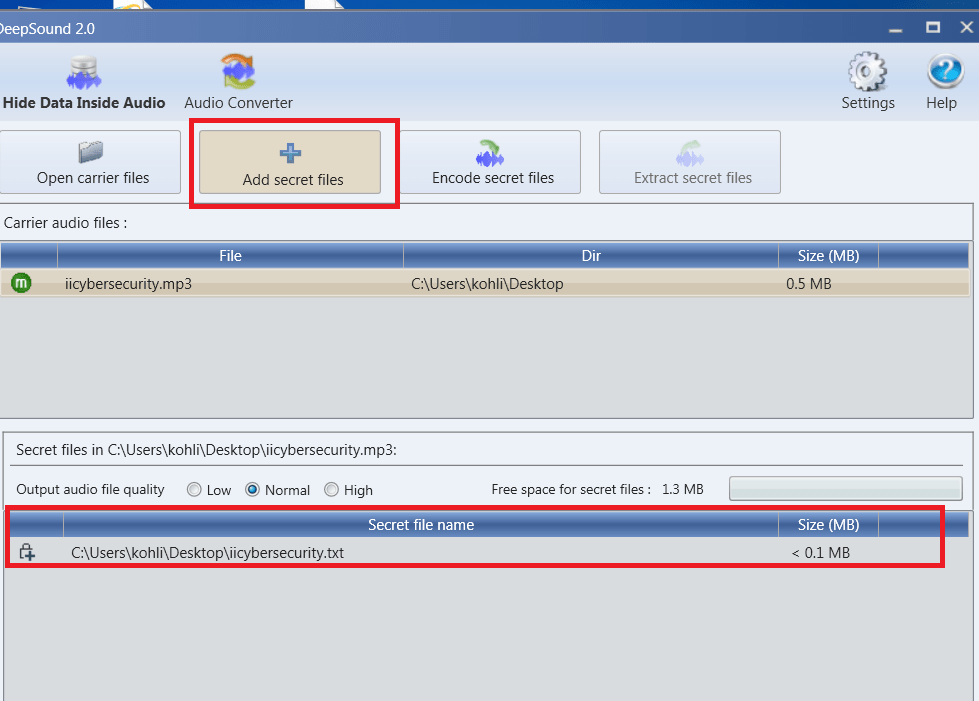
- After that you has to select the file which you want to hide behind the mp3 , for that click on Add secret files
- We are using abcd.txt file as a hidding data. Hiding data must be smaller than the carrier files.
- Now lets bind or we can say Encode secret files. Click on the ‘encode secret files’ option
- Here you have to two options
- 1st is Output you can select Output format it means, in which format you want output file .wav, .flac, .ape
- 2nd option is to encrypt or set the password on the secret file.
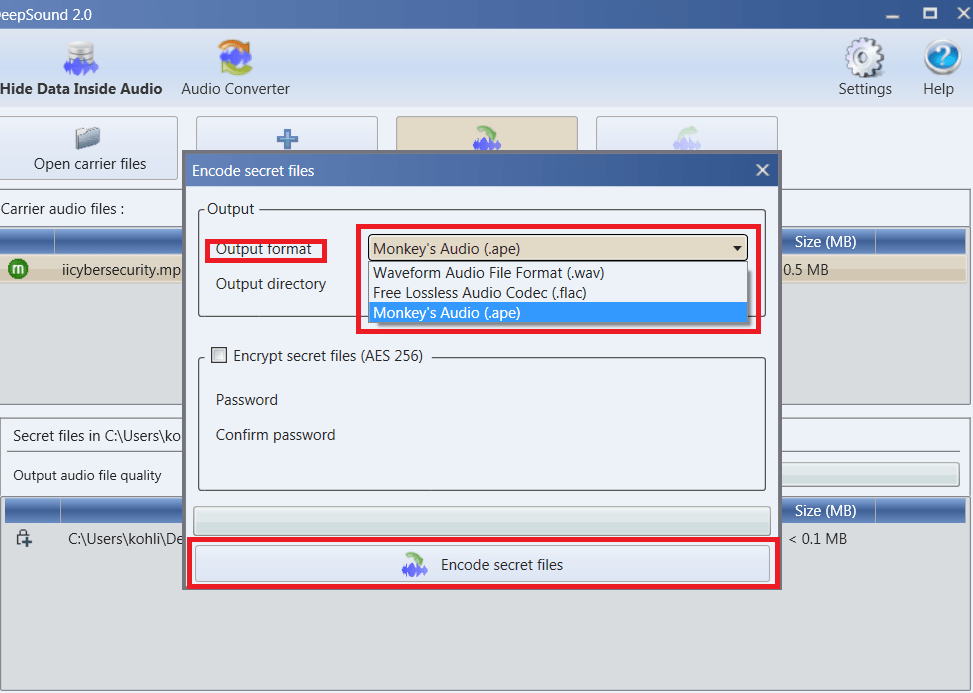
- Click on encode secret files button. Now you have successfully hide your data behind the mp3.
Decoding Data :-
- Encoded file will automatically will be added.
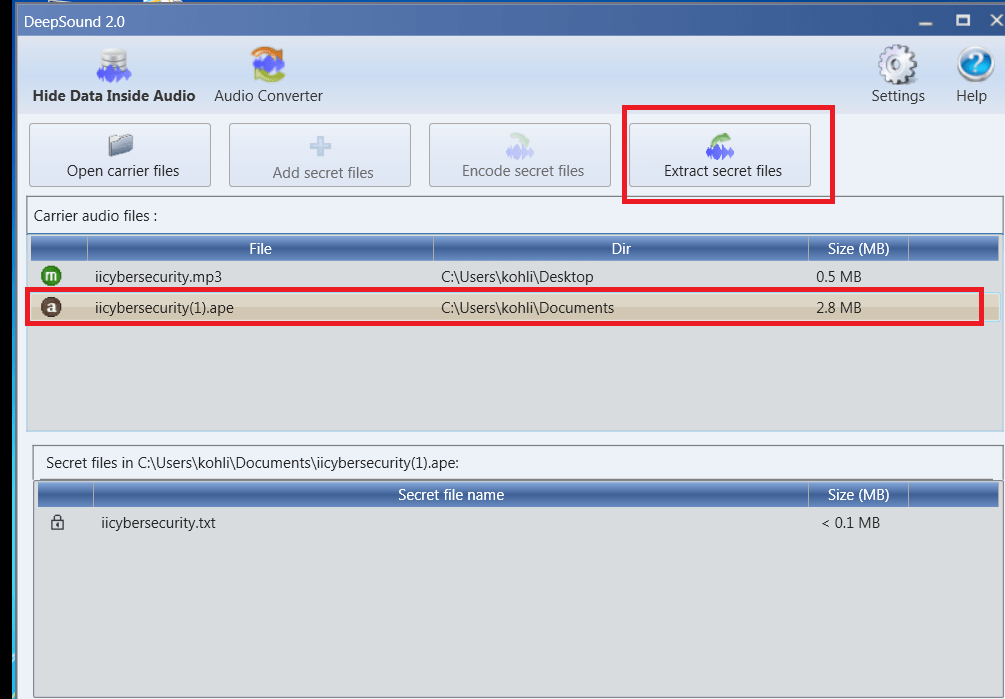
- Then click on Extract Secret Files. And our data is successfully decoded to the given path.
STEGANO
Stegano is a steganography tool. This tool is used to hide the text message into the png image file and this tool also reveal the hidden message in the Image file . This tool work on the LSB (least significant bit) method of image steganography.
REQUIREMENTS AND INSTALLATION :-
- Open the terminal. Type sudo apt-get update
- Now type sudo apt-get install python3
- Then type pip install pipenv
- Now type pipenv install Stegano to install stegano.
root@kali:~# pipenv install Stegano
 Creating a virtualenv for this project…
 Using /usr/bin/python3 (3.7.3) to create virtualenv…
 ⠋Already using interpreter /usr/bin/python3
 Using base prefix '/usr'
 New python executable in /root/.local/share/virtualenvs/root-BuDEOXnJ/bin/python3
 Also creating executable in /root/.local/share/virtualenvs/root-BuDEOXnJ/bin/python
 Installing setuptools, pip, wheel…
 done.
============SNIP==============
Adding Stegano to Pipfile's [packages]…
Pipfile.lock not found, creating…
Locking [dev-packages] dependencies…
Locking [packages] dependencies…
Updated Pipfile.lock (6bfca4)!
Installing dependencies from Pipfile.lock (6bfca4)…
▉▉▉▉▉▉▉▉▉▉▉▉▉▉▉▉▉▉▉▉▉▉▉▉▉▉▉▉▉▉▉▉ 1/1 — 00:00:03
To activate this project's virtualenv, run the following:
$ pipenv shell
- This will install stegano in the python virtual environment.
- Now type pipenv shell , to go in the virtual environment shell.
root@kali:~# pipenv shell
Spawning environment shell (/bin/bash). Use 'exit' to leave.
root@kali:~# . /root/.local/share/virtualenvs/root-BuDEOXnJ/bin/activate
(root-BuDEOXnJ) root@kali:~#
USAGE OF STEGANO :-
Stegano works on two modes, stegano-lsb and stegano-lsb-set. whose details are written below.
STEGANO-LSB
Stegano-lsb mode stores the secret data in LSB of the image in series. For example first bit of data store in the first LSB of the image and 2nd bit stores in 2nd LSB of image and so on.
HOW TO HIDE A TEXT MESSAGE IN THE IMAGE FILE
- Type stegano-lsb hide -i image.png -m ” computer password – abc#123″ -e UTF-32LE -o wall.png
- Here -i option is used to take image.png as input image.
- -m option is used to enter the text message which is computer password is abc#123 .
- -e option is used to set the encoding of the message which is UTF-32LE
- -o option is used to output image file with secret message with the file name wall.png
(root-BuDEOXnJ) root@kali:~/Desktop# stegano-lsb hide -i image.png -m " computer password - abc#123" -e UTF-32LE -o wall.png
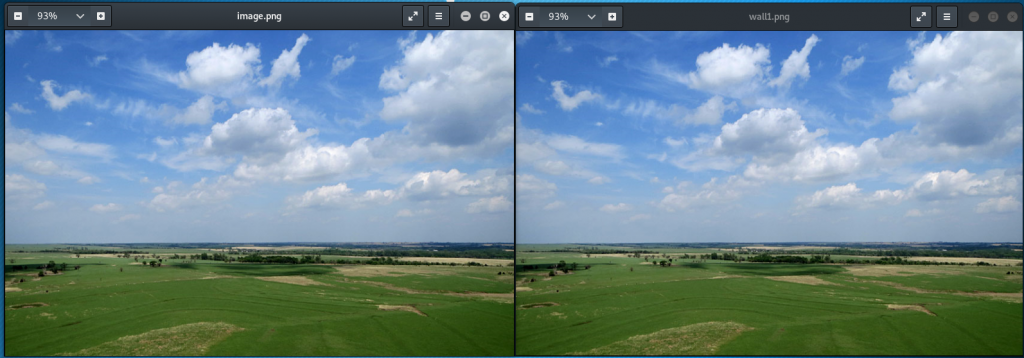
Left image is the input image and the right image is output image with the secret message. Normal human eye can’t see the different between the above image. The only change which can be found is in the size of the image, which can be easy identified by cyber forensics experts.
HOW TO REVEAL THE TEXT MESSAGE FROM THE IMAGE FILE
(root-BuDEOXnJ) root@kali:~/Desktop# stegano-lsb reveal -i wall.png -e UTF-32LE
computer password - abc#123
We are getting computer password – abc#123 as output.which is the secret message hidden in the wall.png.
HOW TO HIDE A FILE IN THE IMAGE FILE
- We are hiding a secret image file inside a image.
- Type stegano-lsb hide -i image.png -f file.jpeg -o wall1.png
- Here -i option is used to take image.png as the input image.
- -f is used to hide secret image file file.jpeg
- -o option output wall1.png file with the secret message.
(root-BuDEOXnJ) root@kali:~/Desktop# stegano-lsb hide -i image.png -f file.jpeg -o wall1.png
HOW TO REVEAL THE FILE FROM THE IMAGE FILE
- Type stegano-lsb reveal -i wall1.png -o output.jpeg
- Here we are using -i option to input wall1.png
- -o option is used to output the image file output.jpeg which is hidden in the wall1.png
(root-BuDEOXnJ) root@kali:~/Desktop# stegano-lsb reveal -i wall1.png -o output.jpeg
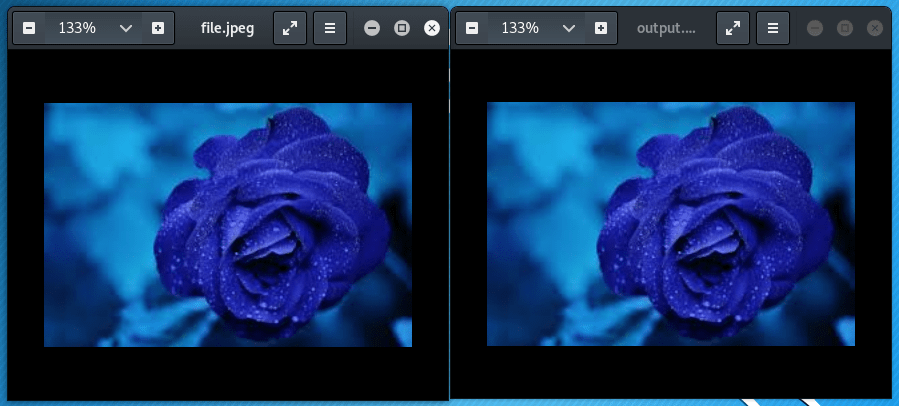
Left image is file.jpeg which hide inside the image and left image is output.jpeg which extract from the image. Both images are identical there is no difference between them.
STEGANO-LSB-SET
Stegano-lsb-set is the another mode of stegano. This mode also store secret message in LSB but this mode stores the data according to the sequence of functions which is used. So revealing data becomes impossible if you don’t know which function is used for hiding information.
List of the functions in the stegano-lsb-set :-
(root-BuDEOXnJ) root@kali:~# stegano-lsb-set list-generators
 Generator id:
     ackermann
 Desciption:
     Ackermann number.
Generator id:
     ackermann_naive
 Desciption:
     Ackermann number.
Generator id:
     carmichael
 Desciption:
     Composite numbers n such that a^(n-1) == 1 (mod n) for every a coprime
     to n.
     https://oeis.org/A002997
Generator id:
     composite
========= SNIP =============
For example we use a triangular_numbers which function is f(x) = n(n+1)/2
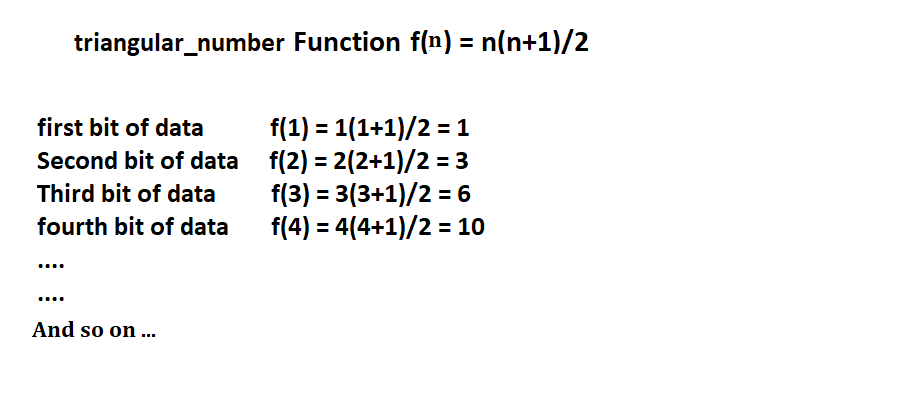
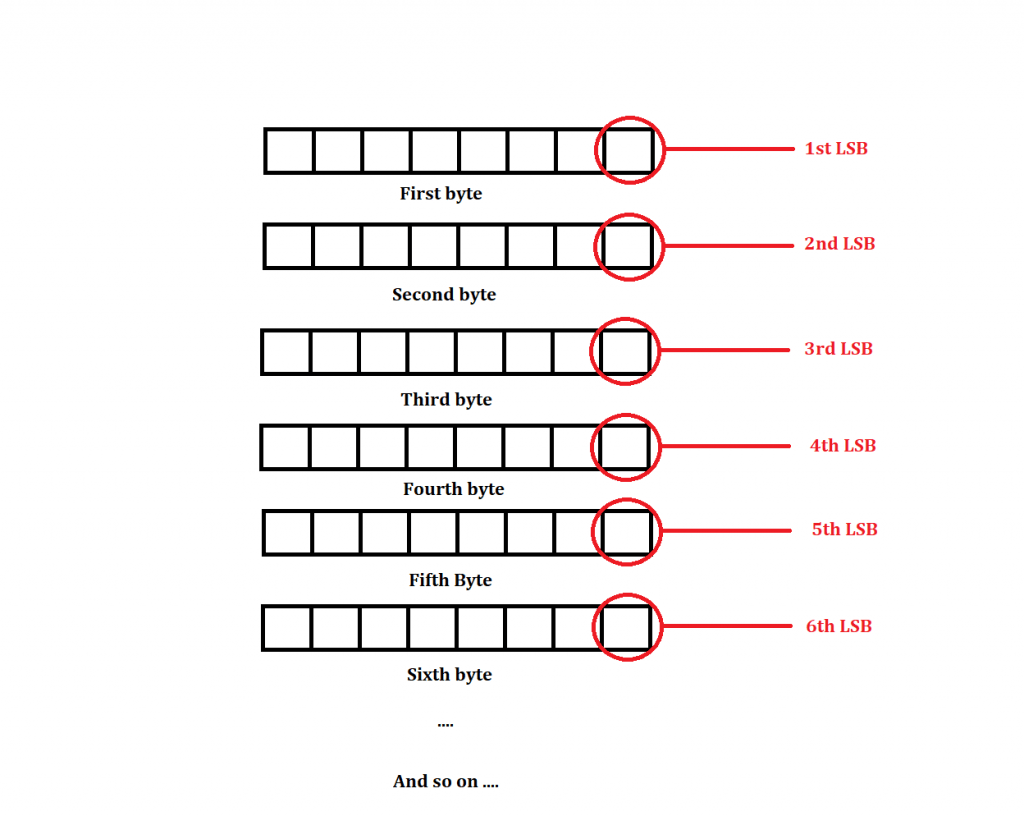
So by the above calculation we can say that the secrete data’s first bit store in the first LSB of the image. Second bit store in third LSB, Third bit store in sixth LSB and so on.
From the above calculate we can say the stegano-lsb-set stores the less amount of the data in comparison of stegano-lsb. The above is explained and shown in the ethical hacking classes of international institute of cyber Security.
HOW TO HIDE THE DATA IN THE IMAGE USING STEGANO-LSB-SET MODE (Using Triangular Function)
- Type stegano-lsb-set hide -i image.png -s 5 -m ‘hi everyone’ -g triangular_numbers -o result.png
- -i option is used to take image.png as an input image file.
- -s option is used to shift LSB to 5 and store bit of secret data .
- -m option is used to give the secret message which is ‘sample text’ .
- -g option select the function which is used to store the data and triangular_numbers function is used.
- -o option is used to output a image file with the secret message and with the the result.png filename.
NOTE-In The stegano-lsb-set MODE YOU MUST USE -g OPTION
(root-BuDEOXnJ) root@kali:~/Desktop# stegano-lsb-set hide -i image.png -s 5 -m 'sample text' -g triangular_numbers -o result.png
HOW TO REVEAL THE DATA FROM THE IMAGE FILE
For revealing the secret data from the image file which used a function to store the data , you must know that which function is used to store the data. Another way you can’t extract the data from the image file.
- Type stegano-lsb-set reveal -i result.png -s 5 -g triangular_numbers
- -i is used to used input file result.png from which data will be extract
- -s option is used to shift LSB to 5.
- -g option select the function which is used to store the data and triangular_numbers function is used.
(root-BuDEOXnJ) root@kali:~/Desktop# stegano-lsb-set reveal -i result.png -s 5 -g triangular_numbers -o result.png
 sample text
Here we are getting sample text as the output which is the secret message hidden in result.png.
TRYING SOME OTHER FUNCTIONS TO HIDE AND REVEAL DATA
LOG_GEN FUNCTION
HIDE DATA :-
- Type stegano-lsb-set hide -i wall.png -m “iicybersecurity” -g log_gen -o result.png
- Here we are using log_gen function and other syntax is same.
(root-BuDEOXnJ) root@kali:~/Documents# stegano-lsb-set hide -i wall.png -m "iicybersecurity" -g log_gen -o result.png
REVEAL DATA :-
- Type stegano-lsb-set reveal -i result.png -g log_gen
- -i is used to used input file result.png from which data will be extract.
- -g option select the function which is used to store the data and log_gen function is used.
(root-BuDEOXnJ) root@kali:~/Documents# stegano-lsb-set reveal -i result.png -g log_gen
 iicybersecurity
IDENTITY FUNCTION
HIDE DATA :-
- Type stegano-lsb-set hide -i wall.png -m “iicybersecurity” -g identity -o result.png
- Here we are using identity function and other syntax is same.
(root-BuDEOXnJ) root@kali:~/Documents# stegano-lsb-set hide -i wall.png -m "iicybersecurity" -g identity -o result1.png
REVEAL DATA :-
- Type stegano-lsb-set reveal -i result1.png -g identity
- -i is used to used input file result1.png from which data will be extract.
- -g option select the function which is used to store the data and identity function is used.
(root-BuDEOXnJ) root@kali:~/Documents# stegano-lsb-set reveal -i result1.png -g log_gen
 iicybersecurity
Here we are getting iicybersecurity as the output which is the secret message hidden in result1.png.
So by trying different functions we can concludes the result the syntax is same for all functions and the difference is in the back-end process of storing data.
PRACTICAL WORKING OF STEGANOGRAPHY :-
We send a secret message hidden in a image to our friend using email service. and we are using stegano to hide the message.
- Open the terminal and type pipenv shell .
- Now type stegano-lsb hide -i image.png -m “meet me at 10 pm” -f wallpaper.png
(root-BuDEOXnJ) root@kali:~/Desktop# stegano-lsb hide -i image.png -m "meet me at 10 pm" -f wallpaper.png
Here we are using image.png as input file and hiding meet me at 10 pm message in it and get the output file with the wallpaper.png name.
- Now send the wallpaper.png as attachment to a friend email ID.
- Friend downloads wallpaper.png from his email ID.
- Friend opens the terminal and type pipenv shell
- Then type stegano-lsb reveal -i wallpaper.png
(root-BuDEOXnJ) root@kali:~/Downlods# stegano-lsb reveal -i wallpaper.png
  meet me at 10 pm
Friend gets the secret message which is meet me at 10 pm.
PARITY CODING FOR THE AUDIO STENOGRAPHY :-
Parity coding is a steganography technique used in audio steganography. Parity coding method breaks a audio signal down into samples and it encodes each bit of secret message in sample’s parity bit. If the parity bit of a selected sample does not match with the secret bit to be encoded, It flips the LSB of one of the samples in the region.
Working of even parity coding audio steganography
Below is the research done by ethical hacking researcher of international Institute of cyber Security.
Encoding :-
- Read audio file(cover file).
- Split the cover audio into 16 bits samples.
- Read the secret message.
- Check the parity bit of each sample.
- If parity of sample is even and secrete message to be embedded is 0, no change in LSB.
- If parity of sample is even and secrete message to be embedded is 1, change LSB .
- If parity of sample is odd and secrete message to be embedded is 0, change LSB.
- If parity of sample is odd and secrete message to be embedded is 1, no change in LSB.
- Then extract audio file.
Decoding :-
- Read the audio file.
- Split the audio file in 16 bit samples.
- Read the parity bit of each sample.
- If parity bit is 1 then take 1 as secrete message bit.
- If parity bit is 0 then take 0 as secrete message bit.
- After collecting the all secrete message bit output the secret message.
Table showing the working:-

Above table is showing the encoding of parity bit. Here audio file is divided into 16 bit samples. Secret message encoder divide the audio file in may sample files but In this table we are showing the sample file number between 52 to 56 just to show the working of the encoder.
- In sample no. 52 where parity bit is 0 and secrete bit is 1 so the LSB of the sample bit is changed.
- In sample no. 53 where parity bit is 1 and secrete bit is 1 so the LSB of the sample bit is not changed.
- In sample no. 54 where parity bit is 1 and secrete bit is 0 so the LSB of the sample bit is changed.
- In sample no. 55 where parity bit is 0 and secrete bit is 0 so the LSB of the sample bit is not changed.
- In sample no. 56 where parity bit is 0 and secrete bit is 1 so the LSB of the sample bit is changed.
Working of odd parity coding audio steganography is quite similar to the even parity coding. Only the difference is in odd parity the number of 1 in the block should be odd instead of even.
MP3STEGO
MP3Stego is windows based audio steganography tool, This tool is used to hide the text file in the MP3 file. MP3stego hide the information during the compression of the mp3 file.
Download MP3stego from https://www.petitcolas.net/fabien/software/MP3Stego_1_1_19.zip
Working Of mp3stego :-
- Extract the Downloaded MP3stego file
- Open cmd
- Go to the directory where you have Extracted MP3stego by
cd Downloads\MP3Stego_1_1_19\MP3Stego>
C:\Users\iicybersecurity> cd Downloads\MP3Stego_1_1_19\MP3Stego>
- Type Encode.exe -E hidden_text.txt -P acb123 svega.wav
- Here we are using Enode.exe application for hiding the text.
- -E option is used to select the text file hidden_text.txt which is going to hide.
- -P option is use to set the password which is acb123
- Then svega.wav is input file on which the text message is going to hide and output audio.mp3 file with the hidden message.

This is the image of hidden_text file which is going to hide.
C:\Users\iicybersecurity\Downloads\MP3Stego_1_1_19\MP3Stego>Encode.exe -E hidden_text.txt -P acb123 svega.wav audio.mp3
MP3StegoEncoder 1.1.19
See README file for copyright info
Microsoft RIFF, WAVE audio, PCM, mono 44100Hz 16bit, Length:  0: 0:20
MPEG-I layer III, mono  Psychoacoustic Model: AT&T
Bitrate=128 kbps  De-emphasis: none  CRC: off
Encoding "svega.wav" to "audio.mp3"
Hiding "hidden_text.txt"
Frame    791 of    791 Finished in  0: 0: 0
Revealing text message :-
- Type Decode.exe -X -P acb123 audio.mp3
- Here we are using Decode.exe to decode the secret message from audio.mp3 file.
- -X option is used for extracting the hidden text from data.
- -P option is used for entering the password which was used for compression.
C:\Users\iicybersecurity\Downloads\MP3Stego_1_1_19\MP3Stego>Decode.exe -X -P acb123 audio.mp3
MP3StegoEncoder 1.1.19
See README file for copyright info
Input file = 'audio.mp3'  output file = 'audio.mp3.pcm'
Will attempt to extract hidden information. Output: audio.mp3.txt
the bit stream file audio.mp3 is a BINARY file
HDR: s=FFF, id=1, l=3, ep=off, br=9, sf=0, pd=1, pr=0, m=3, js=0, c=0, o=0, e=0
alg.=MPEG-1, layer=III, tot bitrate=128, sfrq=44.1
mode=single-ch, sblim=32, jsbd=32, ch=1
[Frame  791]Avg slots/frame = 417.434; b/smp = 2.90; br = 127.839 kbps
Decoding of "audio.mp3" is finished
The decoded PCM output file name is "audio.mp3.pcm"
- Here we are getting two file as output audio.mp3.pcm and audio.mp3.txt
- audio.mp3.txt file contain the text which was hidden in the audio.mp3 file.
- audio.mp3.pcm is decompress version of audio.mp3.

- This is the image of of extracted text file audio.mp3.txt which is same as input text file.
THESE ARE OTHER MECHANISM OF STENOGRAPHY
Parity Bit :-
Parity Bit is a technique breaks audio signals into separate areas of regions & encodes each bit from secret message in sample region parity bit.
Phase Coding :-
In phase encoding the real sound is broken into smaller segments whose size is equal to message to be encoded. In other words it could be song or any recording. Instead of modifying complete phase values selected frequencies are modified.
Phase Coding Working :-
- In phase coding sound signals are separated into smaller segments whose length are equal to the size of encoding message.
- Apply Discrete Fourier Transform for each segment to create matrix phases & Fourier transforms magnitudes. And calculate phase differences between adjacent segments.
- Hiding the secret message in the first segment of an audio file by using equation 2 phase.
- The new sound signals are re-build by using inverse DFT & then connect the sound segments together.
Spread Spectrum :-
Spread spectrum is used for transmitting radio signals by creating encryption path using spread algorithm. This technique is practiced by transmitting signals to fill frequency spectrum.
Working Of Spread Spectrum :-
- Spread spectrum uses spreading algorithm to spread radio signal based on pseudo-noise code. Radio signals are hidden on noise floor of radio band. (Noise floor is measurement of the signals build from sum of all noise sources & unwanted signals within measurement of system).
- On receiver side, in the correlation process signals needs to be de-spread. This makes difficult for any unwanted signals to be seen.
- It becomes difficult to detect end result & transfers bandwidth. Above method makes difficult to intercept or to jam bandwidth that’s why this technology is used by military purposes.
ECHO HIDING
- Echo hiding is the technique of doing steganography using echo. The data can be hidden in the audio(cover) file using the three echo parameters initial amplitude , offset and delay rate.
- The initial amplitude determine the cover audio amplitude.Offset gives the distance between the echo and the cover signal. If the size of offset between echo and the cover file is reduce to extend, Human ears can’t differentiate between two signals and it can’t hear the echo.
- If we use two different delay times between echos, both below the human ear’s perceptual level, we can encode a binary 0 or 1 to this delay time . The decay rate and initial amplitude can also be adjusted below the audible threshold of the human ear, to ensure that the information does not create any noise .
- A binary 0 is represented by a certain delay x and a binary 1 is represented by a certain delay y. By this delay x and delay y value we can encode and decode the message in a audio file.
- To encode more than one bit, the original signal is divided into blocks , each block can be echoed to encode the desired bit. The final encoded can be made by just assemble the blocks again to a audio file.
All these technique are done by the ethical hacking researchers of International Institute of Cyber security.


Cyber Security Researcher. Information security specialist, currently working as risk infrastructure specialist & investigator. He is a cyber-security researcher with over 25 years of experience. He has served with the Intelligence Agency as a Senior Intelligence Officer. He has also worked with Google and Citrix in development of cyber security solutions. He has aided the government and many federal agencies in thwarting many cyber crimes. He has been writing for us in his free time since last 5 years.


